THE ART OF 3D GAMING

THE ART OF 3D GAMING

| - | - | - | - | - |
| - | - | - | - | BATTLESYSTEM |
GETTING STARTED
Painting an army of
minis
can be tedious, time-consuming, and
frustrating, or it can be fun, relaxing,
and
rewarding, depending on how you
approach the task. An organized work
area, the proper tools, and plenty of
patience are the vital ingredients. The
more care you put into the job, the better
your results will be.
The place to get started
is in your tool
box. Having the right tools when you need
them will save time and cut down on
botched paint jobs.
Brushes
Obviously, you'll need paint brushes.
Two or three brushes are enough to start
with, but you'll need a variety of sizes.
Try a size 1 flat brush and a size 2 round
brush for painting large areas, and a
size
0, 00, or even 000 round for painting
details.
Don't even think about
synthetic fiber
brushes. Red sable artist's brushes are
more expensive, but their performance
more than makes up for the cost
difference. Buy the best brushes you can
afford, and take good care of them. That
includes plucking out any hairs that are
sticking out at funny angles, trimming
the end so that it's even, and eventually
retiring a brush when it's worn out.
Clean your brushes thoroughly
whenever you switch colors or paints,
and clean them with soap and water
before you put them away. Reform the tip
with your fingers while the bristles are
still damp so that they will be straight
the
next time you use the brush. And always
pull the brush downward when painting,
so that paint flows from the root to the
tip.
Any other motion--swirling, splaying the
hairs--pushes paint into the roots of
the
bristles, where it is notoriously hard
to
get out and eventually will ruin the brush
for anything except dry-brushing or
dusting.
Paints
Whether you use acrylic
(water-based)
paint or enamel (oil-based) paint is
largely a matter of taste. Most
miniaturists wind up using both in order
to get the colors they want. Acrylics
are
easy to use because they can be thinned
and cleaned up with water. They tend to
give bright, flat colors. Enamels give
a
hard, smooth finish, but you'll need paint
thinner both for thinning and cleaning
up.
By Eric Heaps
There's nothing wrong
with using
enamels and acrylics on the same figure,
as long as you let one coat dry completely
before starting the next one. But never,
never try to mix acrylics and enamels
together to get a third color; it won't
work, and you'll be sorry you tried.
You'll want a wide variety
of colors.
A good flesh tone is essential, as are
numerous browns && greens. Bold,
bright colors look best on gaming
miniatures. While it isn't always
practical, it's nice to have three shades
of
each color: the color itself, and that
color
in lighter and darker shades. This makes
shading and highlighting a lot easier,
since you don't have to mix lighter or
darker shades of each color.
Model paints aren't
cheap, so it's worth
making an effort to take care of them.
The first time you open a new bottle or
tin
of paint, drop in a few ball bearings,
screws, or washers. These help mix the
paint when you shake it. Always shake
the paint vigorously before opening the
bottle, and stir it a few times with a
toothpick or the handle of your brush
after opening tto make sure it's well
mixed. If you paint straight from the
bottle,
shake the paint again before you put it
away.
This prevents the partially dried-out
paint
at the top of the bottle
from drying out completely in storage.
Instead of painting straight from the
bottle, though, it's best to put a little
paint
in an old bottle cap or on a palette.
Then
you can recap the paint bottle
immediately and not worry about it
drying out or tipping over. Paints are
easier to thin and mix when you're
working with a small amount, too.
Other Tools
Besides brushes && paints, you'll
need
all or some of the following: metal file;
utility knife; rags for cleaning brushes;
clean water or thinner (for thinning paints);
more water or thinner (for
cleaning brushes); bottle caps; pliers
(for opening up gunked-up paint bottles);
glue; and toothpicks. Toothpicks are
useful both for stirring paint andfor
touching up small mistakes.
THE ART OF PAINTING
People who paint individual
PC
figures can afford to spend
hours laboring over tiny details and
intricate brush strokes. The fact that
you're reading this implies that you want
to paint entire armies of inch-high elves,
dwarves, and goblins. The basic
techniques are the same for both tasks,
but army painters need to take a few
shortcuts if they intend to ever actually
array their host on a gaming table. Both
techniques--painting for SPEED and
painting for detail--are explained in
this
section. But first, some practical background.
While the BATTLESYSTEM game is
set in fantasy worlds, fantasy is more
appealing when it is extrapolated from
reality. Let your imagination run wild
when painting your fantasy miniatures,
but at the same time, keep your eyes
open for real-life counterparts. A giant
lizard, for example, is a fantasy
concoction, but small lizards do exist.
Your giant lizard will look more
believable if you base your paint job
on
its real-life cousin. You don't need to
lift
your colors straight from a blue-tongued
skink,
but you can examine how the
skink's scales are patterned and colored.
For this purpose, a good painting of a
lizard is more helpful than a photograph.
A photo shows you what the lizard looks
like, but a painting shows you how
another painter captured that look.
The smaller a figure is, the darker it
looks. To compensate, it must be painted
with light, bright colors. A flesh tone
that
looks way too bright painted on the back
of
your hand will be just right on a 25mm
figure. This is true for all colors except
black, white, and most metallics.
Also, small figures look shinier than
they really are. Something that's glossy
in reality looks wrong on a 25mm figure
unless it's painted in flat colors. Polished
leather, silk, and metal are the three
exceptions. Everything else should be
flat.
Fourth, even a highly detailed 25mm
mini just doesn't have that much
3D relief. If you just paint
on the colors, the figure will look like
a
25mm statue. To make it look real, you
must give it shadows; you must create
shadows with paint and brush where none
exist. This is a lot easier than it sounds,
and in many ways it speeds up painting.
The nine steps that follow describe a
system for painting armies of miniatures.
Most of these steps apply equally when
painting detailed leader and
PC figures. Following these
nine steps are a few more advanced
techniques for detailed figures.

The first step
in painting your minis is cleaning
them thoroughly. START by trimming any
flash (excess lead that isn't supposed
to
be there) away from the figure with a
sharp knife and a small file. Try to
smooth out any rough edges that show
where the mold was fitted together. Trim
or file the bottom of the figure so it
stands
up straight without rocking.
Next, wash the miniatures in warm, soapy
water, and rinse them off in warm,
clean water. Set them out on a towel or
newspaper and let them dry overnight.
(This wash is to remove any dirt, grease,
or oil from the figure, so don't handle
the
figures more than you have to while they're
drying).
STEP 2: MOUNTING.
When the
figures are completely dry, mount them
on individual bases. In the
BATTLESYSTEM game, there are three
standard, square base sizes: 1/2 inch
for <>
small troops, 3/4 inch for man-sized
troops, and 1 inch for large troops. Some
esp. big figs--dragons and
dinos, e.g.--USE bases cut to
the size of the fig, or no base at all.
The figures that come in this game
box can be used as bases, if you like.
You
can also make your own--especially if
you plan to field a very large army.
The best material to make bases from
is matte board or posterboard. Matte
board is easy to cut and is available
from
most art supply stores. Use a pencil and
ruler to measure off as many bases as
you need. Put the sheet of matte board
on
a worktable or some other solid surface
that won't be damaged by scratches
and
cuts. Use a sharp hobby knife and a
metal straightedge to cut out the bases.
You probably will need to make several
strokes to cut all the way through the
matte board. Be sure to keep the knife
along the edge fo the metal guide so you
get a straight cut.
Bases also can be made from balsa
wood, masonite, floor tile, or any other
flat, sturdy material. Most of these have
drawbacks of some kind, though, so
unless you're experienced at working
with them, matte board is best.
Epoxy, instant super-strength glues, or
even white carpentry glue can be used
to
mount metal miniatures on their bases.
Be sure to follow all of the instructions
that come with the glue, and use it in
an
AREA with good ventilation.
Bendable plastic minis (which
aren't very common, anyway) are more
difficult to mount. Silicone adhesive
or
rubber cement works best. If ou use
anything else, you may simply have to
resign yourself to having the figures
break loose occasionally.
Some people prefer to mount five or ten
figures on long strips of wood or cardboard
(with a very small amount of glue!)
so that they can be handled more
easily while painting. When the painting
is done, the figures are taken off the
group base and mounted on their
permanent bases. Use whichever method
seems best suited to your painting
system.
STEP 3: PRIMING.
Once the
figures are mounted, they should be
primed. All figures should be primed,
unless you intend to use the bare,
polished metal as a finish (this works
well for knights in plate mail). Priming
prevents tarnishing, helps the paint stick
to the figure, and makes colors
brighter. A flat white or gray spray
primer is best. Let the primer dry
overnight before doing any more
painting.
STEP 4: OUTLINING.
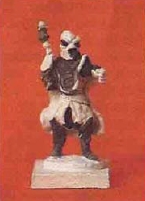
Outlining
involves painting black those areas that
would be in shadow if the figure were
life-size. Dilute flat black paint 2:1
or 3:1
with thinner or
water (so it will flow
into cracks and low
spots) and then
paint it into areas
that should be dark:
folds in robes,
between the arms
and the torso,
around scabbards,
in recesses of
helmets and armor
(esp. chain
mail), above and below belts. At this
stage, it's better to put on too much
than
too little. When you're finished, the
figure's features should be clearly
defined.
STEP 5: COLORING
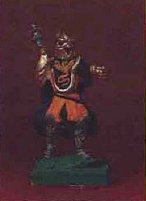
This step is
easy. Simply paint in the areas that have
been outlined in black with whatever
color you want. Take care to paint right
up to the black outlining, but don't
paint completely over it. It's best to
START with the flesh
tones and work
outward; paint the
layer of clothing
closest to the skin,
then the next layer,
and so on, finishing
with backpacks,
weapons, and
equipment hanging from belts. Paint the
figure's base last. You can save time
by
painting figures in groups. If, for example,
you have 20 goblins with pikes, <>
paint the flesh on all 20 at once. Then
paint all of their brown armor, then their
<>
steel helmets, etc.
STEP 6: HIGHLIGHTING.
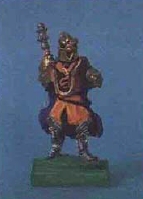
Highlighting is optional. It makes your
minis more visually exciting, but it
takes some practice. The goal is to
lighten those areas
that stand out in
bright light. Make a
pale mix of the color
being highlighted
and brush it onto the
strong spots: outer
folds of cloth,
shoulders,
foreheads. Getting
just the right
amount of
highlighting is
tricky. To work, it must be bold, but
too
much looks artificial. You can get a softer
effect by brushing on the paint, then
wiping off the excess with a cloth.
STEP 7: DRYBRUSHING.
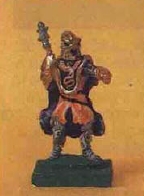
Like
highlighting, not all figures will benefit
from drybrushing. It works best when
trying to accentuate fur, chain mail,
scales, and other
raised surface
details.
To drybrush
details, get a little
paint on your brush,
then wipe off most of
it on a rag or a sheet
of newspaper. With
the small amount of
paint left, brush
lightly across the
figure, leaving just
enough paint to bring out fine details.
USE
an old brush for this, because
drybrushing will ruin a new one.
STEP 8: TEXTURING.
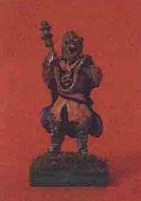
An extra
touch that will make your miniatures
look more attractive and natural is sand
or model railroad grass glued onto the
base. Just spread a
thin layer of white
glue on the base
with a modelling
knife, then dip the
base into the sand or
sprinkle sand over
it. Let the glue dry
for a while, then USE
an old paint brush to
brush away the loose sand. Paint the
base so it matches
the color of your gaming table. Field
green is the most common and versatile
color, but other earth tones can work
just
as well. Drybrushing yellow over a field
green, textured base produces very
attractive artificial grass.
STEP 9: PROTECTING. After your
figures are painted && mounted,
it's a
good idea to protect them from nicks and
gouges w/ clear acrylic spray. Just hte
normal wear from handling minis
during a game can rub the paint off of
high spots and leave greasy finger marks.
A clear, matte acrylic works best,
and can be found in most paint stores
or
art supply stores. If a matte finish isn't
avail., use a glossy acrylic spray and
coat it with a thin matte finish. <?>
These protective sprays may darken
the fig a bit, but this is a small price
to pay for
protecting your miniature masterpieces
from minor damage.
DETAILED PAINTING TECHNIQUES
This nine-step process yields colorful,
somewhat blocky-looking figures. This
is
just what you want in an army, where the
individual
figures aren't subjected to
close scrutiny. But if you're painting
figures to USE as PCs in an
AD&D game, you will want a
softer,
more natural-looking figure. To achieve
this look, steps 4 and 5 must change a
bit.
STEP 4: SHADING.
Outlining should
be much more subdued, or skipped
entirely. Instead, a shadow effect is
achieved by washing the figures with
darker shades of the surrounding color.
First, choose the color you want an AREA
to be. Dilute that color so the paint
flows
easily. It should cover the high spots,
but
also flow into the low, shadowed spots.
Next, make a thinner mix of a darker
shade and paint it into the shadowed
areas. It should flow easily into folds
and
corners, increasing the contrast between
high and low spots. These two coats--the
primary color and its darker
shade--should create enough contrast,
but more shading can be added if you
want the extra detail.
Assume, for example, that you are
painting an illusionist
wearing a green
robe. START by painting with a slightly
thinned green. When that coat is dry,
make a very thin mix of dark green and
paint it into the folds of the robe, around
the belt, collar, and hood, and into the
cuffs. The dark green collects in these
low spots, creating a gradual shadow
effect.
STEP 5: DETAILING.
After painting the major areas, fill in
belts, metallic
colors, and trim. You don't want this
paint to run, so use a fairly thick mix.
Even on highly detailed miniatures,
eyes should be underplayed. That usually
menas you can forget about them
entirely. You really can't see much detail
about a person's eyes from more than a
few feet away. If you decide your figure
must have eyes, try painting on just
eyebrows. If that isn't good enough, try
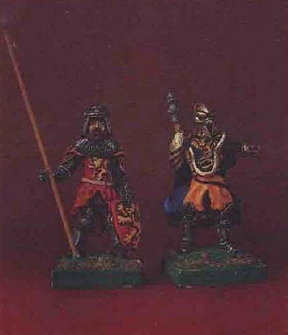
either of these methods: Add an iris of
very light gray (not white) and put in
a
pupil by making a very small pinhole in
the iris. If even that isn't good enough,
paint the eyebrow and the entire eye black
or
brown. Bring out the pupil by putting
a
spot of light gray on both sides.
Once you've painted,
mounted, and
sealed your minis, you'll need to
keep them somewhere. This can be quite
a problem, since it isn't a good idea
to
just toss them in a sack and slide it
under
the bed. You've put a lot of work into
creating your miniature army, and it
must be stored properly to protect it
from
damage and deterioration.
Your storage system
needs to
accomplish three things: it must keep
minis dry and dust-free; it must
protect your minis from getting
nicked and bent; and it must be portable,
so you can take your minis to a
friend's house or a game convention. You
should store your minis standing up
instead of laying over.
Plastic, compartmentalized
trays are
sold in hundreds of varieties. Check at
the
local hardware shop. You should find
several types of workshop storage bins
designed for screws, nails, and other
small items that get lost easily. Some
of
these are clear plastic trays that are
divided
into a dozen or so compartments
and have a hinged lid. Others are
stackable units that have 10 to 30 small
plastic drawers. These hold lots of
miniatures, are sturdy, and are easy to
carry around. If you buy trays like these,
make sure the compartments or drawers
are big enough to hold your minis.
Spearmen, bowmen, and mounted knights
are very tall, and won't fit
standing up in many plastic trays.
Like hardware trays,
fishing tackle
boxes are sold in hundreds of sizes and
shapes, many w/ compartmentalized
trays && drawers. Tackle boxes
are big,
sturdy, and can hold minis of many
different sizes. A tackle box w/ a tray
of
small compartments, a second tray with
larger compartments, and a big storage
AREA at the bottom is esp. useful.
You can store an entire (small) army in
a
tackle box like that. Good tackle boxes
are expensive, but worth the money if
you can afford them.
The cheapest alternative
is to store
your minis in low cardboard boxes
with lids. A stationary box is ideal,
and
large candy boxes work well, also. The
box should be sturdy enough that it
doesn't flex a lot; otherwise, it will
flex
when you pick it up and your minis
will fall over and slide around inside.
The
box must have a lid or it will collect
dust,
cat toys, and other little pieces of garbage.
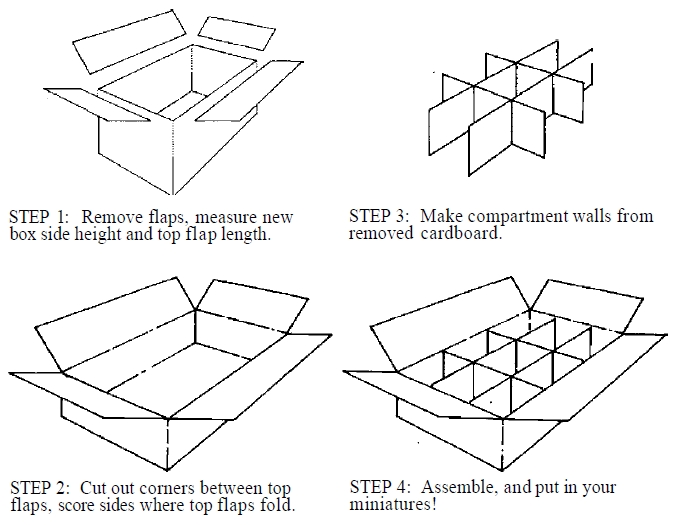
One of the very best
(and cheapest!)
storage boxes is one you make yourself
from cardboard. The drawback, of
course, is that making storage trays
takes some time and practice. Cardboard
boxes are available free (or very cheap)
from stores of any kind. Try to get
several boxes that are the same size,
and
several more that you can cut up for
extra cardboard. If you can find three
or
four boxes of the same size that will
fit
snugly inside another box, so much the
better.
There are lots of ways
to modify
cardboard boxes to store minis. The
best is to cut down the sides of the box
and form a new lid, then USE the removed
flaps to make new compartments (see the
diagram). Use a ruler to measure off the
new height of the sides, and a
straightedge as a guide when cutting.
When forming the new top flaps, you'll
have to score the sides where you want
the flaps to fold. Also, when notching
cardboard strips to form the
compartments, make the cut as wide as
the cardboard is thick. Otherwise the
cardboard strips will twist, bend, or
rip
when you assemble them.
One last note on storing
your
miniatures. Keep them someplace where
your dog, cat, and baby brother or sister
can't get at them. Not only will this
keep
them from getting bent, thrown around,
and lost, but it keeps them out of your
sibling's and your pet's mouths.
Minis are made of lead, and lead
can be poisonous if swallowed, chewed,
or even handled a lot. So wash your hands
and store them on a shelf in the closet
or
in a closed cabinet and SAVE everyone
a
lot of grief.
Minis are only part
of a
minis wargame setup. Once the
armies are assembled, they need
someplace to fight. You can conduct your
battles on a flat, featureless table if
you
want (it might be fun, if the battle was
set in another dimension), but you really
need some interesting terrain to spice
up
the battlefield. Terrain can be the
deciding factor in a battle. A key hilltop
becomes an impregnable fortress, a
forest anchors your flank or screens you
from enemy archers, and a river splits
your enemy so you can crush him in
detail. Even minor terrain features can
be important: a shallow depression hides
troops from the enemy, a farm fence
provides a rallying point for routed units,
a small pond allows a M-U to
summon a water elemental.
At first, esp. if you're
using
counters instead of minis, you may
want to make simple, flat terrain
features out of construction paper and
cardboard. Make hills with brown
construction paper, using progressively
darker shades of brown to show higher
contours. Rivers can be made with blue
construction paper or tinfoil. Dark green
paper makes dense woods, while light
green can be used for open woods,
orchards, or scrub brush. Masking tape
or gray construction paper can be used
for roads. Once you get the hang of it,
you
can make any terrain feature w/ the
appropriate color or combination of colors.
An even easier method
is to simply
draw the terrain features onto your game
table with chalk, or onto large sheets
of
paper with felt pens or crayons. Or you
can USE masking tape to mark out all
terrain featurs. Both methods are FAST
and cheap, but don't look nearly as nice
as terrain made from construction paper.
Of course, part of the
attraction of a
minis game is its visual splendor.
Once you build up an army of minis,
you'll want to START using
3-D terrain on your battle
table. 3-D terrain is easy
to build and, depending on the materials
you USE, can be very inexpensive.
A few materials are
very useful for
making several different types of terrain.
These are: styrofoam or foam rubber
sheets, avail. (as insulation) from
hardware or building supply stores; shag
carpet remnants in various greens and
other earth tones; dried lichen, avail.
from model railroad hobby stores; clean
kitty litter or aquarium gravel;
various-colored sheets of construction
paper, but particularly brown, green,
blue, and gray.
HILLS. Hills
can be handled several
ways. The way you choose is largely a
matter of taste.
The first is to cut
out irregular shapes
of styrofoam or foam rubber and paint
them mottled green and brown. One piece
makes a low hill. One large piece with
a
smaller piece stacked on top is a higher
hill. Each piece of foam represents a
different elevation (like the AREA between
two contour lines on a topographical
map). If each layer of foam represents
10
yards of elevation, then figures on the
bottom piece of foam are 10 yards above
ground level, and figures on the second
piece of foam are 20 yards above ground
level. The change in elevation from one
level to the next can vary from battle
to battle,
but it should be consistent within each
battle.
An alternate method
is to pile up books,
carpet remnants, magazines,
newspapers, etc., on the game table
wherever you want hills, and then lay
an
old blanket, tablecloth, or section of
indoor/outdoor carpeting over the whole
table. This looks more natural, assuming
your table cover resembles grass more
than it resembles a checkerboard. Fasten
the blanket or cloth to the table
with
staples or tape, or an accidental bump
and scrape could wipe out the setup. Be
sure to get permission before using one
of
your mother's good tablecloths.
RIVERS. Even
in a 3-D
game, rivers are best done in two
dimensions. Blue construction paper,
blue felt, or tinfoil (slightly crinkled,
with the
shiny side up) make excellent rivers.
If
you really want a 3-D river, mold it in
sections out of papier-mache or clay.
Paint the banks mottled brown and green
and the streambed blue, then cover the
streambed with a generous layer of white
glue. The glue becomes transparent when
it dries, giving the river some depth.
TREES. You really
have some options
here. Model railroad stores usu. carry
a wide variety of plastic trees in several
scales. Hobby stores also carry dried
lichen, which can be used straight out
of
the package, or glued onto small sticks
so
it looks more like a tree with a trunk.
Dried moss, avail. from most florists
and greenhouses, can be used the same
way, but it's messier. Even a small clump
of steel wool, glued onto a 'tree trunk'
and painted green, makes a fine tree.
For a less expensive
forest, try making
trees from light cardboard. You can
make individual tree stands by notching
two cardboard triangles so they fit
together and stand up, or by making a
stand-up trunk and a flat leaf canopy
that
snaps on the top. The 3-D trees that
came with this game are examples of the
second type.
In any case, keep in
mind that you
don't need a model tree to represent
every tree in the forest. One model tree
represents a lot of trees, and a group
of
model trees marks a large, wooded area.
You can mark the edge of the forest by
making a thin trail of fresh kitty litter
around the trees. Leave enough room
between your model trees to MOVE
miniatures through the forest. And feel
free to MOVE trees around in the woods
to
make room for the figures.
GULLIES. Gullies
can be best
represented with construction paper or
kitty litter.
ICE.
Smooth finfoil (with the dull side
up) or light
blue construction paper make
convincing sheets
of ice, either for
glaciers or mere
frozen lakes and rivers.
BRUSH. Irregularly-shaped
sections of
earth-tone shag carpet make excellent
patches of scrub brush. Carpet remnants
can be picked up at very reasonable
prices from most carpet stores. Lichen
and dried moss also make fine brush.
SNOW. Plain white
paper is the easiest
and best material to USE if you want a
few
snowfields dotting the battlefield. Purists
will insist on using soap flakes; while
their visual effect is stunning, it is
more
than offset by the problem of cleaning
up
afterward. Stick to white paper.
BOULDERS.
Boulders are easy. Just
take a short walk down the street and
pick up a few handfuls of loose gravel
and
small stones. Wash them off at home and,
voila, authentic miniature boulders! <>
SWAMP. A fetid
swamp or two never
fails to liven up a fantasy battle. Whether
it's inhabited by shambling
mounds,
giant leeches, or will-o-wisps, it looks
best if you represent it with small,
scattered patches of dirty blue-green
carpet outlined with kitty litter. Wet
carpet looks even worse, but be sure you
dry it out again before putting it away.
IMPROVISATIONS.
Bearing in mind
that this is a fantasy game, don't restrict
yourself to things that you've seen. If
you
don't toss in a few fantastic terrain
features occasionally, people will forget
they're playing an AD&D game
adventure. Some examples: champagne
corks from last year's New Year's Eve
party make dandy giant mushrooms;
plastic flowers look like exotic jungle
or
magical growths on a game table.
Quicksand,
craters, caves, and lava are a
few other features that lend variety to
games. Let your imagination have some
fun, too!
CASTLES, COTTAGES,
AND CAUSEWAYS
Just as important as
the natural terrain
of the battlefield are the man-made (or
orc-made) structures on it: houses,
farms, fences, bridges, roads, and
castles. Most armies try to find
battlefields that are clear of large
structures, since villages and such just
get in the way of a good cavalry charge.
But sometimes, as in a chance meeting
between two forces, armies must take
whatever ground they get. Sometimes the
village, road, or bridge may be what the
fight is all about.
Several manufacturers
market
medieval bridges and buildings in both
15mm and 25mm scales. These aren't too
expensive (compared to your army of
miniatures) and they look very nice on
the game table. Look in the miniatures
section of your local hobby shop.
TSR Inc. also has available
3-D
Adventure Fold-up figures of bridges,
<H1>
stone walls, and village buildings. These
are printed in full color, and give you
the
added bonus of being fun to put together.
D&D game adventure module B6 "The
Veiled Society," includes seven paper
sculpture houses and a city gate that
are
perfect for setting up a small village.
If you'd rather make
your own
structures from scratch, here are some
basic guidelines to follow.
BUILDINGS.
Make buildings out of
thin cardboard or matte board, balsa
wood, foam-core sheets, or toy building
blocks.
The first four items can be found
at any art supply store. If you (or your
little brother or sister) don't have some
building blocks, check at the local toy
store.
Buildings made from
cardboard don't
need to be elaborate. Four walls and a
roof are all that's really necessary.
TAKE
your time when coloring them and even
these simple constructions will look nice
in the game. You can color them with
markers, pencils, or the paints you USE
on
your minis. USE bright colors and
outline important features in black.
Primitive huts are even
easier to make.
Peat pots are small, rough, cardboard
cups used for starting plants. You can
buy
them at greenhouses or in dime stores.
<>
TURN a peat pot upside down and cut out
a
doorway and you have a fine hut. Very
small paper cups printed with a rough
pattern or painted brown will suffice,
but
they don't look as authentic as peat pots.
If you want thatched
buildings, cover
the roofs and/or walls with burlap. A
spray adhesive is best for sticking the
burlap onto the building, although most
glues will work. Spray adhesive is sold
in
art supply stores, and is useful for gluing
together any sort of paper or cloth sheets.
Like model trees, you
don't need a
model house for each building in a
village. In the BATTLESYSTEM game
scale, each model house represents a
cluster of buildings--a farm house and
several outbuildings or sheds, for
example. Five or six buildings represent
an entire small village.
WALLS. Along
with buildings, TSR Inc.
sells heavy paper fold-up rock walls.
You
can scratch-build very authentic-looking
rock walls by gluing together dry beans,
or by sticking together small lumps of
modeling clay. Long, square strips of
wood can be painted with rock patterns.
Many companies also manufacture
miniature stone walls specifically for
USE
with military minis. Whatever you
decide to USE, look for (or build) walls
that are wide enough for a miniature to
stand on. This makes it easy to indicate
which troops are crossing the wall.
ROADS. Gray
or brown construction
paper, masking tape, or a trail of kitty
litter or aquarium gravel all make excellent
roads. Remember that road
building was pretty much a neglected
science in the Middle Ages. Unless your
fantasy campaign takes place in a very
advanced culture or among the remnants
of a fallen civilization, most roads will
be
nothing but rutted dirt tracks in the
dry
season, and impassable mires in the
rainy season.
BRIDGES. Again,
you can buy
prefabricated bridges from TSR, Inc. or
hobby stores, or you can make your own.
A long, thin candy box or pencil box with
the ends cut off is a good place to START.
An entire chapter could be
written on castle building alone. Castles
come in such a variety of sizes and shapes,
particularly in a fantasy world,
that nothing more than general
guidelines are practical here.
When building a castle,
keep in mind
that its purpose is defense. Also keep
in mind
that defending a castle from umber hulks,
wyvern riders, and magic-users
requires a different type of architecture
that prevailed in medieval Europe. The
exact construction will vary by the
amount of magic in your game. You'll
have to experiment a bit to find out what
works.
The best way to START
a castle is with a
tower. A half-gallon milk carton or a
thick
mailing tube, appropriately painted and
adorned with gates, arrow slits, and
crenellations, becomes a tower
stronghold in less than an hour. Add a
few
shoeboxes and paper towel tubes
connected by cardboard walls and the
tower is a castle. Unless you intend to
run
a full-scale siege, keep the castle small
and simple.
Also remember that,
because castles
are bastions of safety and civilization,
they attract people. Most castles, unless
inhabited by evil wizards who prefer to
be alone, should have a village nearby.
The village may be inhabited or deserted,
depending on how much warning the
villagers had of the attack.
For people who want
to spend the
money, many toy stores sell building
blocks designed specifically for building
castles. These are very attractive, can
be
used to make almost an infinite variety
of
castles, and are lots of fun to play with
between battles. Their big drawback is
cost; expect to pay $40 to $80 for a
medium to large set.
Unlike the AD&D
and D&D
RPGs, which can be played
almost anywhere, a miniatures game
takes quite a bit of space. You'll need
to
find a table that's big enough for the
battle and that won't be needed for
something else (like dinner) before the
game is over.
Your gaming table must
be big enough
to allow two or three turns of maneuver
for both sides before the real fighting
begins. It's tempting to cram as many
minis as psb. into two lines of
battle that stretch from one end of the
table to the other. This set-up looks
impressive, but it leads to boring battles;
the players can't make any important
decisions. Their only option is to charge
straight across the table and hope the
enemy units ahead are small and weak.
Allow some room to march && maneuver,
so players can try to outflank
the enemy or fall back before a heavy
assault.
If you're playing on
a really big table,
check beforehand to be sure that you can
reach every spot on the table from
somewhere along the edge. If you can't
reach the middle of the table, it's too
big.
For small battles, a
kitchen table (with
several leaves in place) should be big
<>
enough. A ping-pong table is xcellent
for
bigger battles. A pool table also works
nicely, but be careful not to damage the
felt surface. A cheap alternative is to
set
a large plywood sheet across two || three
sawhorses. If nothing else is avail.
you can play on the floor, but be careful
not to step on any minis (and sweep
the floor before the game)!
The ultimate game table
is a sand
table. A sand table is basically a sand
box
on legs. The sand can be molded into
hills, ravines, rivers, gullies, and roads.
Dampening the sand helps hold its shape
during the game. The molded terrain can
be spray-painted green to give it a more
natural appearance.
Building a sand table
is a fairly large
undertaking (not like building a garage,
but more than a dog house). Once it's
built, a sand table can't be taken down
and stored the way a ping-pong table can,
so put it up someplace where you can
leave it for a long time. For these two
reasons, a sand table makes a good
wargame club project. The cost and
effort of building the table can be spread
among the club members, and the table
can be kept at the club's regular meeting
place.
Information on building
sand tables at <>
your local hobby store or library.
Whatever design you use, make sure your
table is sturdy && steady; the
sand
needs to be only a few inches deep but
even a few inches of sand, spread over
a 6
by 8 foot table, can weigh hundreds of
pounds,
especially when dampened. Line
the sand box with a heavy plastic sheet
or
seal it tightly with calking compound
so
the sand doesn't leak out.
Minis actually represent
two hobbies in one: first, collecting,
painting, and displaying them, and
second, playing wargames with toy
soldiers. Don't let the first overshadow
the second, or vice versa. Leaning too
far
in one direction takes away the fun, and
leaning too far in the other direction
takes away the challenge.
HOW TO ASSEMBLE THE BATTLESYSTEM 3-D ADVENTURE FOLD-UP FIGURES
The 3-D Adventure Fold-up
figures
included with this game are fairly easy
to
build, if you take your time and check
each step carefully before proceeding
with the next.

You will need a worktable,
scissors (or utility knife),
and glue. A ruler or other
straightedge is also handy for making
folds--place the straightedge against
the
fold and then fold, ensuring a nice, even
crease.
Before actually using
glue on any
figure, fold it together to see if it
works.
If you've made a mistake, you'll have
time to correct it. Otherwise, the piece
will be ruined. When you glue pieces
together, USE the glue sparingly, or else
you can gunk up a figure beyond repair.
There are eight sheets
of figures: one
containing Catapults, Ballistae, and a
Hut, one containing Tree Trunks, Flags,
and a Catapult Top, two containing
Treetops, one containing a Bridge, and
three containing Walls. We'll START
with the Catapults, Ballistae, and Hut
sheet.
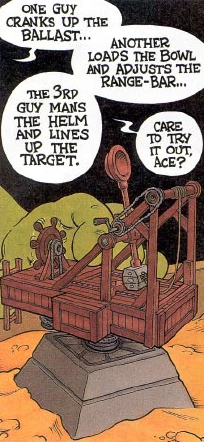
There are two catapults
in the game.
Each catapult consists of a Catapult Top,
Catapult Base, Catapult Arm, and four
Catapult Wheels. The second Catapult
Top is on the sheet with the Tree Trunks.
START by carefully cutting
out all the
catapult pieces along the outer dark
lines. Then look at diagram 1a, which
shows
how to fold up the Catapult Base.
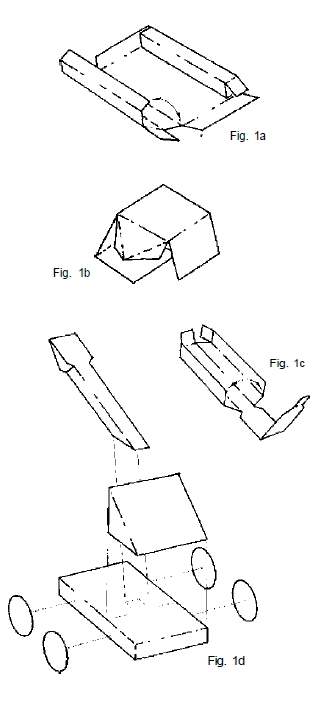
Fold the base inward
(toward the plain,
or undecorated, side) along each of the
dotted lines. The long, thin sections
fold
up into a long, skinny box, with the side
labeled "Catapult Base" facing the
undecorated side of the base. The two
tabs marked with an "X" close off the
ends of the box. The two decorated end
flaps (one with a winch, one without)
fold
down to close off the back and front sides
of the base.
Glue the sides marked
"Catapult Base"
to the undecorated underside, then glue
the decorated end flaps to the "X" flaps.
You now have your base. Put it aside to
dry, then take out the Catapult Top.
Fold the top inward
(toward the
undecorated side) along each of the
dotted lines, as shown in Diagram 1b.
Press the top together so that it forms
a
right triangle, with the side labeled
"Catapult Top" on the outside.
Apply a few drops of
glue to each of the
undecorated small triangles, and to the
square section marked with an "X."
Press together carefully so that the side
labeled "Catapult Top" ends up on the
outside. Put it aside to dry, and then
TAKE
out the Catapult Arm.
Fold the arm inward
(toward the
undecorated side) along with each of the
dotted lines, as shown in Diagram 1c.
You
should end up with a long, thin tube with
two flaps marked "X" at one end, and a
strange-looking extension at the other.
First, glue the long,
thin side marked
with an "X" to the undecorated side of
its
counterpart, forming the tube. Then glue
the two small flaps together, forming
an
angle. Finally, place a drop of glue on
the
tab marked "X" at the base of the
strange-looking extension, and insert
it
into the hollow end of the tube. You will
see a circle drawn on the upper side of
<the> arm. That's where the catapult
projectile
would go if this were a real catapult.
Now to assemble the
device. Study
Diagram 1d before the beginning. First,
glue
the Catapult Top to the Catapult base,
with the side labeled "Catapult Top"
against the corrresponding <> "X" on
the
Catapult Base. The angle side of the
Catapult Top should face the winch drawn
on the Catapult Base.
Next, glue the small
end of the Catapult
Arm to the small square on the Catapult
Base directly in front of the Catapult
Top.
Note that the arm will project at an
angle, and the circle where the projectile
goes will be facing up.
Finally, glue the four
wheels to the
base. Each wheel should stick up equally
above and below the base.
BALLISTA
There are two ballistas
in this game.
Each ballista consists of two parts: a
Ballista Base and a Ballista Arm. First,
carefully cut out each of the ballista
parts
along the solid dark lines. We'll START
with
the Ballista Base.
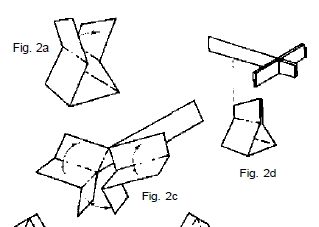
Fold the two dotted
lines nearest the
center inward (toward the undecorated
side), and fold the outer two dotted lines
outward. Don't fold the two undecorated
tabs at either end. Press the base
together so that you have a triangle with
a tab on top, as shown in Diagram 2a.
Glue the two halves of the tab together.
Set it aside to dry, and TAKE out the
Ballista Arm.
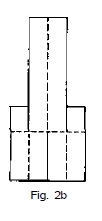
Look at Diagram 2b.
Carefully cut the
Ballista Arm along the lines A-B and C-D.
Do not cut across the dotted lines!
Now, fold the entire
arm lengthwise.
Fold back (decorated side to decorated
side) the front section along the dotted
line (C-C).
TAKE a look at Diagram
2c. Fold each
half of the cut section up along the dotted
lines. Bring the little tabs (each with
a
drawing of an arrowhead) out so that
they point forward. Let go of the folded
sections (each with a drawing of part
of a
bow). When you're finished, the entire
assembly should resemble a crossbow,
which is (sort of) what it is.
Diagram 2d shows how
to put the
pieces together. Glue the halves of the
bow and of the arrowhead together.
Before gluing the long, thin section
together, put a little glue on the
undecorated tabs of the base and insert
the base so that the crossbow tilts
upward. Then glue the REST of the long,
thin section together. You should end
up
with a giant crossbow (in 25 mm scale,
anyway) on a base.
HUT
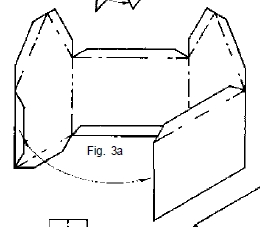
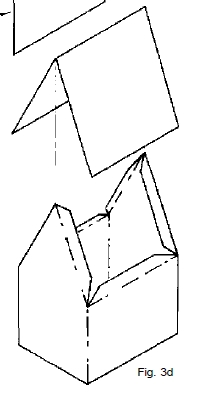
There is one hut included
with the
game. It consists of two pieces, the Hut
and the Roof. First, cut out the two pieces
along the heavy dark lines. We'll START
by
building the Hut.
Fold the Hut along each
of the dotted
lines. If you like, you can cut the door
and
each of the windows along three sides
and
fold them back so that they open.
Find the tab at the
far right edge of the
hut (the right side of the door as you
look at
the decorated side). Fold the hut so that
the tab touches the far wall, as shown
in
Diagram 3a. Glue the tab to the inside
(undecorated side) of that wall.
Then fold the roof in
half (toward the
undecorated side) along the center dotted
line. Put a few drops of glue on each
of
the tabs on top of the hut, and gently
press the roof against those tabs. See
Diagram 3d.
FLAG

Two flags are included.
They can be
fastened to the standard pole carried
by
one of the miniature figures included
in
the game, or fastened to toothpicks or
other thin pieces of wood or metal as
decoration. Cut the flags out along the
solid dark lines, and fold them in half
(toward the undecorated side) along the
center dotted line. Place the standard
pole in the center, and glue the halves
together, as shown in Diagram 4.
TREES AND TREE TRUNKS

There are ten tree trunks
and two
sheets of treetops included in the game.
You can make a variety of trees out of
these materials.
First, cut out several
irregular clumps
of trees from the treetops sheets. There
is
no "right" size or "wrong" size, but try
to
make all the lines curvy. Remember, in
a
miniatures game, each "tree" will
actually represent an aerial view of a
grove of trees or part of a forest. Smaller
clumps of trees are more versatile than
large clumps. Be sure that each clump
of
trees is big enough to USE at least two
tree
trunks, or they will fall over.
Next, cut out each of
the tree trunks.
Fold them inward (toward the
undecorated side) along each of the
dotted lines. When you press them
together you should find that all the
triangles overlap. The undecorated long
side (marked with an "X") can fit behind
its decorated counterpart on the other
side of the tree trunk, so that the tree
trunk forms a triangle. See Diagram 5a.
Glue the undecorated
long side to the
underside of its decorated counterpart
to
form a triangle. Then glue together the
three triangles (it doesn't matter which
side is on top) to close off the ends
of the
trunk.
When you have built
the tree trunks,
glue two or three (as needed) to the
undecorated side of each of the clumps
of
trees you cut out earlier. See Diagram
5b.
BRIDGE

Study the bridge sheet
and Diagram 6a
before cutting anything out. On one end
of
the sheet are 15 hexagons with triangles
in their middles. Those are the End Caps.
Directly above them are what appear to
be two rectangles divided in the middle
by a heavy solid line and lengthwise by
four thin solid lines. When you cut these
out, cut out the long rectangles and then
cut them in half along the heavy solid
line. Don't cut them along the thin solid
lines. These are the Guardrails. Directly
above the Guardrails are two Bridge
Supports with arches. One of the Bridge
Supports is a solid piece, the other is
cut
two pieces. Finally, above the Bridge
Supports, is the Bridge Surface. It is
a
rectangle with a thin solid line dividing
it
in half, and two thin lines at the edges.
Once you've made sure
you know which
part is which, and where exactly to cut,
cut out all the bridge pieces.
First, fold the Bridge
Surface inward
(toward the undecorated side) along the
thin line in the center. Do not fold the
thin
lines at the edges.
Second, take the solid
Bridge Support
and fold it inward (toward the
undecorated side) along the thin lines
that meet in the "V" notch. Apply a few
drops of glue to the flaps created by
the
fold, and press the folded bridge surface
against them so that the surface is glued
ot the top of the support. TAKE the two
halves of the other Bridge Support, fold
them along the thin lines, and glue them
to the other side of the bridge surface
in
the same way.
TAKE each of the four
Guardrails and
fold them into triangles the same way
you folded the tree trunks, except that
there are no triangular sections on top.
It
doesn't matter which side ends up
underneath the others. To cap the ends
of
the Guardrails, TAKE an End Cap piece,
and fold each of the hexagon sides inward
so that only the triangle remains facing
out. Put a drop of glue on each of the
folded hexagon sides and insert the End
Cap into one end of the Guardrail so that
the end of the Guardrail is neatly
covered, as shown in Diagram 6b.
Glue the Guardrails
to the Bridge
Surface, as shown in Diagram 6c.
Next, TAKE out the Walls
sheet, and cut
out two sections each 1 square by 2
squares. (Cut along the heavy solid lines,
not along the light solid lines.) Fold
each
of these sections in the same way as you
folded the Guardrails, and cap the ends
with End Caps. Fasten these small
sections to the sides of the bridge, as
shown in Diagram 6d.
WALLS
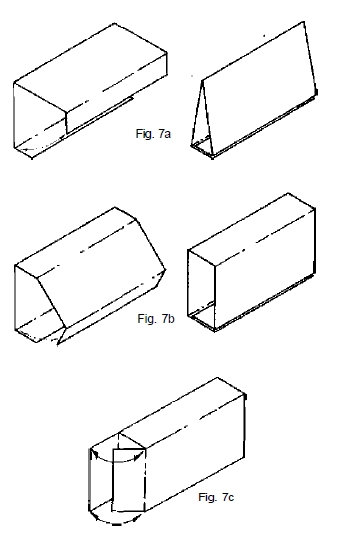
The Walls can be used
to create
walls of different shapes and lengths.
There are two basic shapes: triangular
walls (when you want them to be
impassable) and rectangular walls (when
you want them to be passable). Diagrams
7a and 7b show you how to fold them.
A triangular wall most
be four squares
wide in order to fold, and can be any
number of squares long, up to the limit
of
the sheet. Triangular walls are folded
in
the same manner as Guardrails, and may
be capped if you have any End Caps left
over from building the Bridge.
A square wall that you
want to end up
one square high and wide must be five
squares high when you cut it out. For
every extra square high or wide you want
the wall to be, add two squares when you
cut the wall out. You can make the wall
as long as you want, up to the limit of
the
sheet. Fold the square wall like you did
the Catapult Base (Diagram 1a) or
Catapult Arm (Diagram 1c). If you want
to cap the ends, leave an extra block
on
two of the five sides and fold inward,
as
shown in Diagram 7c.
There are many different
things you
can do with these wall sections.
Experiment with photocopies to get the
shape you want, but photocopies will not
last very long if you USE them in the
game.
<is this a duplicate image?>
Dragon #73
Armory

Armory (Official)
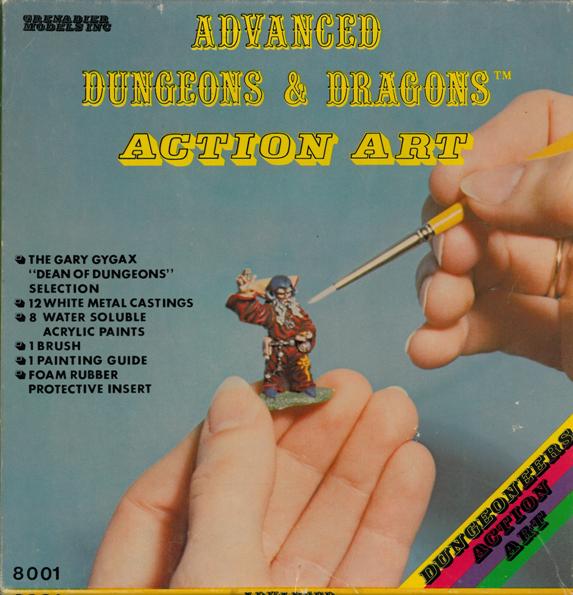
Grenadier
Ral Partha
WARHAMMER
Games Workshop (Citadel)
Walled Outpost (Greenfields Garrison)
Geo-Hex Terrain
Games Workshop
Games Workshop
Games Workshop
Dragon #153
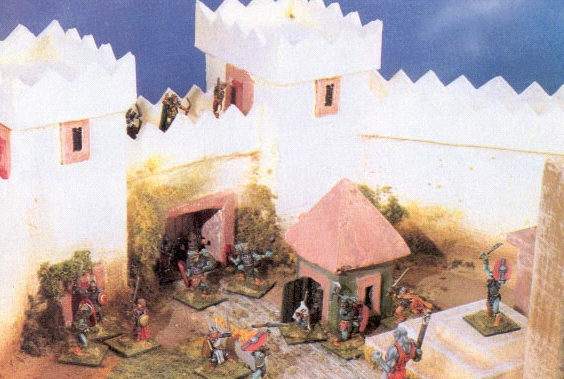
Battlesystem: Skirmishes
![]()
Reduce - Reuse - Recycle