
| Polyhedron | - | 1st Ed. AD&D | - | Polyhedron #10, #11, #12 |
Mapping from Square One is a three part series.
Some D&D and AD&D
game players like to map. Some
hate it. Admittedly, the fun in role playing games comes more
from the action than the mechanics. But there is entertainment
in each aspect, and some map-haters got that way through
bad experiences, whether amateur dungeon designs or poor
descriptions.
One major problem in role playing games is the need
to
visualize what the character sees, and to make the appropriate
notes. If this visualization is incomplete, the player may overlook
options, choose unwise courses of action, or even misunderstand
the situation so completely as to cause the character's
swift demise.
Accurate mapping can be a key element in avoiding
many of
these situations. It can also offer clues, especially in compact
dungeons. A good DM can easily create "top secret" areas,
nearly undiscoverable until their locations are found after careful
mapping, measuring, and digging (or requiring entry by
magical means).
Many "systems" of mapping are in use around the world,
but
few have been actually written down and organized. The following
is a system which began in Philadephia and developed
further in Lake Geneva campaign play. It is an eclectic work,
partially based on auto rally techniques and refined by game
use.
As the title implies, this article starts with the
simplest basics
and proceeds from there. Experienced gamers may wish to skip
the following section and begin with "Terms and Usage."
Mapping a dungeon can be done quickly and easily
if two
rules are followed.
1. One player at each game should be the Mapper,
and
should know the mapping terms and methods used by
the
Dungeon Master.
2. The Dungeon Master can use any system, as long
as the same methods
and terms when describing areas.
A Dungeon Master can use any system, as long as the same
terms are used throughout. Problems and delays in mappnig
most often occur when players don't know just what the DM
means -- this can be avoided if the DM is consistent. When
playing a role playing game, the fun comes more from role
playing than through minor details such a this -- though good
mapping can be a puzzle and challenge in itself.
Abbreviations
The standard abbreviation for "Feet" is one slash
('). The
standard for "inches" is two slashes ("). This is used in
DUNGEONS & DRAGONS games to mean tens of feet, but is
rarely used in mapping.
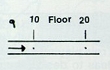
Map Paper
The standard paper used DUNGEONS & DRAGONS
game maps is blue-lined grid paper. It is available in many sizes,
from 1/2" squares to 3/8". The most common is 1/4" squares.
Scale
Each square formed by the blue lines can represent
a 10' x 10'
area, or a 5' x 5' area if more detail is desired. Standard is 1/4"
squares, each representing a 10' x 10' area. This fact -- the
amount of "real" space represented by a map square -- is
known as the "Scale" of the map.
The Scale of any map should be noted on it. EXAMPLE:
Scale
1/4" = 10'.
Compass
Most directionas are given in compass terms (north,
south,
east, west, or in between). A symbol should be drawn near the
edge of each map, indicating the compass directions. EXAMPLE:
Errors
When players make mistakes in mapping due to inexperience
or misunderstanding, the DM should correct them. However,
errors may appear due to magic effects (the characters don't
see what's actually there); special traps, moving walls, etc. Map
with a sharp pencil and keep an erase handy.
Visibility
The Dungeon Master must be careful not to describe
areas
that the characters cannot see. For example, if a square room is
100' across, even characters with magical light and lanterns
could not see the whole room. Only the part within range
should be described. At interections, do not describe side
corridors until characters have approached and described their
method of examination. If characters pass through a four-way
intersection quickly and do not stop to examine the side corridors
they will not be able to map more than a small fragment of
the side passages.
Most dungeon areas are not lit, unless used by humans
or
other creatures unable to see in the dark. Lit areas can usually
be mapped immediately, even if dim and unclear.
Purists may insist that accurate measurement is not
possible
until an area is "paced off." DM's discretion is therefore
required; if a pary normally paces off an encountered area,
there is no harm in giving exact figures, even if they must first
handle a creature therein. If there is reasonable doubt, the
measurements should be approximate at best. For example, if
the DM expects a party to run away or avoid an area, no exact
description should be given.
Map Squares
Distances and measurements may usually be describes
in
feet of "squares," referring to the map paper squares. Diagonal
distance measurements should be given in "diagonals," -- one
diagonal on Standard paper and scale equals about 14' 2".
Standard or Normal
Whenever possible, the DM should give a "standard"
descriptor
for "normal" areas and items. For example, "10 foot high corridors,
15 foot high rooms" could be announced as Standard.
The height of corridors and rooms needn't be mentioned
from
then on unless they differ from the Standard.
A Standard material is common. The usual standard
is "stone
walls, floor, and ceiling," or wooden materials. In most of the
adventure, the DM need only say "normal room, 10' square"
instead of "room 10' square, height 15', walls, floor, and ceiling
of stone." A Standard door can also be described. It may be "4'
wide, 8' high, wood with metal bands." It may have some other
description, simpler, bigger, or heavier.
Standards set for one dungeon do not apply to any
other and
may vary by materials, types of building, type of civilization, etc.
Part II
Corridors
"Standard corridor" -- draw two parallel
lines, starting at the beginning of the
corridor and extending in the direction
given. This is always followed by compass
direction.
Corridors running east-west and north-south
can be easily described in feet.
Five and ten foot intervals are recommended,
for ease of mapping. Other corridors
are known as "diagonals," and are
usually not described in feet.
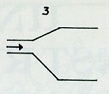
"Corridor Widens" -- the corridor your'e
in gets wider ahead. Always followed by
(a) "to" the new width, (b) "over" the
distance to that new width from the start
of the widening; can be "Immediately,"
Usually followed by a direction to indicate
the wall that "widens," the other
remaining straight. EXAMPLES:
Corridor widens to 30' over 50' [fig.1]

Corridor widens north to 15' over 10' [fig. 2]

A corridor is assumed to widen equally
in each direction, unless specified otherwise.
In fig #1, the 10' wide corridor
widens to 30', 10' to the north and 10'
south, as nothing was specified.
When a corridor widens in both directions,
that should be clearly specified.
EXAMPLE:
Corridor widens to 40' over 20', 10' north
and 20' south. [fig. 3]
"Corridors narrows" -- in the same
manner as above, but a new width less
than the current width. However, the
direction indicates the wall that remains
straight, rather than the one that "narrows."
EXAMPLES:
Narrows south to 10' over 20' [fig. 4]
Immediately narrows west to 10' [fig. 5]
![]()
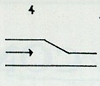
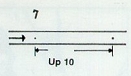
"Corridor slopes" -- the floor and ceiling
of the corridor you're in continue at
some angle other than horizontal. Slopes
are often undetectable and thus not
mentioned. Always followed by "down"
or "up," the amount of descent or rise,
and "over" a distance. Since slopes are
usually not obvious map feature, they
should be noted to the side of the corridor.
EXAMPLES:
Corridor slopes down 5' over 20' [fig. 6]

Corridor slopes up 10' over 60' [fig. 7]
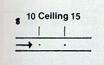
"Ceiling slopes" -- the floor of the corridor
you're in remains horizontal, but
the ceiling slopes upwards or downwards.
Always following by "to" the new
height (from floor to ceiling), "over" the
new heights of corridor. EXAMPLE (Standard
height is 10')
Ceiling slopes up to 15' over 20' [fig. 8]
"Floor slopes -- As Ceiling, above,
but with respect to the floor. The
ceiling remainds horizontal. EXAMPLE
(Std. 10'):
Floor slopes down 10' over 40' [fig. 9]
TURNS AND INTERSECTIONS
"Corridor turns" -- the corridor you're
in turns to head in a new direction.
Always followed by Left, Right, or compass
direction. When mapping, the area
of the turn is described separately from
the corridors leading to and away from it.
EXAMPLES:
Corridor turns left, then goes 30' [fig. 10]

Corridor turns south, narrows east to 5'
over over 10,' and continues [fig. 11]

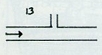
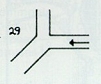
"Sideroad" -- one corridor intersects
the one you're in, at a 90 degree angle.
Usually starts with width of sideroad,
optoinal if Standard. Always followed by
Right, Left, or a compass direction. Sideroad
and continuing corridor are then
described normally. EXAMPLES:
10' sideroad right [fig. 12]

5' sideroad north [fig. 13]
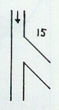
"Diagonal Sideroad" -- as a normal
Sideroad, but intersecting at some angle
other than 90 degrees. Always followed
by a compass direction; size is mentioned
as per Sideroad. EXAMPLES:
10' diagonal sideroad right, northeast
[fig. 14]

20' diagonal sideroad left, southeast
[fig. 15]
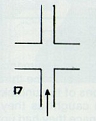
"Four-Way" (or 4-way) -- the corridor
you're in continues, but two sideroads
intersect at one point, the entrances
opposite from each other. They can be at
90 degree angles or otherwise. All
opposing corridors are of the same
dimensions, whether Standard or otherwise
specified. EXAMPLES:
Four way [fig. 16]

4-way with a 20' [fig. 17]
4-way with a diagonal northwest and
southeast [fig. 18]
4-way with diagonals northwest and
southwest [fig. 19]

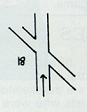
"Complex 4-way" -- whenever any of
the corridors at a 4-way is of different
dimensions than its opposite, the intersection
should be carefully described,
corridor by corridor. The DM should
start to the mapping character's left and
describe, in clockwise order, the corridors
seen. EXAMPLE:
Complex 4-way; left is 20', then ahead
widens left to 15' over 20', then back west
5' to a 10' gap, which is a diagonal
southwest [fig. 20]
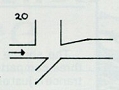
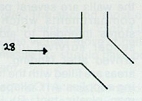
"Tee" -- the corridor you're in goes no
further, but another corridor forms a "T"
type intersection, heading left and right,
always at right angles. The new corridor
is Standard unless described otherwise.
This may be followed by other corridor
information. The "top of the Tee" is
always flat unless noted otherwise.
EXAMPLES:
Corridor Tees [fig.21]
![]()
Corridor Tees with a 5' north, 10' south
[fig. 22]

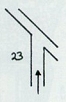
"Lazy Tee" -- as a normal Tee, but the
new corridor does not intersect at right
angles. Only one direction must be given;
the other is obvious. EXAMPLES:
Lazy Tee with a 5', diagonals northwest
(and southeast) [fig. 23]
Lazy Tee, north (and south) [fig.24]

Note that the only difference between
a Tee (or Lazy Tee) and a Sideroad is the
direction from which the intersection is
approached.
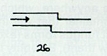
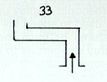
"Jog" -- the corridor you're in shifts
slightly, but continues in the same direction.
Always followed by the direction
and distance of the Jog. EXAMPLES:
Jogs right 10' [25]

Jogs south 5' [26]
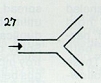
"Three-Way" (also called "Y") -- most
intersections of this type (unless perfectly
symmetrical) should be described
carefully, corridor by corridor, starting
to the character's left and continuing
clockwise. EXAMPLES:
Corridor Y's, each branch 1/2 diagonal
wise [fig. 27]
3-way; north 20', then 2 diagonal wide
southeast [fig. 28]
3-way; southwest 1 diagonal wide, then
north 10' wide [fig. 29]
"Six-way" -- Usually looks like a 4-way
until you get close, when the left and
right sideroads are seen to be two diagonals
each. Other formations are possible
but irregular, and should be described
carefully.
4-way with 10' (pause); six-way [fig. 30]
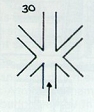
4-way with 20' (pause); six-way [fig. 31]

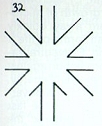
"Eight-way" -- Immediately noticeable
at a distance. Eight corridors intersect
in one area. If irregular, describe
carefull. [fig. 32]
Other -- 5-way and 7-way intersections
will always be somewhat irregular,
and should always be described carefully,
a corridor at a time.
General Note
If any misunderstandings occur, the
DM can easily clarify matters by describing
the course of a wall. For example,
from an existing corridor: "Left wall continues
20'. Right wall goes 30', cuts left.
You get to the turn and see corridor
heading west; left wall goes 40' and cuts
north, right wall goes 30'. [fig. 33]
This method is highly recommended
for describing oddly-shaped rooms and
corridors. EXAMPLE: (A 10' wide corridor,
heading north, opens into an odd-shaped
room): "Left wall goes 10' west,
5' north, 5' west, 5' north, 5' east, 10'
north, 1 diagonal northeast, 20' east, 20'
south, 10' east, 10' south, and 20' west to
connect. [fig. 34]

Features
Doors, stairways, furniture, and other
features are commonly found in most
dungeons. Their location is usually given
in relation to other features. For example,
a chair might be "1 diagonal from the
northeast corner of the room."
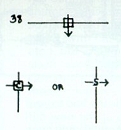
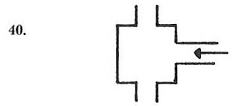
DOORS
Standard map symbols are used for all
types of doors. They include:
Normal Door [fig. 35]

Concealed Door [fig. 36]
![]()
Secret Door [fig. 37]
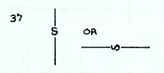
One-Way Door [fig. 38]
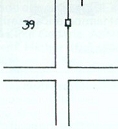
When a door is found, the description
should give a single point; the center of
the door will be at that point. For example,
to a character at a 4-way intersection:
"looking north, you see a Standard door
35' ahead on the right; corridor
continues." Since the center of the 4'
wide door is 35' ahead, it should be
drawn in the center of the right wall of
the fourth square north of the intersection.
[fig. 39]
"Normal" Doors
Normal or Standard doors are the
most common types, but Concealed and
Secret doors are also found occasionally.
Any door can be made to work one-way
only. Most doors have hinges, but
some may simply slide -- up, down, or
sideways.
"Trick Doors"
A door that looks Standard, complete
with keyhole, hinges, and doorknob or
handle, may actually be a sliding door,
using the extra hardware merely to confuse
characters. A hinged door may have
false hinges, and may pivot on any side;
a "Standard" door, for example, may be
hinged across the top to swing upwards,
so that characters enteriing will not (at
first) see what is directly above the
doorway.
<c6 image>
Part III
Rooms may have any shape. The easiest
to map are squares and rectangles;
the hardest are complex, irregular
shapes. Beginning Dungeon Masters
should use easy shapes until the players
are ready for some difficult material.
Several basic terms can be used:
Square: four sides, all equal in length
and intersecting at right angles.
Diamond: as a square, but not at
right angles.
Rectangle (rectangular): four sides,
with opposite sides of equal length. A
square is a special rectangle with all
sides equal.
Circle (circular) or Round (rounded):
only one side, a continuous surface
with no corners (except for exits). A
center point may be fuond from which
all wall surfaces are an equal distance.
"Radius" is this distance, and should
be given, or instead, a "Diameter" (the
distance from one side of the room to
the other, or twice the Radius).
Oval (ovoid): an elongated circle, as if
its sides were pushed in, forcing the
ends outward from the center. Always
described with two dimensions: distance
between the ends farthest apart,
and distance between the sides closest
together.
These basic shapes form most of the
rooms encountered in dungeons. They
may be combined in different ways for
more variety. For example, a "5' square
niche in the middle of the west wall"
would be a 5' x 5' area connected to the
main room at the place indicated,
added onto the room area (and, of
course, without any door).
When describing corridors intersecting
rooms, the DM may describe the
position of the corridors with respect to
the room or its walls. For example,
"corridor opens into the middle of the
east wall of a 30' square empty room,
with other corridors leading from the
middle of the north and south walls."
[fig. 40]
The descriptoin of a dungeon's
rooms and corridors is very important
to players. Accurate descriptions lead to
better visualization, as the players can
accurately imagine what their characters
are doing, and where they are.
However, with faulty descriptions, a
character may find himself unexpectedly
in a corner or ambushed from
behind, all because of a misundertanding
of the situation. It is unfair to
penalize characters in dangerous situations
when they would be able to "see"
what's really going on, but their players
cannot because of incorrect information.
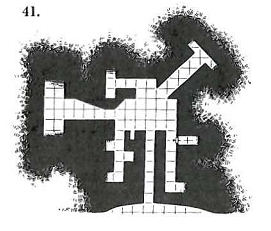
Though the details of this system are
numerous, they are easily grasped with
a bit of practice. If you understand the
system, try the following "final exam,"
a description of a complex dungeon
area (temporarily free of monsters).
Standard corridor is 10' x 10', made
of stone. Standard room height is 15'.
Standard Door is 5' wide, 10' tall,
wooden with metal bands for structural
strength. Standard Door has a metal
handle 1' long, keyhole beneath it, and
metal hinges, sheathed.
Characters' starting point is outside,
by a corridor leading north into a
hillside.
Corridor proceeds 70' north and
opens into a large irregular room. Wall
goes 10' west, then 5' gap, then another
5' of wall, then a 10' gap to a north-south
wall.
That's one wall of a diagonal corridor,
one diagonal wide, both walls
even. From that corridor, wall goes 10'
east and turns south, going 30'; there's
a normal door 5' south of that corner.
To your immediate right, wall goes
10', then there's a 10' gap to where you
left off.
Got that? Good. You step into the
room and look around. You see that
the gap on the west wall is a corridor
that goes 10', then widens to 20' over
30', goes another 10' and tees with a
20'. The 5' gap to the south is a corridor
10' long that dead ends. But the
gap west of that is a 10' wide corridor,
which goes 10', then sideroad west 10',
then sideroad east 10', after which the
corridor continues 10' and then turns
west.
Going to the north end of the room,
you see that the west corridor goes 20'
and tees. The northeast corridor goes 31/2
diagonals and tees with another, 1/2
diagonal wide.
That gap originally to your right is a
corridor that goes 5' south, then a door
on the east wall. As you head further
south, you see that the corridor goes 35'
past the door and then turns east.
You should have a map that looks like
fig. 41. If not, you took a wrong turn
somewhere.
That's it for Mapping from Square
One. I hope our three-part series has
helped sharpen your mapping skills.
(Ed.)
<c6 image>