|
|
|
|
|
|
|
|
|
|
|
|
Non-Crypt
Areas (Generally Northern Portion of Map):
| Die | Result |
| 1 | 3-12 goblins (patrolling from area 7.-8.) |
| 2 | 2-5 bandits (from area 4.4.) |
| 3 | 7-12 giant rats |
| 4 | 1-2 fire beetles (from area 12.-13.) |
Crypt
Areas:
| Die | Result |
| 1 | 1-2 ghouls (from area 24.) |
| 2 | 1 3rd level evil cleric & 2 hobgoblins (from area 35.-37.) |
| 3 | 7-12 giant rats |
| 4 | 2-5 skeletons (patrolling from area 27.) |
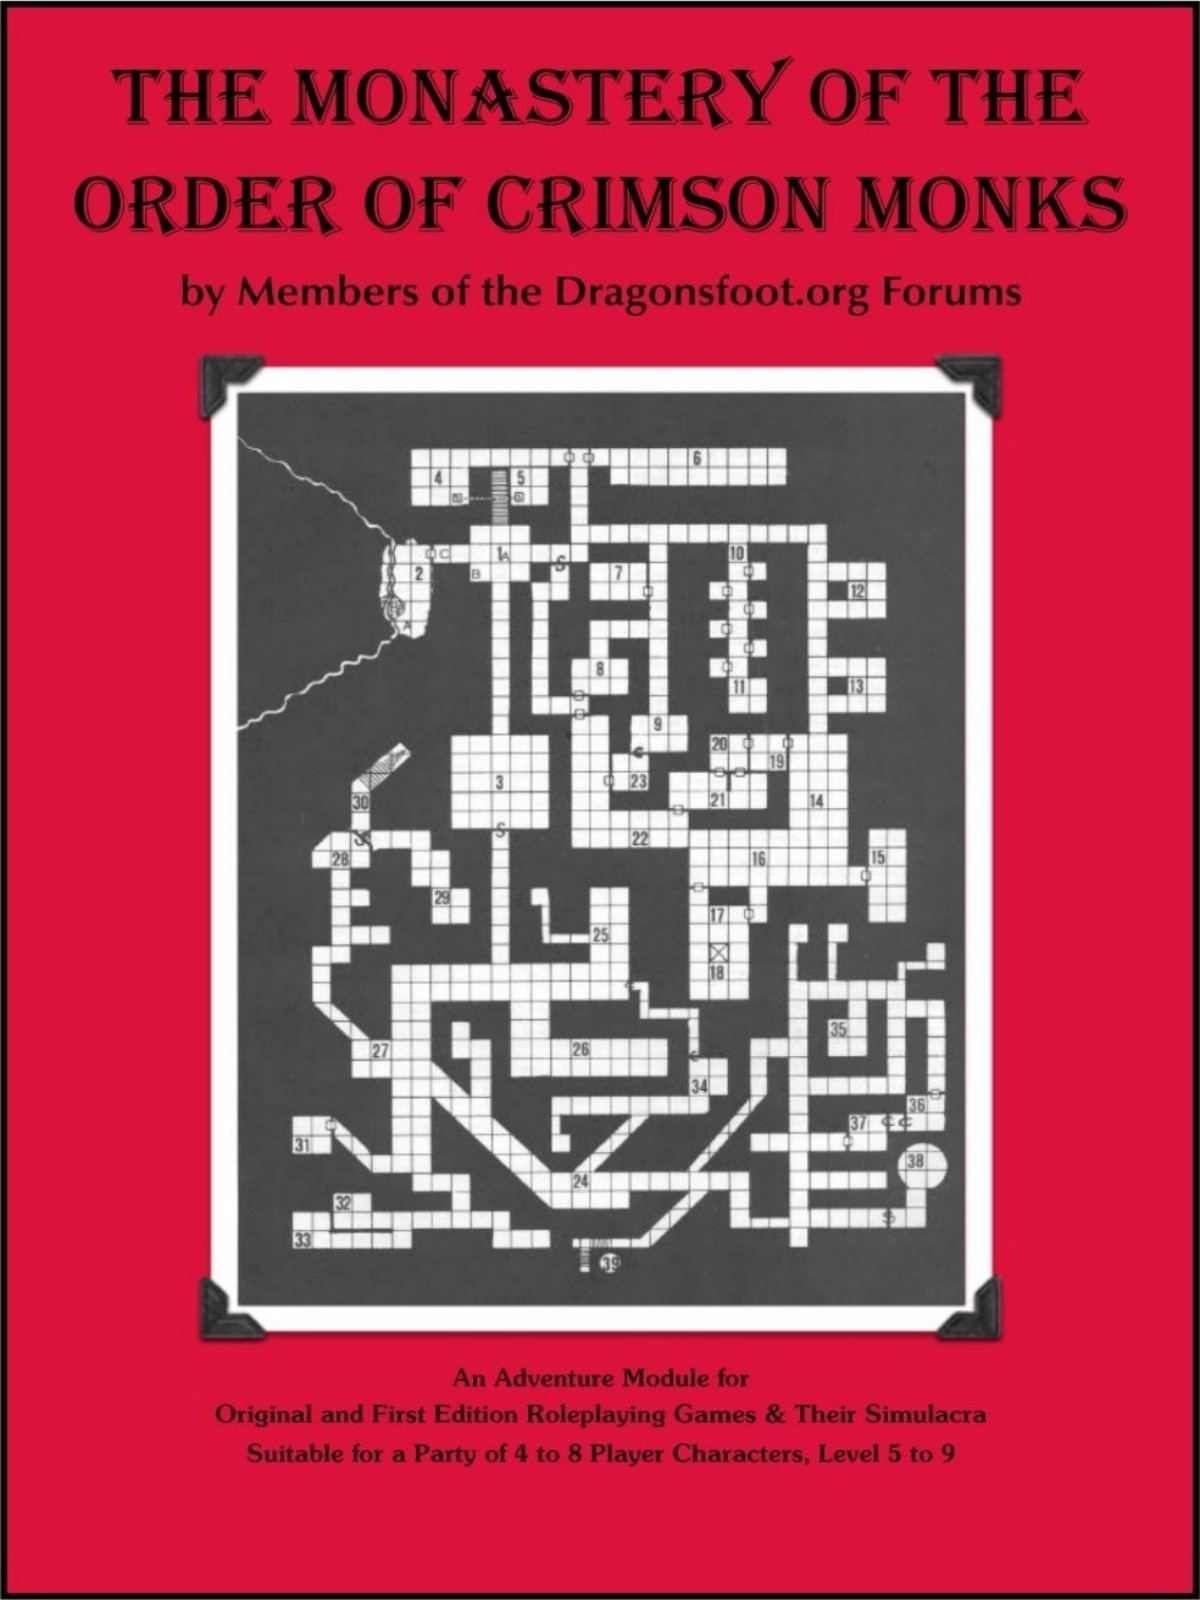
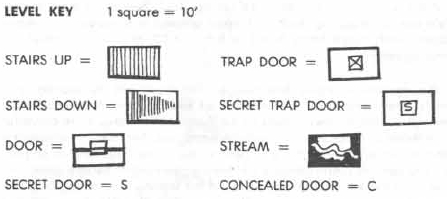
MONASTERY CELLARS & SECRET CRYPTS

1. ENTRY
CHAMBER: A damp and vaulted chamber 30' square and arched
to
a 20' high center roof. Arches begin at 8' and meet at a domed peak.
Walls
are cut stone block, floor is rough. Thick webs hide ceiling. See A
&
B below.
A. LARGE SPIDER: AC 8; Move 6"*15"; HD: 1 + 1 (HP 6). There are also
nine 1 HP young spiders hiding in the upper part of the webs. This
monster lurks directly over a central litter of husks, skin, bones, and
its own castings, awaiting new victims to drop upon. It will always
attack by surprise unless the webs it is in are burned (which will do
3 HP damage to the spider and kill the young). There are 19 silver
pieces in the litter on the ground, while a goblin skull there has a 50
gold piece garnet inside which will only be noticed if the skull is
picked up and examined.
B. ROTTING SACKS: There are 10 moldy sacks of flour and grain
stacked here. The cloth is easily torn to reveal the contents. If all of
them are opened and searched, there is a 25% probability that the
last will have YELLOW MOLD in it, and handling will automatically
cause it to burst and all within 10 must save versus poison or die in
1 turn.
C. Heavy oak door with bronze hardware is remarkable only in that if
any character listens at it, he or she will detect a moaning which
will rise and then fade away. Unbeknownst to listeners, it i s the
strong breeze which goes through area 2. AS SOON AS THIS DOOR
IS OPENED, A WIND GUST WILL EXTINGUISH TORCHES AND BE 50%
LIKELY TO BLOW OUT LANTERNS AS WELL. The wind continues to
make the corridor impossible for torches until the door IS shut.
2. WATER
ROOM: Ihis natural cavern was roughly worked to enlarge it.
Torches
cannot be lit. When the monastery was functioning, the place
was
filled with casks and barrels and buckets, but now only 8 rotting
barrels
remain (location A.) and there are 3 buckets scattered about.
Several
of the barrels hold water - they were new and being soaked
to
make them tight.
B. THE LIMED-OVER SKELETON OF THE ABBOT is in this pool of water,
but it appears to be merely a somewhat unusual mineral formation.
Clutched in the bony fingers is the special key which will allow the
secret door at location 28. to open to the treasury room (29.) rather
than to the steps which lead down to the caverns (steps down at
30.). If the remains are disturbed in any way, a cylindrical object
will be noticed, the thing being dislodged from where it lay by the
skeleton, and the current of the stream carrying it south (downstream)
at 6 speed. To retrieve it a character must be in the stream
and score to hit as if it were AC 4 in order to catch it. It is a watertight
ivory tube with a vellum map of the whole level inside. However,
slow seepage has made all but a small portion blur and run
into ruin. The map shows only areas 1., 2., the passage to 3., a
smudge where 3. is and the passage to 24. about 20 south of the
secret door leading from 3. to 24. -- the latter being shown with
miniature sarcophagi drawn in the 80 or so not water soaked and
ruined.
STREAM: This is cold and fast flowing. It is from 5 to 7 wide and 3
to 5 deep. It enters on the north from a passage which it fills
entirely, and it exits to the south in the same manner.
POOL: The pool is about 10 long and 15 wide. It is about 4 deep at
its edge and 7 in the center. There are a score or so of small, white
blind fish in it, and under the rocks are some cave crayfish, similarly
blind and white.
3. EMPTY
CEREMONIAL CHAMBER: This large place appears to be a dead
end.
It has roof supports similar to chamber 1, but the vaulted ceiling
dome
here is fully 25 high. When the monastery was functioning, the
faithful
were brought here after death, consecrated, and then carried
to
their final resting place by silent monks after the mourners left. A
wooden
platform, supposedly merely a dais for ceremony and
religious
rites, was placed against the south wall. This platform being 9
off
the ground enabled the use of the secret door in the south wall --
this
portal being 81/2 wide, 10
high, and 10' above the floor of the
chamber.
Amongst the 7 small protruding knobs of stone about 91/2
above
the floor, the 7th pushes in to trigger the door mechanism, and
the
portal will swing inward (swings east) with a grinding noise. The
only
clue which still remains are socket hales in the south wall. There
are
2 at the 20 and 2 at the 30 line (that is, on either side of the centermost
10
south wall space). Each pair has 1 socket at about 4 height, 1
at
about 8 . Each socket is 1/2
X 1/2 square and a little deeper.
The first
socket
hole examined by the party will have several splinters of wood
(from
the platform, of course) which might prove to be another clue to
thinking
players.
4. (Etc.)
*template***template*

Quote:
Originally
Posted by grodog
Hi
Gary---
While
reading up on some of the gates to other worlds you mentioned in the DMG
(Vance's Planet of Adventure, et al), I popped to the sample adventure
on a lark, and re-read the following:

The
DMG only contains the monastery map, and not the village/wilderness map
or the upper works map of the ruined monastery.
Do you recall if the two missing maps were ever drafted and were simply dropped from the DMG for space considerations, or were not completed in time to be published, or what otherwise happened to them? Was this map created specially for the DMG or was it set in Greyhawk or Kalibruhn or elsewhere, back in the day?
The
fire opal monastery has always been a favorite of mine.
Many
many moons ago, I created my own second level of caverns to the dungeons
level (at http://www.greyhawkonline.com/grodog...ry-Caverns.pdf
in case anyone's curious), and I changed the background of the monastery
to tie it to the then-as-yet-unpublished T2
![]()
I hope
the winter's not treating you too badly up there?
Ciao
Alan,
I created the three maps strictly for examples in the DMG. What became of the two that were dropped is beyond my ken. As I never had reason to refer to that portion of the work the omission was unknown to me until you brought it up :\
After seeing your interesting looking map, I wish I could recall what the two lost maps had on them, but my mind is a complete blank in that regard. Likely the press of creating the DMG material was such that details of that sort were wiped from memory quickly to make room for the next portion being devised.
Cheers,
Gary
Ahoy
Grodog!
Likely Sutherland and Mike Carr were the ones that did the layout and editing for the DMG. Mike is still around, so check with him.
I meant
that about your map...oddly enough it resembles many of my hand-drawn ones ![]()
Cheerio,
Gary
(ready to kick back after a long day)
