| Setting Up | Notation and terminology | - | - | - |
| THE UPPER BOARD | Sylph | |||
| Advanced Dungeons & Dragons | - | - | - | Dragon magazine |
The DRAGONCHESS game is a fantasy-based variation of
chess, in which the object of the game (as in standard chess) is to
checkmate the opposing King. An understanding of the rules of
chess is helpful in order to understand how DRAGONCHESS is
played.
The playing surface for DRAGONCHESS is a three-tiered structure
of rectangular boards, with each board composed of a grid 12
squares wide and 8 squares deep. The squares are alternately colored
light and dark (or other color tones that contrast with each
other), configured so that a light-colored square is in the near righthand
corner when the board is viewed from the longer side. The
upper board represents the air, the middle board the land, and the
lower board the subterranean world. To simulate the various environments,
it is suggested that the squares on the upper board be
colored light blue and white; on the middle board, light green and
amber; and on the lower board, red and brown. Each board is the
starting place for pieces particular to its environment; some pieces
cannot move up or down off the board they begin on, but other
pieces can travel between two or even all three boards. The opposing
forces are designated as Gold and Scarlet, with Gold always moving
first.
Setting up
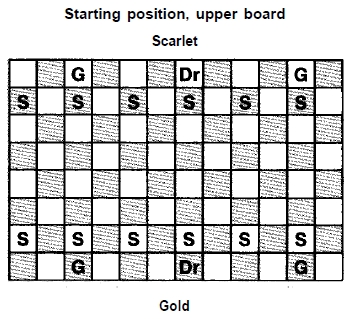
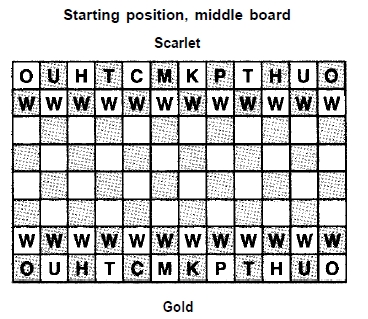
At the start of the game, each player?s pieces are positioned as
shown in the accompanying diagram. Each force on the upper board
consists of six Sylphs, two Griffons, and one Dragon. On the middle
board, each side possesses one King, one Mage, one Paladin, one
Cleric, two Heroes, two Unicorns, two Oliphants, and twelve Warriors.
Each side?s force on the lower board is made up of six
Dwarves, two Basilisks, and one Elemental. In all, there are 42
pieces per side, or a total of 84 pieces in the game.
Notation and terminology
In the following descriptions of how pieces move and capture,
squares on the board(s) are described in algebraic notation, with files
(columns) labeled ?a? through ?l? reading left to right from Gold?s
viewpoint, and ranks (rows) numbered 1 (nearest to the Gold player)
through 8 (nearest to the Scarlet player). A numerical prefix of 1
(upper board), 2 (middle board), or 3 (lower board) designates the
board on which a certain square is located. Thus, ?1a1? is the
square in the near left-hand corner of the upper board, as viewed
from the Gold player?s position, and ?3l8? is the square in the far
right-hand corner of the lower board. Each piece is identified by the
initial letter of its name (?S? for Sylph, etc.) except for the Dragon,
which is identified by ?Dr? to distinguish it from a Dwarf piece.
In all other respects, movement and capture notation is essentially
the same as for standard chess. A full description of this notation
is
given near the end of this text.
Standard chess pieces are referred to frequently in the descriptions
of how DRAGONCHESS pieces move and capture; in such cases,
their names (king, rook, etc.) are not capitalized, while the names
of
DRAGONCHESS pieces are always capitalized. In the diagrams of
movement that accompany the description of each piece, ?M? designates
a square that a piece can move into, if that square is unoccupied
(i.e., no capture is permitted); ?C? designates a square that
can be occupied only if a capture is involved; and ?X? designates a
square that can be occupied either by a capturing or a non-capturing
move.
Because many pieces can move in three dimensions, nomenclature
for movement between squares has been standardized as follows:
?horizontal? refers to a side-to-side move as viewed by the player
moving the piece; "vertical" is a MOVE forward (toward the opponent's
side of the board) or backward (toward one?s own side) along
the file occupied by the piece; and ?up? and ?down? refer to movement
from one board to another.

THE UPPER BOARD
Sylph: The Sylph has a move on the upper
board which is essentially
the converse of that of a pawn. It moves forward only, one
square diagonally either to the left or right, and it can capture a
piece on the upper board which lies directly ahead of it by moving
forward into that square and supplanting the opposing piece that
was located there. Thus, every time a Sylph makes a capture on the
upper board, it changes the color of the diagonal along which it
makes further (non-capturing) moves, from dark to light or vice
versa. Gold?s Sylphs begin the game on the light-colored squares of
the second rank, while the Sylphs of the Scarlet side start on the
dark-colored squares of the seventh rank.
In addition to its movement and capture powers on the upper
board, the Sylph can capture an opposing piece on the middle board
which lies directly below it. This is the only way in which the Sylph
can move to the middle board. It cannot move to, nor make a capture
upon, the lower board. Once located on the middle board, the
Sylph cannot move except to return to the upper board. It may do
this by moving directly upward to the square it previously occupied,
or by moving upward to any of the six starting squares for Sylphs of
the appropriate color. A Sylph cannot capture by means of an upward
move; it must return to the upper board by moving into an
unoccupied square.
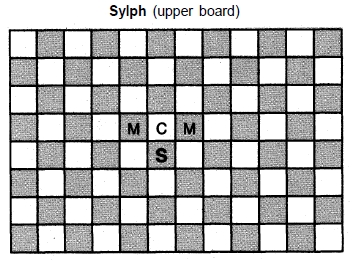
A Sylph located at 3c4 can move to 3b5 or 3d5. It can occupy 3c5
or 2c4 by capturing an opposing piece, if one is located on either
of
those squares. After making a capture at 2c4, the Sylph can move
back to 3c4 on a subsequent turn, if that square is empty, or it can
move up to any unoccupied starting square. For a Gold Sylph, the
legal destinations are 3a2, 3c2, 3e2, 3g2, 3i2, and 3k2.
A Sylph that reaches the eighth rank on the upper board can
move no farther on that board, but retains the power to capture
downward. If such a capture is accomplished, the Sylph can regain
mobility on the upper board by moving up into one of the starting
squares for Sylphs of the appropriate color.
Griffon: Starting squares for the Gold
Griffons are 3c1 and 3k1;
the Scarlet Griffons begin at 3c8 and 3k8. When on the upper
board, a Griffon moves one square horizontally or vertically and two
squares diagonally. Like the knight, it vaults over intervening
squares (even if they are occupied) and only exerts control over the
destination square, not the intervening ones. (This is identical to
the
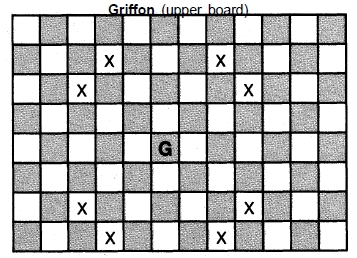
move of the elephant in Korean chess.) A Griffon at 3d4 can move
to or capture a piece at 3a2, 3b1, 3f1, 3g2, 3g6, 3f7, 3b7, or 3a6.
In addition, a Griffon may occupy the middle board by a move
down to one of the four squares on the diagonal from the upperboard
square it started from. (Note that a Griffon located on the
edge of the upper board only commands two squares on the middle
board instead of four.) A Griffon returns to the upper board by a
move to any of the four (or two) squares diagonally above the
Griffon. It can move between the upper and middle boards whether
or not a capture is involved. A Griffon at 3d4 can move to or capture
at 2c5, 2c3, 2e3, or 2e5.
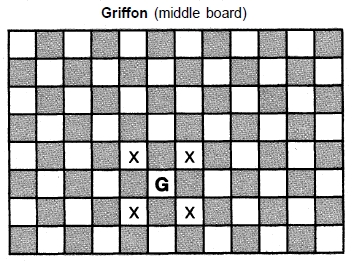
While a Griffon is on the middle board, it forfeits the power of
flight, and as such it can only move and capture in the squares diagonally
adjacent to it. A Griffon located at 2e5 commands all of the
following squares: 2f6, 2f4, 2d4, 2d6, 3f6, 3f4, 3d4, and 3d6.
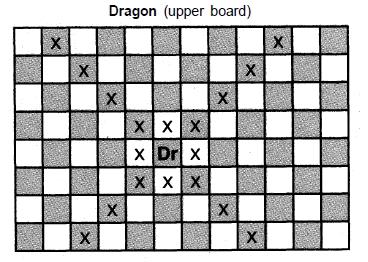
Dragon: The starting square for the Gold
Dragon is 3g1, and the
Scarlet Dragon begins at 3g8. A Dragon?s movement and capture
powers on the upper board are a combination of the moves of the
king and the bishop: unlimited along the diagonals, or one square in
any horizontal or vertical direction. While the Dragon cannot move
downward, it does have the unique ability to capture an opposing
piece on the middle board which lies in the square directly beneath
it
or on any of the squares horizontally or vertically adjacent to that
square. The captured piece is removed from the middle board, but
the Dragon remains on the upper board. A Dragon at 3c4 could
capture ?from afar? an opposing piece located at 2c4, 2c5, 2d4, 2c3,
or 2b4.
THE MIDDLE BOARD
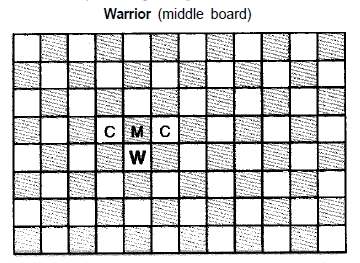
Warrior: At the start of the game, the
twelve Gold Warriors are
positioned along the second rank, and their Scarlet counterparts
begin on the seventh rank. The move of the Warrior is identical to
that of a pawn, except that a Warrior cannot advance two squares on
its first move. The Warrior can move into an unoccupied square
vertically ahead of its location, and it can capture an opposing piece
located on either adjacent diagonal square ahead of it. The Gold
Warrior which starts the game at 2c2 can move to 2c3, or it can
occupy either 2b3 or 2d3 by capturing an opposing piece located on
one of those squares. A Warrior that reaches the opponent?s back
rank is promoted to a Hero, in the same fashion that a pawn is
promoted, However, unlike standard chess, the owning player does
not have a choice; a pawn can be promoted to a queen, bishop,
knight, or rook, but a Warrior can only become a Hero. A Warrior
cannot move to or capture pieces located on the upper or lower
boards.
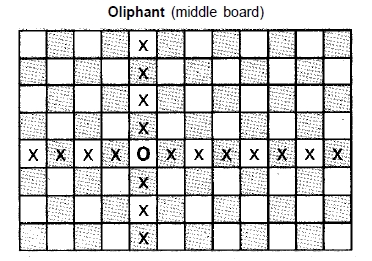
Oliphant: The Oliphants for each side
start on the corner squares
of the middle board ? 2a1 and 2l1 for Gold, 2a8 and 2l8 for Scarlet.
The move of an Oliphant is identical to that of a rook ? that is, as
many squares horizontally or vertically as desired, as long as no
piece interferes with its path of movement. An Oliphant cannot
move to or capture pieces located on the upper or lower boards.
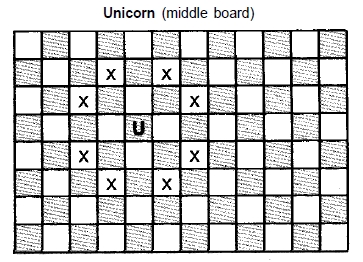
Unicorn: The Unicorns for each side start
on the squares horizontally
adjacent to the Oliphants ? 2b1 and 2k1 for Gold, 2b8
and 2k8 for Scarlet. A Unicorn moves and captures in the same way
as a knight, including the ability to vault over pieces on intervening
squares. It cannot move to or capture pieces located on the upper or
lower boards.
Hero: The Heroes for each side start adjacent
to the Unicorns ?
2c1 and 2j1 for Gold, 2c8 and 2j8 for Scarlet. On the middle board,
a Hero moves either one or two squares in any diagonal direction,
with the ability to vault over an intervening piece on a two-square
move. Capture is accomplished in the same manner.
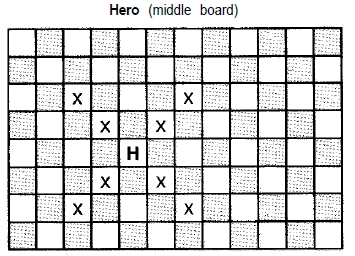
A Hero can also move up or down one board at a time, going to
any square diagonally adjacent to the square directly above or below
its former location. A move back to the middle board is accomplished
the same way. When located on the upper or lower board, a
Hero?s only move is to return to the middle board; it cannot travel
to any square other than the one to which it ascended or descended.
A move from one board to another can involve a capture if so desired.
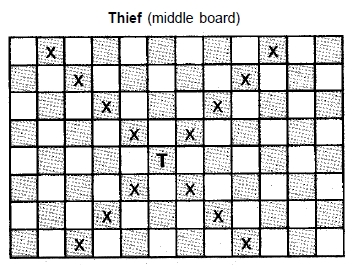
Thief: The two Thief pieces for each side
start the game adjacent
to the Heroes ? 2d1 and 2i1 for Gold, 2d8 and 2i8 for Scarlet. A
Thief moves and captures exactly as a bishop, going any number of
squares diagonally as long as no piece interferes with its path of
movement. It cannot move to or capture pieces located on the upper
and lower boards,
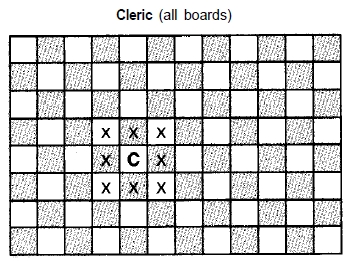
Cleric: The Gold Cleric starts on 2e1, the
Scarlet Cleric on 2e8.
The basic, two-dimensional move of a Cleric is the same as that of
the king: one square in any direction. In addition, a Cleric can
move one square directly up or down, and retains its full movement
(and capture) abilities on both the upper and lower boards.
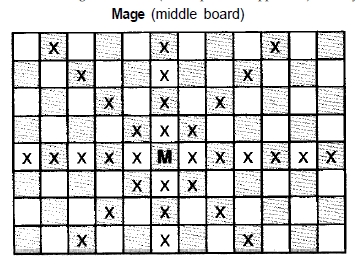
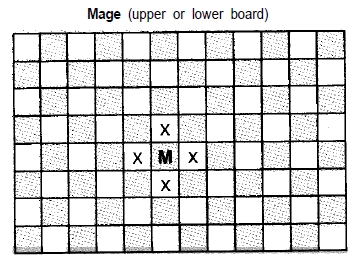
Mage: The Mage for each side starts on the
square adjacent to the
Cleric ? 2f1 for Gold, 2f8 for Scarlet. On the middle board, a Mage
moves and captures in the same way as the queen, able to follow an
unobstructed path in any horizontal, vertical, or diagonal direction.
In addition, a Mage can move (and capture, if applicable) directly
upward or downward across one or more boards. However, a Mage
on either the upper or lower board is limited to a move of 1 square
in a horizontal or vertical direction. A Mage located at 2c4
could
move up to 3c4, and on its next move could go downward 2
boards to 1c4. If the Mage then remained on the lower board,
it
could only move to 1c5, 1d4, 1c3, or 1b4.
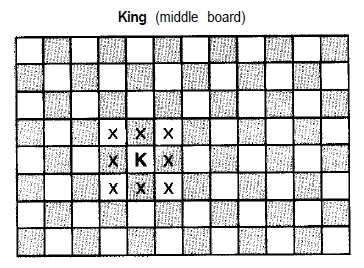
King: The King for each side begins on the
square adjacent to the
Mage ? 2g1 for Gold, 2g8 for Scarlet. The King moves and captures
similarly to a king in standard chess. In addition, the King
may move (and capture) by shifting one square directly up or down.
A King which has moved to the upper or lower board cannot move
upon those boards, and must return to the middle board before it
can again move and capture normally.
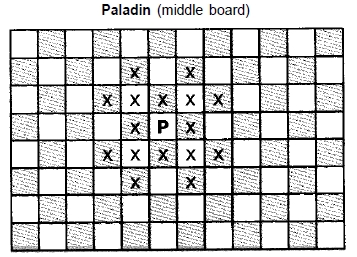
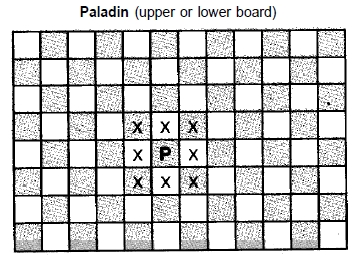
Paladin: The Paladin for each side begins
in the square adjacent
to the King ? 2h1 for Gold, 2h8 for Scarlet. On the middle board, a
Paladin?s movement and capture abilities are a combination of those
of a king and a knight. It can also move upward or downward with a
knight-like move, i.e. one board up and two squares horizontally or
vertically, or two boards up and one square horizontally or vertically,
and it can vault over intervening pieces with this sort of move, just
as if the move did not involve a change of boards. Upon the upper
or lower board, the Paladin is limited to a king-like move (and capture)
of one square in any direction. A Paladin located at 3c4 can
move between boards to any of the following squares: 2c6, 2e4, 2c2,
2a4, 1c5, 1d4, 1c3, or 1b4.
THE LOWER BOARD
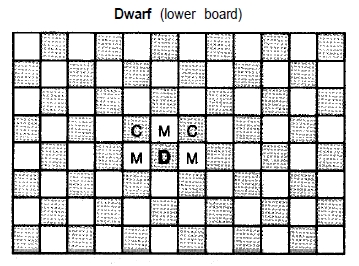
Dwarf: The six Gold Dwarves start on the
dark-colored squares of
the second rank on the lower board; the six Scarlet Dwarves begin
the game on the light-colored squares of the seventh rank on the
lower board. Similar to a Warrior, a Dwarf can make a noncapturing
move one square vertically ahead, and captures ahead
diagonally. In addition, a Dwarf can make a non-capturing move
one square in either horizontal direction, and it can capture an
opposing piece on the middle board that lies directly above the
Dwarf. If a Dwarf moves to the middle board by means of a capture,
it retains the movement and capture powers it has on the lower
board, but a Dwarf cannot move to or capture pieces located on the
upper board. It may return to the lower board by a move directly
down to an unoccupied square; i.e., the downward move cannot
involve a capture. A Dwarf on 1d4 could move (without capturing)
into 1d5, 1c4, or 1e4; it could capture an opposing piece located on
1c5, 1e5, or 2d4. A Dwarf on 2d4 could return to the lower board by
moving to 1d4, but only if that square is unoccupied. A Dwarf that
reaches the opponent?s back rank is limited to horizontal moves on
the board it occupies, and also retains the ability to move between
the lower and middle boards in the manner described above.
Basilisk: The two Gold Basilisks start
on 1c1 and 1k1; the Scarlet
Basilisks start on 1c8 and 1k8. A Basilisk moves one square at a
time, either ahead diagonally or vertically or backward vertically.
It
captures by forward movement only. A Basilisk also has the unique
ability of ?freezing? an opposing piece ? but not a friendly piece
?
located directly above it on the middle board, such that the opposing
piece cannot move until the Basilisk is moved or captured. (This
?freezing? is automatic and involuntary; the player owning the

Basilisk cannot choose not to immobilize the piece, and does not
have to specifically declare that the ?freeze? is in effect.) If the
opposing
King is the piece being ?frozen,? the King is checkmated if
any other piece attacks it and the opponent is unable to capture the
attacking piece or interpose a piece to blunt the attack.
A Basilisk located on 1d4 can make a move or a capture into 1c5,
1d5, or 1e5. It can move to 1d3 if that square is unoccupied, and it
automatically ?freezes? any opposing piece on 2d4, or one that is
subsequently moved into 2d4. A Basilisk cannot move off the lower
board or (with the exception of the ?freezing? power) capture a
piece on any other board.
Elemental: The Gold Elemental starts
on 1g1; the Scarlet Elemental
begins the game on 1g8. An Elemental can move one square
diagonally or one or two squares horizontally or vertically. It captures
only on horizontal or vertical moves. It may move up to the
middle board to make a capture by moving one square horizontally
or vertically and then directly upward. It may remain unmoving on
the middle board if so desired, or it can return to the lower board
by
a reverse of the upward move, i.e., directly down and then one
square horizontally or vertically. The upward move can only be
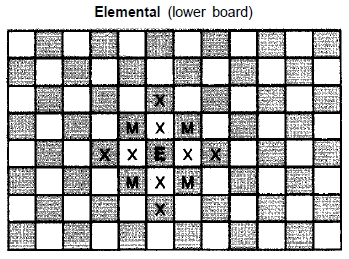
made if a capture is involved, but the downward move can be made
without capturing.
An Elemental on 1d4 can move (but not capture) into 1c5, 1e5,
1e3, or 1c3. It can move or capture into 1d5, 1d6, 1e4, 1f4, 1d3,
1d2, 1c4, or 1b4. It can capture upward into 2d5, 2e4, 2d3, or 2c4.
An Elemental on 2d4 can move or capture downward into 1d5, 1e4,
1d3, or 1c4.
Movement between boards
At first, it may be difficult for players to envision and properly
execute the upward or downward movement of pieces. However,
?thinking in three dimensions? will come easily after one or two
practice games are played. Perhaps the hardest single concept to
grasp is the idea of intervening squares on moves from one board to
another. The general rule is this: If a piece is unable to vault over
intervening squares in its basic (two-dimensional) move, then it is
likewise unable to move between boards if a piece blocks the path it
must take. Specific applications for particular pieces are as follows:
The Griffon, the Hero, and the Paladin all have the knight-like
ability to vault intervening squares, and this applies on any upward
or downward move made by those pieces. (The square directly
above or below the piece in question need not be vacant.)
The Mage can move from the lower board to the upper board (or
vice versa) in a single move, but it cannot vault intervening squares.
Thus, in order for the Mage to travel upward from 1d4 to 3d4, the
square at 2d4 must be vacant.
The Elemental is something of a special case. Its move between
boards is a two-step process, and it cannot vault over intervening
squares. Its upward move begins with a shift of one square horizontally
or vertically on the lower board; thus, at least one of the
squares horizontally or vertically adjacent to the Elemental must be
vacant in order for it to make an upward move. The Elemental is
even more restricted when moving down from the middle board;
since the horizontal or vertical move is preceded by a move directly
down, the square immediately beneath the Elemental must be vacant
in order for it to make a downward move.
Chess rules that do not apply
Two conventions of standard chess are not part of the DRAGONCHESS
rules. The Warrior is unable to move two squares ahead on
its first move, and as such it is not possible for a Warrior to capture
en passant as a pawn does. Also, because of the multiple boards,
greater area of play, and larger number of men, castling is not possible
in DRAGONCHESS.
Values of the pieces
The complexities of multiple-board play and the varying powers
of the pieces in DRAGONCHESS makes absolute valuation far
more difficult than it is for standard chess pieces. In chess, a pawn
is
valued at 1, knights and bishops at 3, rooks at 5, and the queen at
9.
(If the king were not of infinite value, its movement and capturing
power would give it a value of 4.) The approximate relative values
of
the pieces in DRAGONCHESS is detailed below, to give players an
idea of which exchanges are beneficial and which are not. For instance,
the trade of a Hero for a Griffon is roughly an even exchange,
while the trade of a Basilisk for an Oliphant will generally
result in a material advantage for the player losing the Basilisk.
However, it should always be kept in mind that the true ?value? of
a
piece in any game situation depends primarily on the piece?s location
and its role in the game, rather than on its theoretical movement
and capture powers.
| Piece | Value |
| King | ** |
| Mage | 11 |
| Paladin | 10 |
| Cleric | 9 |
| Dragon | 8 |
| Griffon | 5 |
| Oliphant | 5 |
| Hero | 4.5 |
| Thief | 4 |
| Elemental | 4 |
| Basilisk | 3 |
| Unicorn | 2.5 |
| Dwarf | 2 |
| Sylph | 1 |
| Warrior | 1 |
** -- In practice, the value of the King is infinite, since the loss
of
this piece means the loss of the game.
Movement and capture notation
The method of recording moves in DRAGONCHESS is basically
the same as for standard chess, with certain differences (explained
earlier) to account for the different names of the pieces and the
multiple boards. The following examples cover all the situations that
could occur in a game:
| 1) | w2f3 | A basic non-capturing move; notation 1 is the
first non-capturing move that the Gold Warrior starting at 2f2 can make. (Read it as ?Warrior moves to 2f3.?) In most cases, a non-capturing move can be noted simply by naming the type of piece being moved (W) and the square it moves to (2f3). When more than one piece of the same type is capable of making the same move, the moving piece is specifically identified by naming the square it is moving from, using a ?/? to indicate ?at.? (Read notation 2 as ?Sylph at 3e2 moves to 3d3.?) In this notation, a hyphen is used to separate the location square from the destination square. |
| 2) | S/3e2-3d3 | ^^ |
| 3) | W2e3 | 5 ways of describing a capture; the correct
notation depends upon the position of the pieces and, to some extent, the preference of the players. Notation 3 can be used if only 1 Warrior is capable of moving to 2e3, and if that move involves a capture. |
| 4) | WX2e3 | ^^
Notation 4 is more specific, using the "x" to indicate a capture. (Read as "Warrior captures (unspecified piece) at 2e3). |
| 5) | W/2d2x2e3 | ^^
Notation 5 is necessary when more than one Warrior would be capable of making a capture at 2e3, again using the "/" (as in notation 2 above) to indicate "at." (Read as "Warrior at 2d2 captures at 2e3. |
| 6) | WxU2e3 | ^^
Notation 6 includes the identification of the type of piece captured -- in this case, the Unicorn located at 2e3. |
| 7 | WxU | ^^
Notation 7, read simply as "Warrior captures Unicorn," can be used if only one such capture is possible. In most cases, the proper notation would be 4, 5, or 6, or a minor variation on one of those. The important thing is to describe each move in such a way that the notation could only refer to one specific move by one specific piece. This will avoid possible confusion if the moves of a game are to be studied or replayed. |
| 8) | W2f8(H) | The move and promotion of a Warrior. (Read as
"Warrior moves to 2f8 and is promoted to a Hero.") |
| 9) | Drx2c4 | A capture "from afar" by a Dragon. (Read as
?Dragon captures (unspecified piece) at 2c4.?) To avoid the awkward ?Drx? usage, this move could be written as ?Dr2c4? since any move by the Dragon involving a square on the middle board must necessarily be a capture ?from afar.? |
| 10) | UxOch | Illustrating the use of ?ch? to indicate a move
that puts the opposing King in check. (Read as ?Unicorn captures Oliphant with check.?) |
| Other symbols | dbl ch
dis ch mate |
These three terms, taken from standard chess
notation, indicate certain special occurrences. Double check (dbl ch) occurs whenever a move enables one or more pieces to give check at the same time. Discovered check (dis ch) occurs when the move of one piece opens a path that enables a different piece to give check. And ?mate,? of course, is checkmate ? noted on the final move of a game, when the King is attacked in such a way that it cannot avoid being captured on the attacker's next move. |
No special notation is given for the Basilisk?s ?freezing? power,
since it is not technically a move or a capture, and since it is automatically
assumed that any piece occupying the square above the
Basilisk is frozen. Thus, a notation of B1e3 makes it clear that (a)
the Basilisk now occupies square 1e3 and (b) any opposing piece
located at 2e3 is thereby immobilized as long as the Basilisk remains
where it is.
Strategic and tactical tips
No single piece of text ? even one many times longer than this ?
could fully describe and analyze the myriad positions and situations
that can occur in DRAGONCHESS. However, some general strictures
are apparent from an examination of how the various pieces
move and capture, and certain basic facts of chess strategy apply
equally to DRAGONCHESS.
Mobility is all-important, and, just as in chess, control of the
central squares is usually a prerequisite for victory. The rectangular
board of DRAGONCHESS makes the ?central squares? area somewhat
more difficult to define than it is in chess ? but it certainly is
a
larger area. It could be described as a 2x6 rectangle with 2d4, 2d5,
2i5, and 2i4 as its corners; or, a 2x8 rectangle extended out on either
side; or, a 4x4 rectangle in the center of the middle board. In any
event, the side that does the better job of controlling the center
squares will have a greater amount of mobility and will more easily
be able to bring pieces to bear upon critical squares anywhere on the
playing surfaces.
In many instances, the square that a piece stands on is not as
important as the squares that the piece controls. Players should be
mindful of moving their pieces into positions where they command a
large number of squares, thereby limiting the opponent?s ability to
occupy those same locations.
In general, it is wise not to bring the ?big guns? (particularly the
Mage and the Paladin) into active positions until some of the minor
pieces have been developed. Making a lot of moves with the Mage
(for instance) early in the game is usually a bad idea, because this
delays the development of other pieces that could have been moved
out instead, and because this could subject the Mage to a series of
harassing attacks from the opponent?s minor pieces ? which are
being developed at the same time that they are doing the harassing.
(In chess, this phenomenon is known as a ?queen hunt,? and it has
led to the downfall of many a player who had visions of ravaging the
opposition with sweeping moves of the queen ? but instead ended
up without a queen to move.)
It is no accident that each side?s Dragon begins the game directly
above the King of the same side. While the Dragons are obviously
powerful offensive pieces, each must play predominantly a defensive
role to begin with ? for if one Dragon sallies forth on the upper
board to wreak havoc upon the opponent?s middle-board pieces, the
King may be left vulnerable to a quick but deadly attack from the
opposing Dragon.
The power of the Basilisk to immobilize an opposing piece has a
lot of potential for use in offensive and defensive strategy. To help
protect one of your own pieces, move it to the square above one of
your Basilisks. Then, if it is captured, the capturing piece is ?frozen
? and you can capture it more or less at your leisure without
necessarily having to make the return capture immediately. A welltimed
Basilisk move can lead to an abrupt checkmate even if the
opposing King is not the piece that is frozen, in a case where the
Basilisk immobilizes a piece that was crucial to the defense of the
King. Except for the fact that it occupies a square on the board, an
immobilized piece can be treated as if it did not exist. An immobilized
Mage may be better than no Mage at all ? but not by much.
In general, the pieces on the lower board (especially the Dwarves)
do not play critical roles in the opening or the middle game, but if
the Dwarves haven?t already been moved too far forward, they can
be very useful in the endgame (when relatively few pieces remain on
the board) as defensive outposts, to prevent the opponent?s middleboard
pieces from penetrating too deeply into the territory nearest
your side of the board.
Do not underestimate the power of the Cleric. Of the five types of
pieces that can move up or down to any of the three boards, the
Cleric is the only one which moves and captures in the same fashion
regardless of which board it occupies. The Paladin and Mage are
limited in their mobility when not on the middle board, to such an
extent that they will not generally spend much time on the upper or
lower board ? and the Heroes and the King, although they can
move to the upper or lower board, cannot move on those boards,
and the King especially can be easily trapped if left on the upper
or
lower board for any longer than necessary.
Putting together a game
For reasons that should be obvious, this presentation could not
include actual components for a DRAGONCHESS game ? making
a board and filling it with pieces must be left up to you. For our
playtesting and development purposes, we constructed a board from
sheets of plexiglass with contact paper applied to form the checkerboard
patterns. The boards were spaced approximately six inches
apart, allowing enough room for hands to reach in and manipulate
pieces. The squares on our board are 1½? on a side, making a
playing surface 18? wide and 12? deep. The plexiglass sheets were
cut large enough to allow another 1½? all around, and had ¼?
holes drilled in each corner. Through these holes we inserted
threaded metal rods, fastened into place with connectors to space the
boards properly and capped on each end with plastic knobs to prevent
scratching the surface on which the entire board is placed during
play. It probably isn?t necessary to build a three-dimensional
board; three flat rectangles placed in a row on the tabletop could
be
used to represent upper, middle, and lower levels. But it?s a lot
easier to visualize the up-and-down moves of pieces if the playing
surface is actually composed of three levels.
The pieces came from our collection of metal miniatures, and they
do not in all cases exactly resemble the pieces they represent. (For
instance, we used centaur figures for Oliphants because we couldn?t
find any 25mm scale elephants ? and even if we could have, they
would have been too large for the board.) Any sort of pieces will do,
even simple tokens, as long as each type of piece looks distinctly
different from the others.
Good luck, and may all your moves be ones that Rexfelis would
envy. . . .
AUGUST 1985
No set plans
Dear Editor,
My friends and I are very interested in Dragonchess
(issue #100), and we are wondering if a
set will soon be on sale in hobby shops or other
stores.
Greg Della Rocca
Castleton, N. Y.
(Dragon #102)
I'm sorry to report that, as of this writing, I
know of no plans to produce Dragonchess for sale
as a separate product. We talked about it when
the rules were being produced for publication in
#100, but decided pretty quickly that we wouldn?t
be able to have the board and the pieces manufactured
for anything less than a small fortune ?
which means we?d have to charge you a medium-sized
fortune to buy it.
To do it right (which is, I hope, the only way
we would consider doing it), we?d have to include
84 specially designed metal miniatures ? and
you know what it costs to buy one or two figures.
(The figures we used to assemble our playtest set
would have cost more than $100 if they were
purchased individually) We?d have to produce
components for a board that would be both big
and strong. (The ¼-inch plexiglass we used for
each board level seemed like it would be sturdy
enough, but it developed a permanent sag in the
middle when all the pieces were arrayed on it.
And the raw materials we used for our board cost
about $25 ? not including the cutting that had to
be done and the holes that had to be drilled.)
Of course, it would be possible to massproduce
playing pieces and board components for
substantially less than what it cost to make our
playtest set. But I think we?d still be talking about
a product that would carry a pretty hefty price
tag. . . too hefty, I fear, for us to consider foisting
on you. -- KM
Dragonchess
To the readers.
We expected that people would have questions
about Dragonchess, and we were right. Some of
the rules weren't expressed as clearly as they
could have been, apparently, and a couple of
mistakes have come to light that are downright
humiliating for this Embarrassed Editor to admit.
Here's a rundown of answers that should clear up
most people's confusion.
The numerical prefixes in the "Notation and
terminology" section should have been given as 3
(upper board), 2 (middle board), and 1 (lower
board) to be consistent with the usage throughout
the rest of the article. Even though this was the
most embarrassing mistake, it was fortunately
also easy to figure out . . . wasn?t it?
The list of pieces given in the section under
"Setting up" does not mention that each side has
two Thieves.
The Dragon's "capture from afar" ability left
some people up in the air. This capturing ability
only applies to the square directly beneath the
Dragon, plus the 4 squares horizontally and
vertically adjacent to that square. A capture from
afar can only be made as a move unto itself; the
Dragon cannot move to a square on the upper
board and capture a piece on the middle board in
one continuous action, which means that a piece
in jeopardy beneath the Dragon has an opportunity
to get away. Only one piece can be captured
from afar on a single move.
Now, down to the lower board. The Basilisk
cannot ?freeze? an opposing piece that moves
through the square above it; the freezing power
only applies to a piece that occupies that square
or is moved into it. The Elemental?s move between
boards was described as a two-step process
only to emphasize the fact that the intermediate
square it moves through must be empty in order
for the Elemental to be able to move in this
fashion; this was not meant to imply that the
move between boards is actually two separate
moves that must be taken on successive turns.
We?re in the process of collecting observations
about strategy and tactics and hope to eventually
combine them into a followup article, perhaps
including scores from exciting or interesting
games that you?ve been involved in. Keep sharing
your thoughts with us, and help us make the
game as good as it can be. -- KM
(Dragon #102)
Game of kings
Dear Dragon:
I just got a back issue of DRAGON Magazine
issue #100 and I liked the DRAGONCHESS
game. I intend to make a board and obtain the
pieces so that I can play without using pieces of
paper with the names of the pieces written on
them. Would it be possible for you
to send me a list of the miniatures you used for
your game? Im not able to get many miniatures
and I assume that you had picked the best
figures available. Could you also tell me if any
combination of sets would give the same results,
and if so, which ones?
In issue #102 in the Letters section, Kim
Mohan said that TSR, Inc., doesnt intend to
produce the DRAGONCHESS game due to the
cost and construction problems. Ive got a
suggestion: make plastic figures and use ¼
Plexiglass with reinforcing bars crosswise
underneath. The crossbars should provide
enough strength to prevent sagging (even with
the lighter plastic figures) and keep the board
from flexing.
If the above suggestion doesnt work, I
thought that a computer DRAGONCHESS game
could be a lot of fun. You could switch between
the three boards and also have an overall view
from all three boards side by side. This feat of
programming is beyond me but perhaps someone
else could design it. It might be just like
playing three interlocking Sargon games.
Emil Leong
Los Angeles CA
(Dragon #122)
Im afraid we dont have a list of all the pieces
used in the DRAGONCHESS game set that Kim
and others used to playtest the game, though a
Forum piece by Boyce Kline (issue #119,
page 6)
gives some of his suggestions on this topic.
We are printing your suggestion on the use of
Plexiglass for possible use by other gamers. A
computerized DRAGONCHESS game would be a
horror to develop; TSR, Inc., is not likely to
tackle this project very soon. Good luck with
your own set, however! Roger Moore
D-Chess I
Dear Dragon:
I just received [DRAGON®] issue #122 and
read the letter from Emil Leong about the
DRAGONCHESS game -- and your comment
about a computerized DRAGONCHESS game
being a horror to develop. You were only partially
correct. Ever since issue #100, when you
introduced that game, I have tried to develop a
computerized version of it on my Apple IIc
computer because I liked the idea of the game
but didn't like the work involved in setting it up.
So far, I have a semi-finished version that is
playable only by two people who know how to
play the game. The basic design of the game
was easy to create because it was given in the
article, but putting the mechanics in the computer
was hard.
You are correct about it being a horror to
develop; it has taken me almost two years to get
this far, but things are going along nicely. If
anyone who knows about Apple computer
programming and how to play DRAGONCHESS
games has any advice, it would be greatly
appreciated.
Paul Van Horn
Rochester NY
(Dragon #128)
We can pass on comments and questions on
the DRAGONCHESS game through this column
or through the Forum, or if writers enclose
postage and a letter, we can send them on to
other writers. Interest in Gary Gygaxs imaginative
game continues to be shown, as witness the
following letter:
D-Chess II
Dear Dragon:
I?ve just read DRAGON issue #122 and Emil
Leong's letter concerning the assembly of his
own DRAGONCHESS set. Since my letter in the
Forum section in issue #119 (page 6) concerning
some of the pieces used to assemble my own
set, I have completed constructing my own set
of figures. I carefully selected each piece and
think they represent the best miniatures available.
Some (such as the king, basilisks, sylphs,
and griffons) were the only examples of these
figures I was able to find.
For Emil Leong and anyone else who wants to
put together his own DRAGONCHESS game,
here are the figures that I used, showing the
game piece name, number of figures needed,
the figure pack providing the figure, and the
number of packs you?ll need to purchase:
Dragons (2): Grenadier Models #2505: "Green
Dragon" (2 packs)
Oliphants (4): Ral Partha Personality Miniatures,
#01-099: "Armored Giant on War Elephant
" (4 packs)
Thieves (4): Grenadier Models #193: "Thieves"
(2 packs)
Clerics (2): Grenadier Models #142: "Clerics" (2
packs)
Basilisks (4): Grenadier Models #1501: "Monster
Manuscripts, Vol. 1" Figure MM4 (4 packs)
Elementals (2): Grenadier Models #1503: "Monster
Manuscripts, Vol. 3" (2 packs)
Dwarves (12): Grenadier Models #1603:
"Dwarves, Army of the Gold Mountain" (1
pack), and Grenadier Models #189: "Dwarf
Champions" (1 pack)
Unicorns (4): Grenadier Models #160: "Unicorn
and Maid" (4 packs)
Paladins (2): RAFM Miniatures #3804: ?Odo,
Warrior Cleric? (2 packs)
Heroes (4): RAFM Miniatures #3810: "Charles
the Great, Paladin" (4 packs)
Warriors (24): Grenadier Models #1601: "Foot
Knights, Army of the Dragon Lords" (3 packs)
Mages (3): RAFM Miniatures #3801: "Nimrod,
The Bold Wizard" (2 packs)
Sylphs (12): Grenadier Models #120: ?Winged
Folk? (4 packs)
Kings (2): Grenadier Models "Wizzards and
Warriors" Double Blister Dioramic Sets #WS4:
"The Royal Court" (2 packs)
Griffons (4): Grenadier Models #6004: "Monsters
of Mythology" Figure M9 (4 packs)
The basilisk, elemental, and griffon figures
each come with nine other figures not needed
for the DRAGONCHESS game. You can write to
Grenadier Models and ask to buy just the one
figure that you need from each set. I bought my
griffons this way for only $1.50.
I hope that this helps anyone putting together
a DRAGONCHESS game set of their own. Maybe
it will save them the three months it took me to
put together my own set.
Boyce Kline
Ledyard CT
(Dragon #128)
Readers who wish to order these figures
directly from the companies making them may
use the following addresses:
Grenadier Models, Inc.
P.O. Box 305
Springfield PA 19064
(215) 583-1105
RAFM Company
19 Concession Street
Cambridge, Ontario
CANADA N1R 2G6
(519) 623-4832
Ral Partha Enterprises, Inc.
5938 Carthage Court
Cincinnati OH 45221
(800) 543-0272 toll-free
(513) 631-7335 in Ohio
The Grenadier figure pack WS4: The Royal
Court, has been reissued as #2021: The Throne
Room. All other figures and figure packs are
available as of this date (November 1987). Call
the companies involved for their prices, or
check for them at your nearest hobby and
games shops.
The TSR Mail Order Hobby Shop has the
figure packs named above for the dragons,
oliphants, basilisks, elementals, sylphs, and
griffons (The Mail Order Hobby Shop, P.O. Box
756, Lake Geneva WI 53147). Good luck!
2. THE FORUM
I am currently putting together
my own
DRAGONCHESS game in
accordance with the
article by Gary Gygax in
DRAGON
Magazine
#100
(August, 1985). I noticed in the section
of the article labeled "Putting
together a
game," that you could
not find 25mm elephants
for Oliphants and had to
resort to using centaurs.
While it was difficult, I
managed to find
25mm elephants that would
not be too large for
a game. Ral Partha
Enterprises produces a
25mm elephant for their Personalities
series,
"Armored Giant on War Elephant"
(catalog #012-099-099).
For my set, I simply do not
put the
giant on the elephant and
the figure looks great
for the game. Syphs
can be found in Ral Partha's
"Winged Folk" Blister pack,
and other
hard-to-find figures can
be foufnd in Grenadier
Models kits (Fantasy Lords
#6004 for griffons,
and the Monster Manuscript
series for such
exotic creatures as basilisks,
elementals, and
unicorns). I hope this
letter helps you improve
your DRAGONCHESS game set
at TSR, Inc., and
benefits any other readers
of the magazine
trying to put a set together.
Boyce Kline,
Ledyard, CT
(Dragon
#119)
Quote:
Originally Posted by Nagora
That reminds me of Dragonchess.
I actually programmed my computer to play Dragonchess at the time when
the rules were printed in Dragon #100 but the technology of the time meant
that even a 3-ply search took something like 45 minutes, and with no openings
book, that was for every move right from the start. That was too long to
wait for a fairly poor level of challenge so I gave up on it and made a
set with the boards layed out on the table in 2D. A bit of practise allowed
us to map the boards up and down by eye okay and I had a few games with
my friend Paul. I might have another go at writing a program; my computer
might actually be up to it now.

The Dragonchess game
gets a fair but of coverage on the Chess Variants boards.