| - | - | - | - | - |
| Dungeons & Dragons | Advanced Dungeons & Dragons | - | Dragon magazine | The Dragon #36 |
Many of the figures you buy for fantasy gaming are not quite in the
position you want them. As you go further into miniature modelling,
this
will be more and more irksome. Without being able to change your
figures, you may have to paint up miniatures that arent the way you
want them.
Actually, minor alterations are fairly easily done. This article will
discuss basic, simple reanimations that can add to the variety of your
miniature set, and require no special tools. It will do so in the context
of
the skeletal undead.
Skeletons used to be a bit scary to me. Going to museums and
seeing the bones of great mastodons and reptiles was spooky, even
though I knew they couldnt hurt me. Human skeletons were even
spookier; they always seemed a bit threatening. Skulls were especially
weird, with their dark, empty eye sockets and eternal grins.
But in order to get to the bare bones of things, you have to understand
skeletons. Their bones are the basic structure on which all else is
hung. Bones give support to the muscles and flesh, and determine
balance and proportion.
My own mistrust of skeletons evaporated in a physical anthropology
class. There I met a fellow who believed that beauty is much more than
skin deep. He thought that Marilyn Monroe must have had a particularly
beautiful skeleton. After I stopped laughing, I had to admit that perhaps
he was right. After all, every beautiful woman I have ever known had
a
skeleton inside her. So do you.
All art students who wish to draw people must first learn about the
skeleton, and medical students agonize over the Latin names for your
bones. A miniature painter needs only to know that de head bones
connected to de neck bone, but a little more knowledge in this area
is
essential to being able to modify miniatures. Skeletal figures will
be
extremely useful in D&D in their own right, since skeletons
are fun to
have around to throw at adventurers that do not have Clerics with them.
All the best families have skeletons in their closets, and you should
have
a few in your fantasy miniature collection.
The reason behind needing to know skeletons is that any miniature
will look ill-proportioned if it doesnt have its arms, legs, and head
in the
tight place, at a reasonable angle, and of properly proportionate length.
If you know dem bones, youll never make mistakes by proportioning
miniatures wrong. This article will use a particular set of miniatures
as an
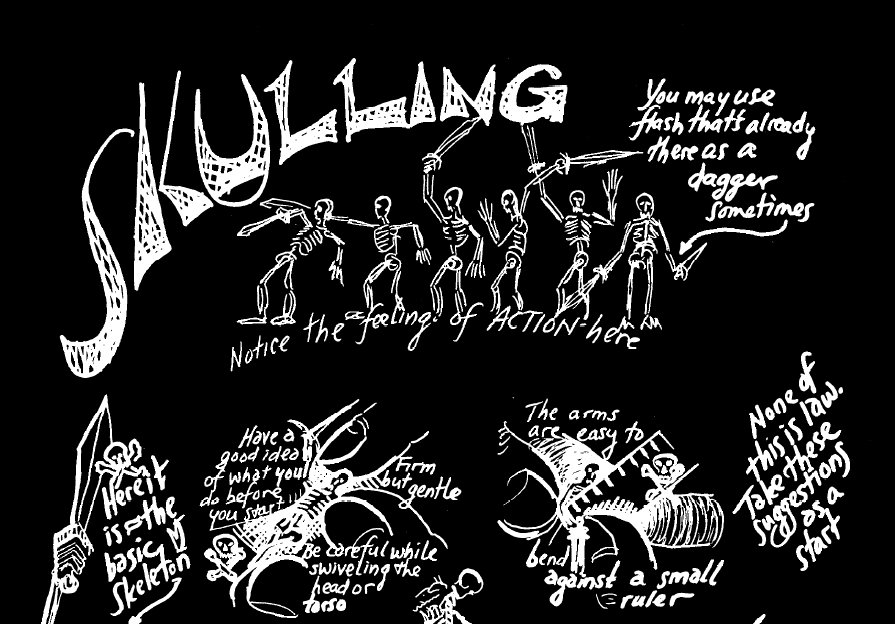
example: Grenadier set #W-51, Skeleton Warriors. <x>
When I first looked at this pack of figures, I was a little disappointed.
There they were: six figures exactly alike. The minor anatomical problems
could be easily overlookedafter all, these were fantasy miniatures
and were less than 1 tall. But how could anyone live with
regimented undead? Tenshut! Forward, Stagger! (Rattle, shuffle,
rattle, rattle, rattle) Those skeletons were much too orderly!
They
probably didnt have a brain in their head.
Yet the Grenadier figures are close to ideal for alteration. Because
of
their construction of soft metal, and the fact that there was no clothing
or
flesh to give problems, the figures are easily altered. The basic skeleton
is
illustrated on the accompanying instruction page-hand to side, sword
raised, jaw open. Not a pretty prospect, but even worse when there
are
six all alike. You only need your hands to modify these guys-but
possibly a small metal ruler or pliers will come in handy to increase
your
leverage. Youll want to leave at least one piece in its initial pose
so you
can show it to admiring friends and say: See, they all looked like
this
when I started.
Dont clean off the flash before modifying: it will give a bit of extra
strength to the areas you are bending and can be removed later. A lucky
bit of flash could give you the opportunity of making a dagger if you
wish. Start off by filing or sanding the bases flat. This will allow
you to
stand them up easily during the process to come. When the bases are
flat, you can start bending the figures. This is called reanimation.
Remember that although the metal casting will try to bend in a
curve, a bone would not bend that way, so youll have to take care.
The
arms are the most important part to bend. By putting arms in a different
position, you can radically alter the visual impact of a skeleton.
Some
possible reanimations which affect only the area above the hip bones
are illustrated. In order to assure a clean, straight bend, put a brace
at the
bend point. Almost anything that is small and strong, such as a small
steel ruler, will do. You could also use your small pliers to do thisand
have a much easier time of it.
Dont push too hard on the arms, especially if you begin to feel metal
fatigue. When the metal begins to bend really easily it has become
fatigued and will snap. Oops! Too much? Well, read on, and Ye
Fantasysmith will tell you how to fix it right up.
Torsos and heads can be bent around to give a new position; just
incline them as you wish, and swivel them a bit Watch out for that
metal
fatigue, though. Its deadly to undead miniatures.
If youre careful enough, youll hardly ever need the repair tips that
follow. But you still should know them. In one case, a casting from
my
set of figures simply did not have a left arm. This is the same circumstance
that occurs when you snap off an arm. To save the casting, glue a
cardboard shield to the stump that remains, and hopefully no one will
be the wiser. Use a simple rectangular shield. This is not only easier
to
cut out, but matches the Roman short sword the skeletons carry.
If there hadnt been a stump big enough for attaching the shield,
youd need more tools to save the casting. Take a small twist drill
and
put a hole into the ribcage right about where the arm socket would
have been. Then get a small piece of copper or other soft wire ready
to
glue into the hole. Shape the wire and flatten the forearm with a
file
before gluing the shield on. Shaping means that you will not have to
put
any pressure on the glue joint. The flattening means that youll have
more surface to attach the shield to and, because the wire is roughed
up,
the glue will adhere better. Now glue the shield onto the wire, let
it dry,
then glue the whole thing into the arm socket you drilled previously.
If the right arm (which holds the weapon) breaks off, youll have to
modify around the breakage. Right arms are not too hard a problem,
and require much the same method as the left arm. You start off by
gluing the forearm and weapon to the wire instead of a shield. This
is a
bit trickier and will require more skill; a method is illustrated on
the
instruction page. Human forearms have two bones so that the hand can
swivel about 270 degrees. The hand and weapon are on the end of the
forearm. This makes for a complicated shape, so it is always easier
to
save the broken piece and use it rather than trying to build the arm
from
scratch. If you get a casting without a right arm, you can always make
that skeleton into a left-handerits easier than fabricating the arm.
Any skeleton with a trick back needs all the help it can get Start by
gluing a support between torso and hip bone. The flat end of a toothpick
will do nicely. Use epoxy cement to attach the toothpick to the torso.
After that has dried, glue the entire thing to the hip bones. With
this kind
of support, it is best to have the skeleton facing directly forward
so as to
get the maximum area for the glue to hold. After de back bone
connected to de hip bone again, you have the same problem that
Richard Nixon had with his skeletonscoverup. Really now, you
wouldnt your skeleton to develop an inferiority complex when all its
buddies called it toothpick back, would you? Get over this problem
by improvising a ragged cape.
Take some very light cardboard or heavy paper, the thickness of an
old Dragon cover, to make the cape. Cut out the paper in a rough
cape
shape with ragged edges. Weaken this a bit by rolling it on a pencil
and
make folds for the neck and shoulders where the cloth would naturally
fall over the bones. Working the cape will make it fall into a drape
shapenow keep it in shape by strengthening the entire cape with glue.
Moisten the cape and skeletons back thoroughly with your favorite
quick-drying cement and hold it in place until it sets up. Presto!
a
skeleton with some shreds of dignity.
Now youre ready to paint. Here are a few hints. Bones normally
bleach white, but would usually have darker parts. Use a light flesh
color
to indicate these parts by giving areas like the rib cage, forearm,
and
lower leg a base coat of flesh color or darker shade first. Then dry
brush
some white over the bones. The skull is all white, of course, but shading
is necessary around the temples and jaw. Eye sockets, nose and mouth
cavities are often painted black, but a dark brown will be more effective.
An interesting effect is created by putting a tiny dot of red directly
in the
middle of the eye cavity. If this proves to be too difficult for you,
though,
forget it.
Swords, of course, will be nicked, dull, and rusty. A quick shot with
knife or file can nick the swords quite convincingly. If you do not
have a
dull silver or gunmetal color, put a black wash over your normal
silver
paint after it dries. This will do nicely. As a last detail, a small
bit of red
orange color on the blade with indicate rust Any capes you have added
will have to look old as well as tattered, so mix grey with any color
you
choose, and give it a wash of lighter grey as a finisher. You can paint
in
the smallest tatters, holes, and frayed edges with black if you wish.
The degrees of difficulty and what they mean
| This article is an introduction to alteration of miniatures, and
covers reanimation and adaptations. The alterations below are defined as they will be used in future columns. They have not been defined exactly this way before. This series of definitions was needed to differentiate a progressive increase in complication of operations, and increasing use of tools and skill. The definitions do not include putting together kits, but only changing some aspects of a standard one piece miniature. CONVERSION: Use of one figure to represent another type
REANIMATION: Minor alteration of a figures appearance
ADAPTATION: Minor additions and changes to a figure
MODIFICATION: Major alteration of figure requiring considerable
SCRATCHBUILT: Rather than an alteration of a figure, this
|