Build your own cardboard castle
A grand tour
by Arthur Collins
-
-
| - | - | - | - | - |
| From concept to cardboard | How it all goes together | - | - | - |
| Advanced Dungeons & Dragons | Castles | - | Dragon magazine | The Dragon #86 |
The original name of this awesome structure
was The High Keep of the Grand
Chapter of the Order of St.
Raphael. Since
that was a little too elaborate for everyday
use, the castle became known as Great
Stoney. It is a fortified monastery, such as
might be maintained by a band of ecclesiastical
knights or an abbot who is also a temporal
lord. While not a large castle in terms
of area covered, it is quite tall and very well
built, easily capable of housing a great
number of folk of all degrees. The main
chapel has a seating capacity of about 330,
taking the balcony into consideration.
Great Stoney was designed to provide
maximum security for its inhabitants without
having to depend upon any natural
defenses of the terrain. It is assumed that
Great Stoney sits upon open meadowlands,
surrounded by the fields that feed the monastic
community. The surrounding area
has no hills, cliffs, lakes, or other outstanding
features to enhance the defendability of
the castle. Therefore, it was built as concentric
rings of stone, each part?s defense easily
supplemented by others, affording easy and
rapid communication of forces within its
perimeter.
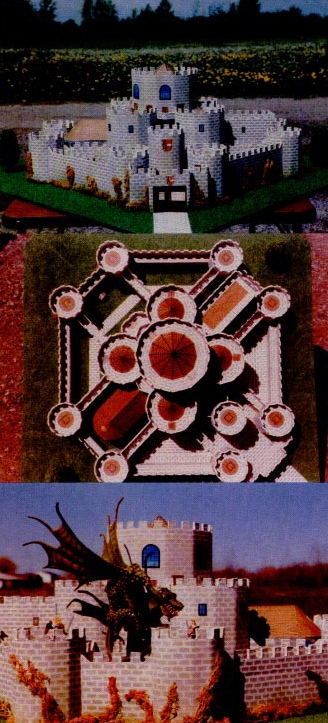
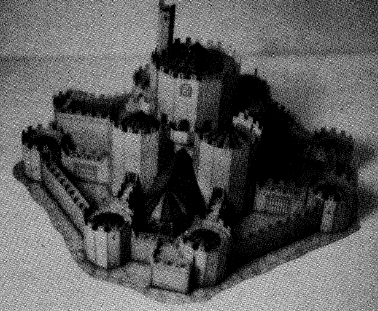
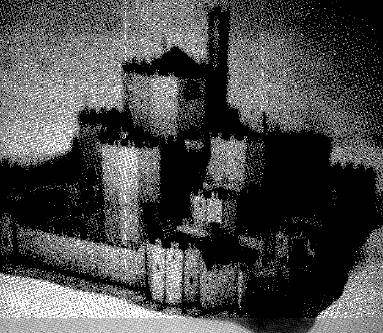
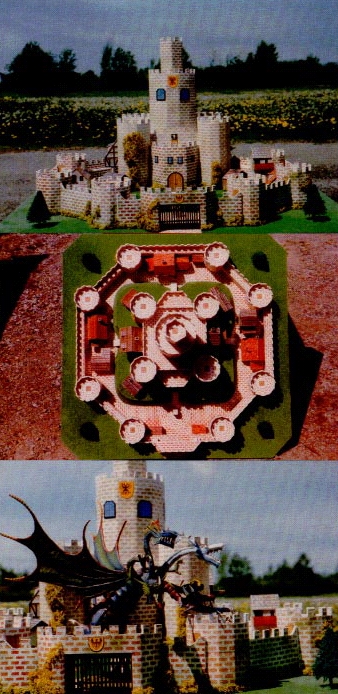
| The castle as
seen
from the rear. The most prominent features in the foreground are the postern gate along the outer wall and the chapel with its sharply angled timber roof and stained-glass windows.
|
Complete instructions and
floor plans inside
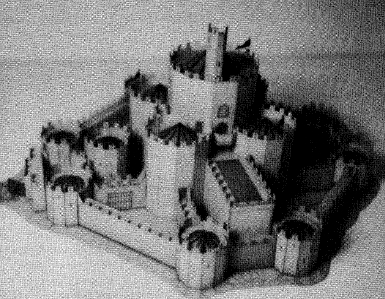
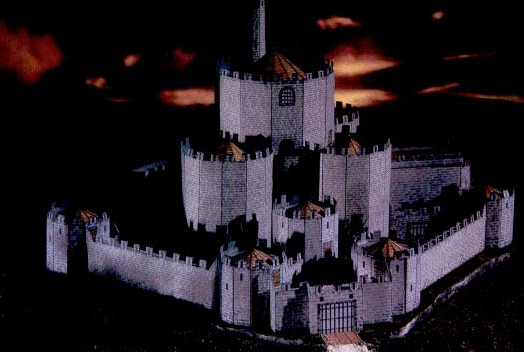
| This view of Great
Stoney shows the main gate in profile, with the drawbridge lowered to an almost-horizontal position. The tall rectangular structure in the center is the great hall and cloister.
|
The great central tower rises eight stories
(from the basement through the seventh
story), with a watchtower going three stories
higher. Supporting the central tower are
four more towers, each five stories tall,
grouped about the center in cloverleaf fashion.
Giving further support to this huge
volume of outward-pressing stone are eight
two-story walls radiating out to the outer
wall towers. Various other structures complete
the complex.
Outer defenses: The
outer walls of Great
Stoney are very strong. They average about
10 feet in width, and rise two stories to the
height of the walk-wall, with crenellated
battlements. The outer wall towers are three
stories high, crowned with conical timber
roofs. The main entry to the castle is
through a barbican. A barred double door
and portcullis form the outer gate, and
between them is a small space covered by a
murder hole above. If intruders breach the
outer gate and get into the barbican, they
can be fired upon from the outer gate wall
and the three towers surrounding the entry
area. Exit from the barbican into the central
bailey is by way of two normal-sized doors
between the three gate towers. A wellguarded
postern gate is at the other end of
the complex.
Foundation level:
Supporting such a
rockpile as Great Stoney requires massive
foundations. Here in the bowels of the
castle are the places where food
and arms
are stored, meat smoked, wine and ale
made, and (yes, even here) criminals confined.
In three of the towers, the foundation
walls have been hollowed out to make extra
storage hatches a few feet high.
Down here is also the crypt and its
chapel, behind a wrought-iron gate. Corridors
leading away from the crypt chapel
traverse the foundation. Dead brothers are
buried here by prying stones out of the
floors and walls, then sealing up the bodies
behind cenotaphs.
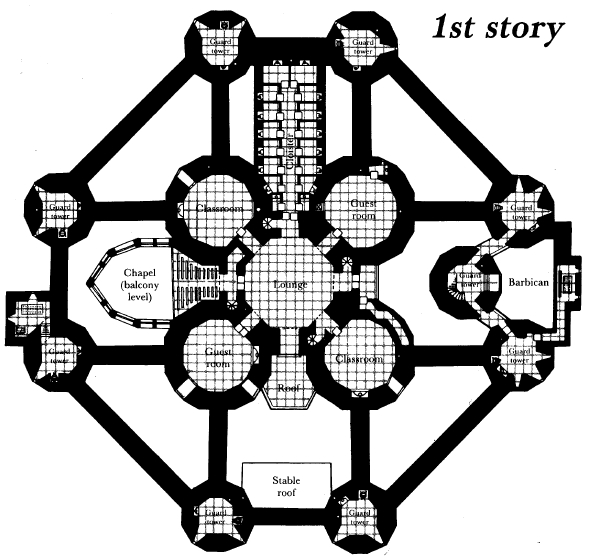
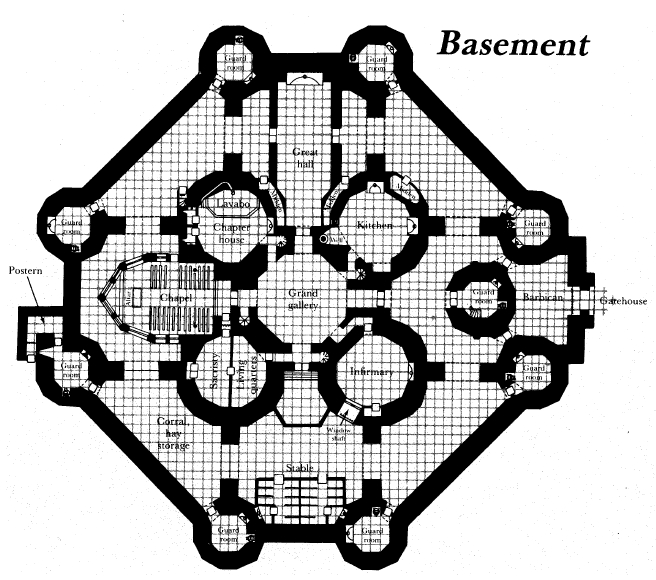
Basement level:
Here on the main (first)
level are the great public rooms of the complex
-- the kitchen, great hall, grand gallery,
infirmary, sacristy, chapel, and chapter
house. There is also a lavabo, or bath area,
where water from the cisterns can be run
into a large pool for bathing. Garderobes
(medieval toilets) and middens (cesspits) are
everywhere throughout the complex. The
middens have to be cleaned out every so
often, and this is the single most obnoxious
job of castle life.
The chapter house is a small chamber
where senior members of the order gather
for business meetings. The main chapel is
the great worship area for the whole community.
The altar has a hidden safe built
into its back. Great windows are set into the
exterior walls of the chapel. Font, pulpit,
and chairs for the presiding officers are in
the front. Seating is augmented by a balcony
in the rear of the chamber.
Certain other conveniences are built into
the complex, such as a dumbwaiter from
the kitchen to the upper levels. Unlike
many castles, this one has plenty of fireplaces.
Altogether, it is a very comfortable
place.
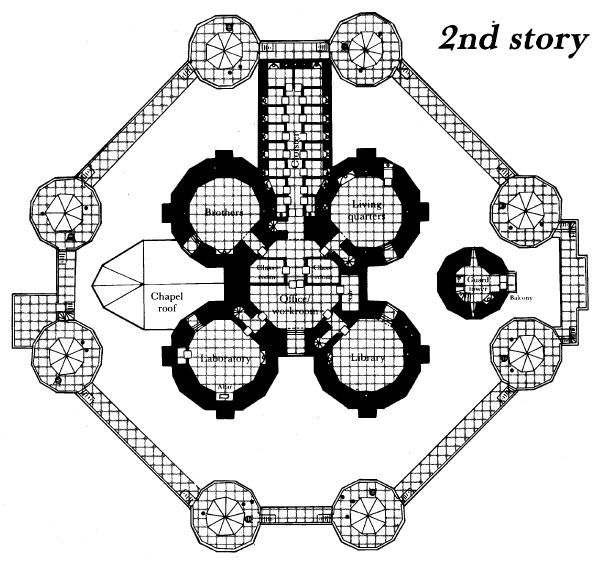
First and second
stories: These tower
rooms and the wing containing the great
hall serve to house the cloister for junior
brothers, the better living quarters, classrooms,
guestrooms for hospitality (a medieval
duty), a laboratory, and a library. The
main business of the community is carried
on in these areas.
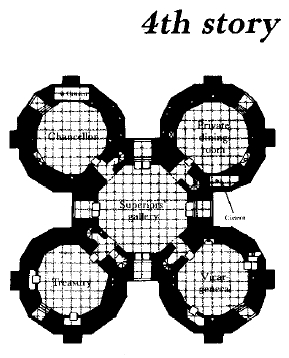
Third and fourth
stories: On these
floors are the living and working quarters of
the officers of the community, the treasury,
the meditation chapel, and so forth. Large
window seats set in the tower walls are
found throughout. A great solar (sunroom)
with balconies is a major feature,
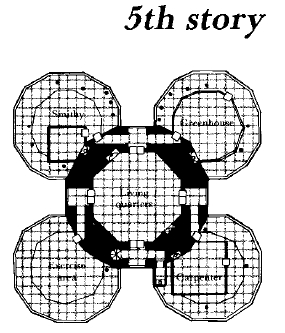
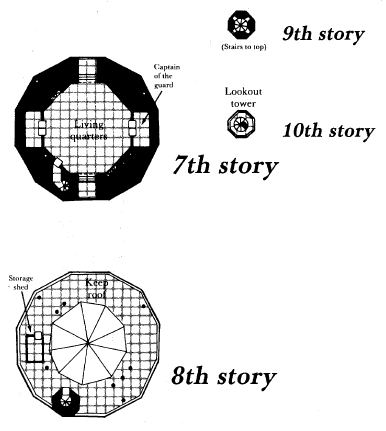
Upper levels: The open
areas around the
edges of the conical roofs atop the cloverleaf
towers are used for various purposes: a
carpenter's shop, a greenhouse, a smithy,
and an exercise area. The great central
tower continues on up, giving further living
and working space. On the very top of the
central tower, beside its conical timber roof
and close to the base of the watchtower, is a
storage shed where astronomical equipment
is kept.
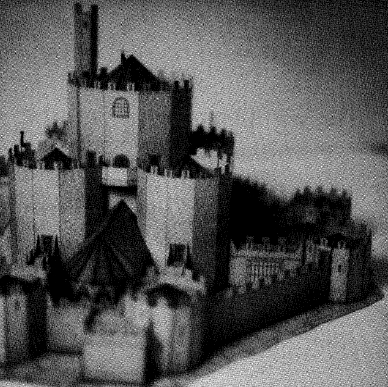
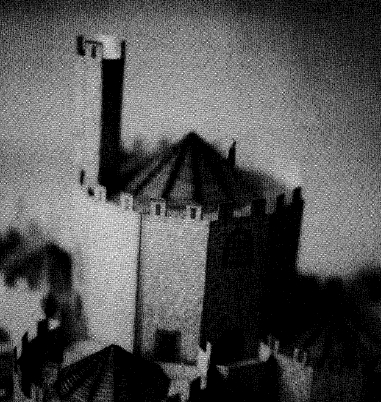
| The closeup view at
right shows the large central tower and two of the four towers that surround it. Atop flagpoles made from straight pins, pennants add a touch of color to the massive stone and wood structure. The detail photo below and to the right shows the drawbridge, made more realistic-looking by attaching it to the gate with short pieces of small chain.
|
Conclusion:
It is perhaps no coincidence
that Great Stoney resembles something like
a beehive, for it is a tightly organized,
packed community of very busy people.
Well designed for defense, it nevertheless
has many features for recreation and worship
that one would not find in a secular
lord's castle.
The cardboard version of Great Stoney
that you can construct from the parts in this
magazine is not identical to the castle that?s
depicted in the accompanying floor plans.
Rather than being a disadvantage or a
weakness, that fact is an indication of how
the creation process differs depending on
how many dimensions you're working in.
When Arthur Collins drew up his original
floor plans for Great Stoney, he based the
two-dimensional construction on his extensive
knowledge of how a castle is laid out
and built. When Arthur?s floor plans were
rendered in pen and ink for publication, we
adhered to the design in that form.
But when Dennis Kauth turned Great
Stoney into a cardboard sculpture, he
deemed it necessary to change some design
elements. Certain things that "work" in a
drawing on graph paper weren't feasible or
even possible to translate into parts that
would fit together properly and could be
squeezed onto four sheets of cardboard.
For instance, the walls of the cylindrical
towers are thick in the drawings, but in
cardboard they're only as thick as the cardboard
itself. It would have been possible to
construct thick-walled towers in cardboard
by nesting one cylinder inside another, but
that would have taken more space on the
sheets than we had available -- and it
would have meant twice as many crenellations
for you to cut out.
Arthur's design included flying buttresses
that extended from the cloverleaf section
down to the outer towers. In an actual stone
construction, the buttresses would be essential
to keep the massive center section from
collapsing outward under its own weight. In
cardboard, the parts would have been difficult
to form and assemble; they would serve
no structural purpose, since the center
towers stand up quite well all by themselves;
and again, there was the problem of
space on the sheets. So . . . no flying buttresses
(unless you make your own).
The roofs of the four cloverleaf towers
were designed as flat surfaces, but Dennis
supplied conical timber roofs for them
similar to the ones on the outer towers and
the center tower. One of the main reasons
for this was aesthetic -- "to give it a
little
color," in Dennis's words. If you want those
towers to have flat timber roofs, leave off
the timber cones and use markers or brown
paper to color in the center of each roof
section so that it looks like a flat timber
surface instead.
Despite the minor differences between
them, the floor plans and the cardboard
structure can be used in conjunction with
each other as a gaming aid, to help monitor
the location of people and objects within the
complex. In most cases where the floor
plans and the sculpture are in conflict over
a
specific point, the floor plans should be
considered the final authority -- unless, of
course, you have a reason for deciding in
favor of the opposite viewpoint.
How it all goes together
-
I. THE BASICS
In addition to this copy
of DRAGON®
Magazine, you'll need:
* A 12-inch ruler or straightedge,
preferably metal.
* A pair of sharp, pointed
scissors, not too
big (so you can wield them
easily).
* A modeling knife with a
sharp blade.
* A tube or bottle of high-quality
glue
for paper.
* A ball-point pen (one without
ink is okay)
or some other object to be
used as
a stylus for scoring along
fold lines.
* Paper clips, spring-type
clothespins, or
similar items that can be
used to hold
parts together while the glue
dries.
* A few straight pins.
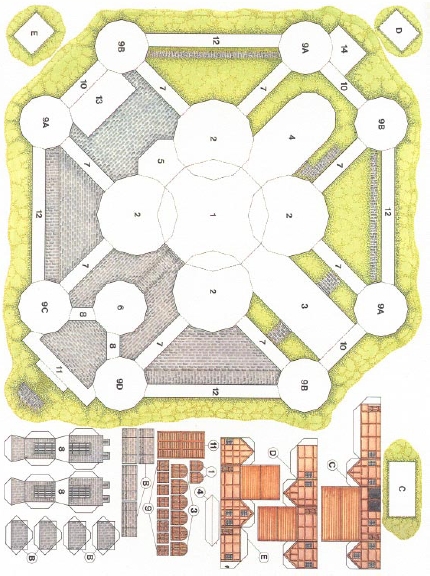
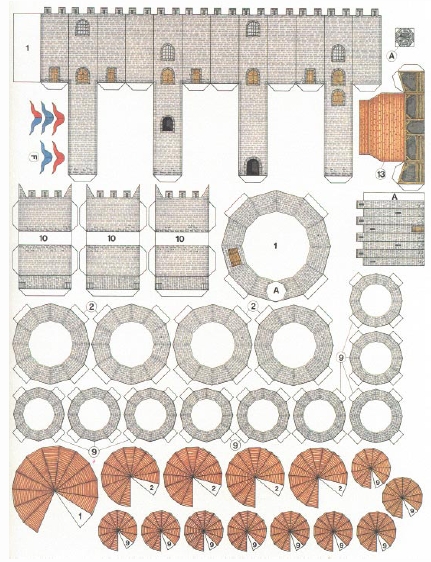
1. Separate the two large sheets of cardboard
from the center of the magazine. The
best way to do this without damaging the
paper is to pry up the ends of the staples,
lift out the sheets, and then push the staples
back down to hold the rest of the pages
together.
2. Cut the pages apart into smaller sections
for easier handling. Cut out the base
first; this is the part that will hold all of
the
others, except for the small outbuildings
(which have their own small bases).
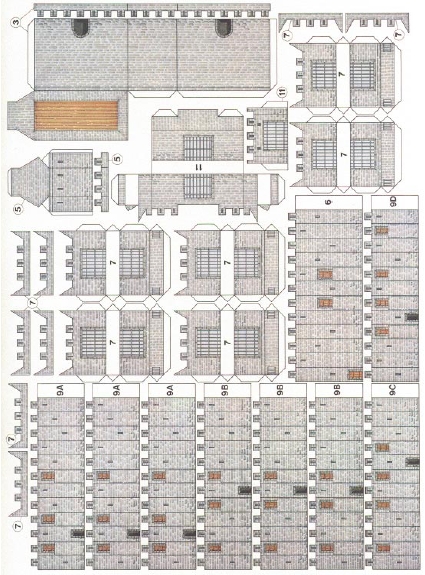
3. Cut out the individual parts of the
castle, one at a time as needed; notice that
parts and groups of parts are numbered in
the order of assembly. If you have a steady
hand, you can use scissors for most of the
long and straight edges. To cut out small
detailed areas, such as the crenellations on
the tops of the walls, a modeling knife and a
straightedge to guide it are the best tools for
true and accurate cuts.
4. Using the stylus and straightedge,
score each part along the black lines to
make folding easier. (The black lines are
only printed on the colored surface, but if
you score the parts on that surface the colors
might "break up.-- It's safest to do the
scoring on the non-printed side, as long as
you line up the straightedge carefully before
scoring each line.)
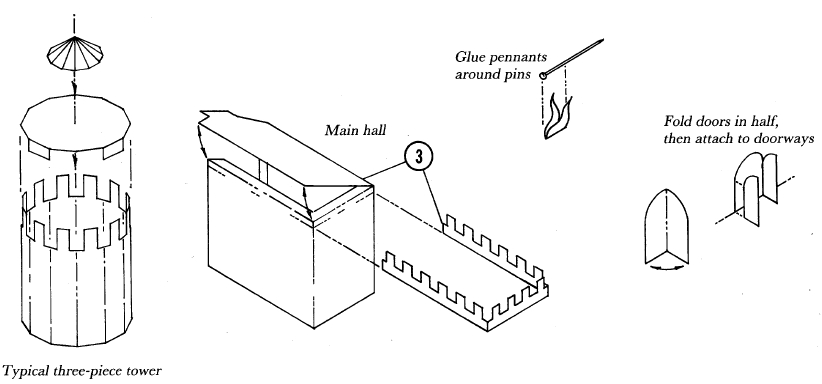
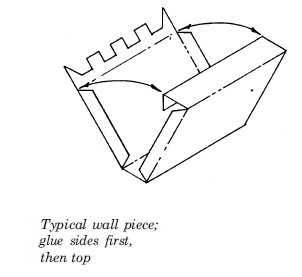
5. Fold each part so that it forms the
three-dimensional shape it's supposed to,
then apply glue to the surfaces that will
touch (only one surface, or both, depending
on the kind of glue you use) so the part will
stay in that shape. Refer to the schematic
drawings to see how certain types of parts
are constructed. If you're using a fastsetting
glue, be sure the parts are aligned
properly the first time you touch the connecting
surfaces. If you're using a slowsetting
glue, you may find it handy to
clamp surfaces together with paper clips or
clothespins until the glue dries.
6. Attach each part in its proper place,
either on the base or on another part. Put
down the center tower first, then the ?cloverleaf
? towers around it, then the great
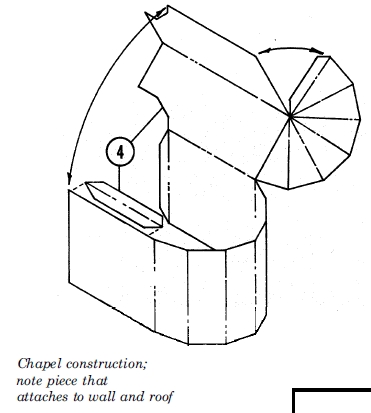
hall (location #3), then the chapel (#4) and
so on, working your way toward the perimeter
of the castle. Attach small parts as you
go along to avoid being hemmed in later by
other parts; for instance, put the doors on
the great hall before gluing down the two
walls that run parallel to the hall.
SPECIAL INSTRUCTIONS
Doors: Many of the doors of Great
Stoney are designed to be shown in the
opened position. Each of the open-door
pieces is actually half of a door. As you cut
each one out, fold it in half and glue it to
make a piece that's colored on both sides
(see the diagram). Then, using a very small
amount of glue, attach each half to the side
of an open doorway. The door halves labeled
3 go at the base of the central tower
and on the great hall. The door labeled
1 is
for the doorway leading from the central
tower to the roof of part #5. The doors
labeled 9 go at the base of each of the outer
wall towers.
Outbuildings:
Because a castle often had
such things in its vicinity (and because we
had a little extra room on the cardboard
sheets), we've provided three outbuildings,
each in one piece, that can be folded and
attached to their own small bases and then
displayed outside the castle walls in any
location you choose.
Balconies: The
parts labeled B (on the
sheet containing the base) are used to form
the balconies that jut off the central tower
along the tops of the cloverleaf towers. For
added support and to be sure they're
aligned properly, it's best to attach them
after the cloverleaf towers are in place.
Tower roofs: Most of
the flat roof sections
that fit inside the cylindrical tower
pieces should be fixed to the insides of the
cylinders so that each roof is about 1/16 inch
below the battlement. Exceptions are the
roofs on the cloverleaf towers, which fit
somewhat lower inside the cylinders so
they?ll be at the right height when the cloverleaf
towers are fitted against and under
the central tower. Whenever you?re not sure
how two pieces are supposed to fit together,
try them on for size before applying any
glue. The conical timber roof on each tower
is designed to fit over the uncolored area in
the center of the flat roof piece -- there is
no need to cut out the uncolored sections,
and the structure will be weakened if you do
so. Each of the timber roofs on the cloverleaf
towers is marked with a small notch
that must be cut out to make the roof fit
snugly against the central tower.


ADVANCED TIPS
Anyone who's experienced at scratchbuilding
and detail work will think of several
ways to make Great Stoney even more
realistic-looking. Here are a few of the ideas
we've thought of, including some things
that were incorporated into the prototype
model shown in the photographs.
With a couple of pieces of small chain
and four straight pins, you can build the
drawbridge (door part #11) in a partly
opened position, as in the prototype. Cut
the chain to fit, then "bolt" it to the door
and the wall with straight pins, clipping off
the shaft of the pin with pliers or scissors.
Wherever straight pins are used in the
construction, try to get the type with colored
heads that will match the color of the
part the pin is used with.
The pennants fluttering from the higher
towers are made by folding and gluing each
paper pennant around a straight pin, then
poking the pin through the black dot in each
roof piece. To keep the pins at the proper
heights, stick each one in the roof and fix it
in place with a spot of glue before attaching
the roof to the tower. For added realism and
a custom touch, design your own pennants,
and try cutting them out of cloth ? but
first, seal the cloth with liquid glue to keep
the edges from fraying.
By working very carefully, you can cut
out any doors or windows you think should
be opened; likewise for the portcullis gates
along many of the walls. Simulate bars and
latticework with thin wire attached to the
inner surfaces of the wall or tower in question.
As with many detailing projects, you
should finish this work before proceeding
with the construction of the part being
detailed ? for instance, it would be very
tough to cut out the windows on the central
tower after the central tower is attached to
the base.
The stable area offers several opportunities
for detailing. You can build hitching
posts from toothpicks, and feed troughs
from cardboard or balsa. Use flocking material
or fibers of twine, or check out the spice
and herb rack in the kitchen, for something
that looks like straw.
Because the printed sheets are not colored
on both sides, several uncolored areas will
be visible on the finished product ? particularly
on the inside surfaces of walls and
battlements. You can fix this by coloring
those surfaces with a felt-tip marker in a
shade of gray that will match the exterior.
Markers will also be handy for covering up
places on the exterior that get slightly damaged
during construction.
As suggested in the section on the stable
area above, you can build new parts and
accessories for anything you consider appropriate.
For instance, the roof of the central
tower could use a three-dimensional storage
shed instead of the two-dimensional image
shown on that surface. You could build
sloping staircases from the walls to the tops
of each of the outer towers. You may find
good uses for small parts and bits of scenery
from model railroad accessories.
It is possible, but not recommended, to
go so far as to cut out the arrow slits on the
crenellations along the walls. Even if you
can do this with precision, the hole that?s
left behind will make a flimsy part even
flimsier. With any extra cutting or detail
work you attempt, be sure you aren?t losing
more than you?re gaining because you?ve
created a structural weakness in the process.
When you?ve got Great Stoney looking
the way you want it, spray the entire construction
with a dull coat finish to give the
castle an appropriate flat luster, add some
strength, and cover up any glue spots that
may have found their way onto the exterior
surfaces. When you?re done, Great Stoney
will be useful as a gaming accessory (if
anyone in your campaign is lucky enough to
encounter -- or own ? such a grand place)
or a display piece, either as the focal point
of a diorama or sitting on a shelf all by
itself.
| This photograph
offers a good view of the main gate area. Three towers ring the main entrance, making it very difficult for hostile visitors to penetrate further into the castle grounds.
|
| Anyone with a fear
of heights was probably not required to work a shift in the lookout tower, which extends three stories higher than the roof of the central tower and a dizzying 165 feet (at 15 feet per story) above ground level.
|
|
Where credit is due Original design and floor plans: Arthur Collins 3-D design and instructional drawings: Dennis Kauth Graphic rendering: Roger Raupp Everything Arthur didn't write: Kim Mohan |
Scale: 1 square = 5 feet