inside. Unless this is done, however, those outside
must break the lock, free the chain, and
slide the bar before entering the door.
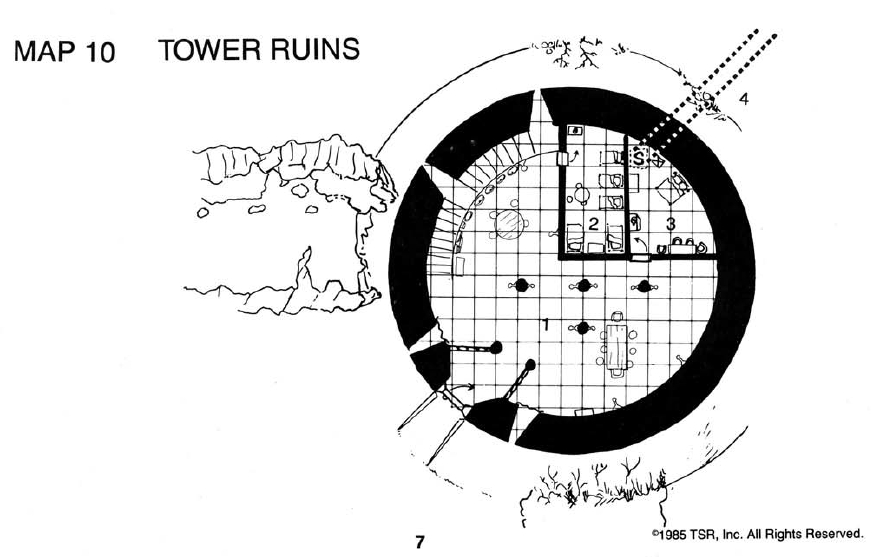
This area lies at the northeast corner of
the Upper Works
map. Some general details
can be discerned from a distance, but do
not
emphasize the Tower's existence to the
players.
If the party has not yet slain any ravens,
read the following description; omit it
otherwise,
proceeding to the other details if the
tower is closely investigated.
| The jagged stub of a large
tower stands
up from the razed walls. 2 small black birds are perched on the tower top, about 25 feet up. |
An illusion on the tower top makes all
creatures thereon appear smaller.
These
birds are, in fact, 2 of the 16 giant ravens
which live here and serve as guards and
sentries
for the bandits
detailed below. Most
ravens are out of sight, roosting on the
timbers
where the 3rd storey collapsed and
broke through the 2nd level. Of course,
if the party has slain all the birds, they
find
none here, only the seemingly deserted
tower ruin.
| 1 heavy door can be seen, barred and
chained shut from the outside. Arrow slits are visible on either side of the door, but peering in reveals only blackness beyond. |
The bar is a ruse; it can be disengaged
from
inside. Unless this is done, however, those
outside
must break the lock, free the chain, and
slide the bar before entering the door.
Before you start the
following encounter,
be sure you are familiar with the Tower
Map
(Map 4), the occupants, their Defense
Strategy <Map 10>
(given below), and the other Combat
Notes given hereafter.
Refer to the Tower Map. 4 guards are
on duty at all times, each peering out
of an
arrow
slit. Note that the 2 slits at ground
level are screened by heavy
black felt draperies;
anyone trying to peer in from outside
sees only darkness.
Entering by the door,
one sees low stone
walls, a little over waist
height, leading from the exterior wall
to
support columns. These serve to channel
entrants through a passage some 8 feet
wide.
The tower cannot be entered from above;
the 2nd and 3rd storeys have collapsed,
forming an impassable jumble. The ravens
which roost above croak a WARNING
to the
guards if intruders are sighted.
The tower interior is lit by 12
torches
in sconces.
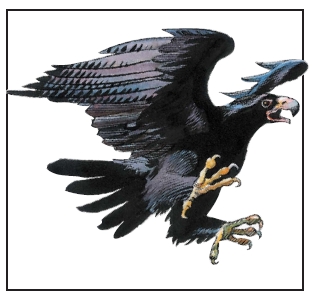
This tower is the residence of 26 brigands.
Raven,
giant (16): AC 4; MV 3 "/18"; HD
3 + 2; #AT 1; D 3-6; AL N(E); SZ M-L (6-
10' wing); XP 60 + 4/hp
<6'>
<7'>
<8'>
<9'>
<10'>
Footmen (8): AC 6; Level 0; hp 6 each; #AT
1; D 1-8; <spears do 1d6 damage vs.
M targets>
front rank (4) in ring
mail, with spear & throwing
spear; <'long' spears, i.e. ash spears>
rear rank (4) in studded
leather & shield, with spear and
longsword;
<buckler> <'long' spears, i.e. ash
spears>
XP 20 each
Crossbowmen
(4): AC 6; Level 0; hp 4 each;
#AT 1; D 2-5 (bow)
or 1-8 (battle axe);
scale mail;
XP 18 each
Archers
(4): AC 5; Level 0; hp 5 each; #AT 2 <archer>
or 1; D 1-6/1-6 (shortbow)
or 1-6
(shortsword);
in chain mail armor; XP 19
each
Guards (5): AC 5; Level 0; hp 5 each; #AT
2
or 1; D 1-6/1-6 (shortbow)
or 1-6
(shortsword);
in chain mail armor; XP 19
each
Sergeants (2): AC 4; Level
1 Fighters; hp 11;
9; #AT 1; D 1-8 (throwing
spear or longsword)
or 1-4 (dagger);
in chain mail &
shield; XP 25; 23 <small
wooden shield>
Lieutenants (2): AC 2; Level
3 Fighters, hp
22; 17; #AT 1; D 2-5 (heavy
crossbow) or
2-8 (morning
star) 1-6 (spear) or 1-4
(dagger);
plate
mail, Dexterity 15; XP
116; 101
Leader (1): AC 0; Level
6 Fighter; hp 43;
#AT 1; D 3-10 (longsword
+1) or 2-7
(hand
axe) or 2-5 (dagger),
chain
mail
armor, shield + 2; XP 558
S 15 I 13 W 12 D 16 Co 15 Ch 17 <STR
should be 16>
<medium shield +2>
In their coin purses, the brigands have
the
following treasures:
Leader: 11 gp,
27
pp
Lieutenant (each): 2-12 ep, 2-12
gp, 2-12 pp
Serjeant (each): 1-6
sp, 1-6 ep, 1-6 gp
Guard, archer, crossbowman, footman
(each): 1-6 cp,
1-6
sp
<Leader: 29 pp>
<Lieutenant 1: 8 pp>
<Lieutenant 2: 6 pp>
<Serjeant 1: 1 pp>
<Serjeant 2: 0 pp>
The positions noted apply only if the PCs
manage to approach completely undetected
and somehow learn of the interior arrangements
(through invisibility
and clairvoyance,
for example).
If the party's approach is seen by either
guards or ravens,
all but 2 torches are
immediately extinguished, and brigands
armed with missile weapons MOVE to cover
the door. The balance of the men form a
shield and spear
wall, 2 ranks deep,
about 5 feet northeast of the entryway.
Behind the missile troops, 1 1st and 1
3rd level brigand
take station on each
flank. Behind the ranks, the 6th level
leader and 1st first level brigand stand
ready to MOVE as the need arises (left,
right,
or upwards). The 2 guards on the stairway,
at their arrow
slits, remain in position
to shoot at targets of opportunity.
As soon as the party attacks the door, the
remaining torches in the main room are
extinguished. Lanterns
in the 2 interior <bullseye or hooded?>
rooms remain alight, not being normally
detectable. As soon as the door is opened,
and invaders (characters) are illuminated
or
silhouetted, the brigands attack with
arrows,
bolts, and spears. If the intruders
FLEE, they are fired upon again. If they
ADVANCE, the brigands use flanking fire
while their forward line engages.
Combat Notes
As soon as combat begins, give the brigands
the following advantages (assuming
that the party was observed, and that they
forced entry through the door):
a. Only the intruders
(party) can be surprised.
b. The brigands automatically
gain initiative
in the first round.
c. Attacking illuminated
or silhouetted targets,
the brigands gain a + 2 bonus to all
"to hit" rolls for all missiles (including
arrows,
bows, and hand-hurled weapons;
each round, this should affect 6
arrow shots, 2 heavy crossbow
bolts,
4 light crossbow bolts, and
10
spears).
d. A -1 penalty applies
to all the invaders'
"to hit" rolls until the tower interior is
illuminated, and the brigands gain a corresponding
+ 1 bonus for their familiarity
with the dark AREA.
After the initial round of missiles, the
party's
actions determine the lieutenants'
actions:
If the party flees, they reload crossbows.
If the party hesitates, they pick up spears.
If the party enters, they get morning
stars.
Serjeants either grab extra spears to hurl
or draw swords. Guard-archers continue
missile fire. Light crossbowmen reload
if
possible, or drop their crossbows and grab
battle
axes for melee.
Front rank brigands draw swords and
advance 1 pace, while rear ranks level
their 2nd (long) spears and MOVE up. The
6th level leader and his 1st level serjeant
ready their hurling weapons for FAST release,
followed by movement to any threatened
AREA.
If the party hurls oil
or otherwise attacks
with a serious threat, the leader moves
rapidly
to the south-central pillar and releases
a
chain there. This triggers a fall of several
hundredweight of rocks and loose stone.
Each victim in range (the entry AREA
bounded by the door and low walls) takes
1-
12 points of rockfall damage,
is stunned for
the following round, and blinded by a choking
cloud of dust which settles in 2
rounds. Meanwhile, the brigand leader
dashes to his room (area 3),
slams and bars
the door, and enters the secret trap door.
There is little in the place other than
the
rude tables, benches, chairs, and stools.
<funiture=x>
Heaps of old blankets and brown
cloaks lie
by the walls, and several sacks near them
are filled with foodstuffs. On the tables
are <wine (cheap/sour), meat (horse)>
bottles of cheap wine (mostly consumed),
knucklebones, dirty plates and mugs, and
nothing else.
The brigands
obviously live in the place,
eating, sleeping and gaming while awaiting
further raids. If the rafters are examined,
various smoked meats, sausages, and bags
of onions and herbs
can be seen. All told, <caraway, white horehound>
the provisions here can supply all the
brigands
for a full week. Under the ascending
stone spiral staircase
are
5 large barrels.
The 2 largest contain water;
the next 2,
beer. The smallest (about 40 gallons) is
nearly full of winethe same sour, cheap
stuff on the tables. A bale of blankets
is
stuffed under the stairs, evidently loot
from
some hapless merchant.
This place quarters the 2 lieutenants
and the 3 sergeants. In addition to the
5 rough beds, the room contains a round
table, 3 stools, a chest of drawers with
a
lantern
atop it (and nothing but old clothes <purse (volume = 1/4 cubic foot)
(carrying capacity = 2.5#) (from: PC record sheets)>
and the like inside), and a padlocked ironbound
oak
chest. <small chest or large chest?>
Inside the latter is a potion
of healing,
a sack of 300 ep, a jeweled dagger
(worth 250 gp), and four bolts of silk
(worth 10-60 gp each). <40, 30, 50,
60 = 180 gp>
This is the leader's private chamber. He
has a comfortable bed heaped with quilts
and pillows, a table and 2 chairs, a small
<table=x, chairs=x>
desk and stool, a chest of drawers, and
a
padlocked iron box.
<small box or large box?>
On the table are a few pewter dishes, a
bottle (full of good brandy), and some
slightly wrinkled apples.
Inside its fold-down top, the desk holds
some quills, an inkwell, and several sheets
of parchment. 1 sheet bears a list of possible
victims (including the
jeweller at Hommlet).
The other sheets are blank, but if the
correct one is held up to a strong light,
a
map is revealed, showing the secret tunnel
out of the towerand into the 3rd level
of
the Temple dungeon, if entry is desired.
The chest of drawers conceals a short
sword
with a topaz pommel (total value 500
gp),
a suit and hooded cloak of brown
velvet trimmed with fur (200 gp), <what kind of fur?>
plus normal clothing and odds and ends.
<pouch (volume = 1/4 cubic foot) (carrying capacity = 2.5#) (from: PC
record sheets)> <mantle, toga, leggings>
The iron chest
is trapped with poison needles, <insinuative
D>
which project to either side of the lid
when it is raised. Inside are 384
cp,
556 sp, <152
pp>
106 ep, 277 gp,
and 91 pp.
1 flagstone can be lifted to reveal a
bronze ring,
set into the floor. The pivot is
undetectable by normal sight, and the flagstone
locks into place. It is mechanically
linked to the trap door beneath, which
is
counterbalanced to raise and lower with
ease and but little noise. If the trap
door is
closed from below, the flagstone also closes
neatly. The shaft below is about 3 feet
square, and bronze
rungs lead 30 feet down
to a small chamber.
In this 10'x 15' room
are the following:
*Small,
flat silver box (worth 125 gp) containing a jeweled necklace
(2,400 gp)
*Cloak
of elvenkind, hanging on a peg by the entrance of the passage leading
to the west
* Large pouch with
a leather strap for shoulder slinging, containing 50 tiny
pearls
(base 10 gp each) and a leather bag (containing 50
pp)
* Longbow
and quiver with 9
arrows + 1
* Locked bronze coffer
containing 3 potions: speed,
extra
healing, and
water breathing)
* Locked iron box,
containing 800 gp and 200 ep <small box
or large box?> <180 pp>
The fleeing leader immediately dons or
picks up all but the last 2 items. If time
permits,
he drinks or takes the potion of extra
healing. If he hears pursuit, he probably
(75%
chance) drinks the potion of speed. He
probably
(75%) ignores the potion of water breathing.
He then runs down the west passage and
out to escape. If successful, he visits
Nulb
at
night and then leaves the AREA on horse,
seeking
better things in Dyvers
or somewhere
across the Nyr
Dyv.
This 5-foot-wide passage is hewn from
the bedrock underlying the Temple
complex,
evidently following a natural fissure in
the limestone. It bears generally west,
though it has many curves. In places it
is not
worked at all, and there the width varies
from 4 to 8 feet. About 540 feet
along, it opens into a small
natural cave.
The north wall of this 40' oval chamber
is
marked by a 3-foot wide opening. (A
secret entrance to Dungeon Level Three,
area 335, is concealed
in the eastern portion
of the south wall by a
balanced, pivoting
stone slab.
The passage concealed is 3
feet wide and leads 600 feet south, slanting
<slope=x>
downwards rather steeply. At its end is
a 10'
wide stone passage east, turning south
in 30
feet; see the Dungeon
Level map and key.)
The narrow north passage leads north
and gradually west, ascending slowly over
<slope detection>
about 200 feet. It then turns due north
again
for another 100 feet, where the limestone
gives way to clay walls shored up by timbers
for 50 feet. The escape tunnel mouth is
at the side of an abandoned dry well. A
small heavy door there
is set back from the
side of the shaft and painted dull
brown,
barred from the inside. A short ladder
can
be set up inside the shaft, enabling the
escaping party to gain a series of ascending
ledges which lead to the top. The ladder
is
inside the tunnel.
(The position of this exit is indicated
by
an X on the large AREA map,
deep in the <x>
woods north of the Temple, towards the
Velverdyva.)
Near the tunnel exit are a deserted cottage
and a ramshackle barn. This whole AREA
is
screened by surrounding trees. In the barn
are 6 light
horses, which belong to the brigand
leaders. They are fed and exercised
each night in most cases.
>> B.