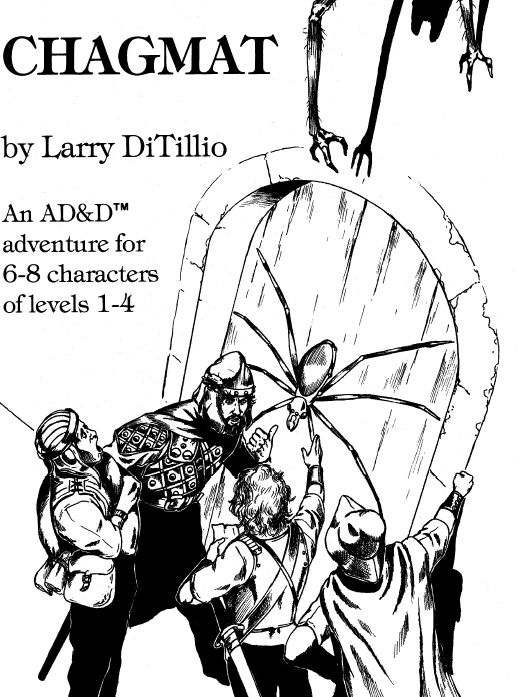
For the players
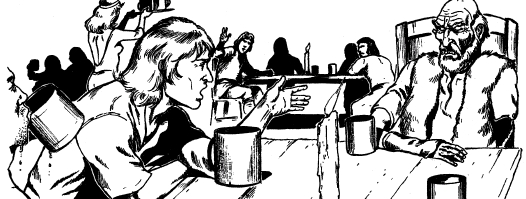
The party is traveling the land and has stopped in the small, pleasant
farming town of Byr. While sitting in the towns only
tavern, The Broken Web, the characters overhear an argument among the mayor
of Byr and several of its citizens. The argument concerns what to do about
the disappearance of five maidens from the town. These five women have
all vanished within the last two weeks. Search parties have been sent out,
but have found no trace of them. The most recent of these parties, made
up of five of the towns hardiest souls, has apparently also disappeared,
somewhere in the vicinity of Little Boy Mountain.
By listening further to, the arguing townsfolk, the party gets the following information: Most of the townsfolk blame the disappearances on a party of hobgoblin brigands rumored to be raiding in the area. Scattered reports of hobgoblins have been circulating in the area for the past month. However, a few of the townsmen, particularly one grizzled old fighter-type with a missing left arm, believe the disappearances are the work of the dread spider-folk, the chagmat.
The reports of hobgoblins will be confirmed by various townsfolk who have sighted one or more of the nasty creatures in the area. However, no large concentration of hobgoblins has been spotted; no hobgoblin has actually been seen in the town itself, and as far as anyone knows all the maidens were in town when last seen.
The player characters will learn about the chagmat mainly from Akron Oheeyo, the grizzled old fighter, who will be prompted by the crowd to relate what he recalls from his younger days: Chagmat are spider-people, six-armed horrors who are an intelligent race serving the dire ends of Chag, the Spider-Spirit. The land around Byr was once beset by chagmat, and one of their major temples was rumored to be somewhere around Little Boy Mountain. Most townspeople avoid Little Boy Mountain because of this, and also because of other nasties that have been encountered around it.
The last of the chagmat was said to be driven from the land more than 50 years ago. The name of The Broken Web tavern comes down from this time. Akron Oheeyo was one of the people involved in driving the chagmat from the land, but now he is sure they are back. However, his point of view doesnt attract as many townspeople as it might, because Akron has a tendency to get agitated easily and many of the other citizens regard him as senile. One or two other townsmen also feel the chagmat may be to blame, but no one has an idea what the purpose of the evil spider-folk might be. Belying the chagmat theory is the fact that there has been no preponderance of spiders noted in the land, traditionally known as a sure sign that chagmat are in the vicinity.
For the DM
Note: Players should read no further. All the following information
is knowledge which only the Dungeon Master should have at the start of
the adventure. The player-character party (assuming the group is not predominantly
aligned toward evil) should have sufficient interest in the goings-on to
volunteer as a rescue party. If they do so, the mayor will heartily accept
their offer and promise a reward of 5,000 gold pieces if the adventurers
can return all five missing maidens alive.
If player characters are reluctant about volunteering, the mayor will approach them and implore them to help, saying that the town cannot afford to risk any more of its able-bodied men, and a band of adventurers is bound to succeed where a group of simple farmers could not. And he will offer a slightly higher reward in this case, amounting to 1,000 gold pieces for each member of the party.
The player characters may ask, but wont receive any information about
the rumored chagmat temple, since none of the townspeople have actually
been there. Little Boy Mountain is about 13 miles east of Byr. If the party
befriends Akron Oheeyo, he may accompany them as a guide. Because of his
age, his onearmed condition, and his suspected senility, none of the townspeople
has been willing to allow him to go on a search party but, by the same
token, Akron Oheeyo is at present the
only citizen of Byr who does not shudder at the prospect of going on
a rescue mission to Little Boy Mountain.
Akron Oheeyo
Akron Oheeyo is a 5th-level fighter:
AC 5 (chain mail), HP 32, Str 10, Int 9, Wis 10, Dex 9, Con 10, Cha 9.
He has a longsword and a dagger.
Akron Oheeyo is 73 years old and has been without his left arm since the time when (as he tells it) he helped beat back the last chagmat invasion of the land. (He was a 4th-level fighter at the time, and because of the forced inactivity brought about by his injury he has only attained one more level of experience in the intervening years.) While he can still swing a sword, he is not capable of much physical activity and will be useful to the party mainly as an information source. What Akron may or may not know as the adventure progresses is up to the DM; as the mission goes on, Akrons memory may be stimulated by his reintroduction to some of the sights and sounds he recalls experiencing as a youth. (Basic information about the chagmat is the logical thing to divulge.) Do not force this NPC on the adventurers; let them take him only if they want to.
If the party has volunteered to help, townsfolk will provide them with horses, a wagon, rope, torches, and other gear they may not possess. If they had to be hired for the mission, such considerations may not be given for free, and some items may not be offered at all.
The town of Byr
This adventure does not include a detailed description of the town
of Byr. If the DM wishes to add more substance to this preliminary part
of the mission, any village of the DMs devising or any small town or village
from another adventure module may be used as a framework. The town and
its plight provide a justification for the trip to Little Boy Mountain,
and the town also serves as a place where the adventurers can stock up
on supplies and other necessities. No matter what else the town contains,
there should be a magic supply shop that deals primarily in spell components
and may have a scroll or two for sale;
a money-lender, who may be useful if the adventurers dont have too much
of a grubstake; and a cartographer who can, if approached and properly
reimbursed, provide the party with a map that clearly shows the safest
route to Little Boy Mountain.
Chagmat
FREQUENCY: Rare
No. APPEARING: 1-20
ARMOR CLASS: 5 MOVE: 6*12
HIT DICE: 1 or 2 or special (see below)
% IN LAIR: 50%
TREASURE TYPE: G
NO. OF ATTACKS: 2
DAMAGE/ATTACK: 1-3/1-3 or by weapon type
SPECIAL ATTACKS: See below
SPECIAL DEFENSES: See below
MAGIC RESISTANCE: Standard
INTELLIGENCE: Average to very
ALIGNMENT: Chaotic evil
SIZE: M (up to 6)
PSIONIC ABILITY: Nil
Attack/Defense Modes: Nil
Chagmat look like humanoid spiders. They have six arms branching off a human-like torso, two legs supporting the body, and eight eyes clustered where a mans eyes would be located on a human head. Their eyes give the chagmat the ability to see in a 270-degree arc centered on the direction they are facing. This peripheral vision and their acute senses of smell and hearing make it possible to surprise them only on a roll of 1.
Chagmat fighters are always brown, and chagmat clerics are always white. The two types do not interbreed, and chagmats are either fighters or clerics. Normal (non-extraordinary) chagmat clerics all have one hit die, while normal chagmat fighters have two hit dice. More powerful clerics or fighters, such as the High Priest Byaculuse, will have hit dice commensurate with their effective level of experience. Fighters are armed with short swords and clerics are armed with clubs. A chagmat fighter can wield two weapons at once, gaining two attacks per round if this is the case. If a chagmat is unarmed, it can use its natural attacks, consisting of two claw attacks per round for 1-3 points of damage each. Chagmat can employ two shields at the same time, generally holding one in each hand of their centermost arms. Shields (not figured in the armor class given above) provide a bonus of 1 to a chagmats armor class for each shield used. All chagmat can scuttle vertically up walls when not engaged in melee, using their legs and two of their arms, with the same chance of success as a second-level thief. They can walk upright on level surfaces, but must use two arms and two legs to travel at their prescribed movement rate in a web.
Chagmat can spin webs in the same way a giant spider accomplishes this, but cannot shoot a web in the manner of a Web spell. Chagmat clerics can use two first-level cleric spells once per day. Non-extraordinary chagmat clerics generally disdain the good forms of spells and will usually opt for the reverse form of such spells as Cure Light Wounds, Purify Food & Drink, Remove Fear, etc.
Chagmat clerics will be able to speak (but not read or write) the Common tongue in addition to their racial language. Chagmat may use any magic items permitted by class. Their bite does no damage and is not poisonous.
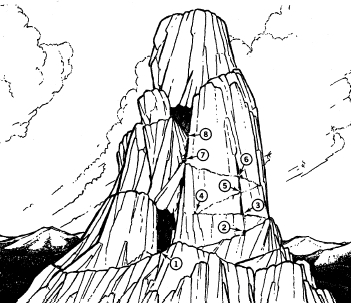
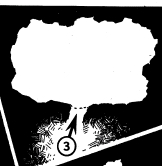
The mountain
Little Boy Mountain gets its name from its shape, which reminds viewers
of a small boy seated on the ground, arms locked around his knees. It is
surrounded by hills, and all its faces
except the south face are treacherous to climb. The south face of Little
Boy Mountain is dotted with eight cavern-like openings, some of them (Caverns
1, 3, 4, 6, and 8) visible from the base of the mountain and the others
(2, 5, and 7) only able to be seen from a few feet away. Three of the cavern
openings (3, 5, and 8) are occupied (see area descriptions), and another
one (7) is the entrance to the chagmat temple; the other four are normally
unoccupied, though a party might encounter something within them. There
is a 75% chance (1-3 on d4) of an encounter occurring within a supposedly
unoccupied area. This chance is rolled when a cavern is entered for the
first time, and if an encounter is indicated, roll d4 and consult the following
list to determine the type of encounter. Note: The first three numbered
encounters will only occur once each, if at all; only the fire beetles
(encounter #4) may be met more than once, and in that case a new roll must
be made each time for the number appearing.
1: 5-10 (d6+4) Troglodytes; AC 5, MV 12", HD 2, HP 4, 11, 9, 8, 4, 6, 7, 9, 4, 2. #AT 1, D by weapon; revulsion odor when aroused. These troglodytes are seeking to establish a base in the mountain. They are armed with stone battle axes and vaned javelins.
2: 7-12 (d6 + 6) Piercers; AC 3, MV 1, HD 1, HP 7,5,8,6,4,6,3,2,5,4,4,4. #AT 1, D 1-6. These will be spread out in the cavern where they are encountered, such that no area within the cavern is safe from their attack.
3: Brown mold, one patch, covering the floor, walls, and ceiling of the designated area.
4: 1-4 Fire Beetles; AC 4, MV 12,
HD 1+2, HP 6, 5, 7, 8. #AT 1, D 2-8. Note: These beetles, unlike the first
three encounters described, can appear in more
than one cavern.
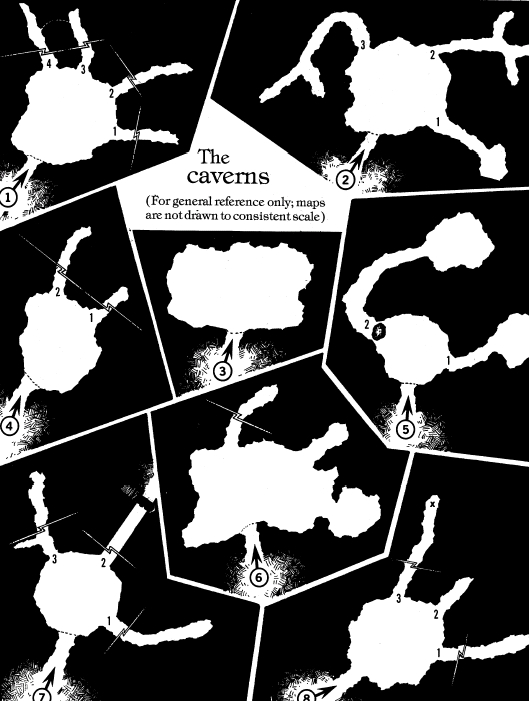
The Caverns
After reaching the mountain and determining
that the south face is the only
area of interest, adventurers will have to
make an ascent as far as Cavern 1, getting
there by means of mountaineering
techniques or magic. From that point on,
a rough but usable path connects the
caverns to one another, in the order in
which they are numbered (see map). It is
about 225 feet up to Cavern 1, and the
DM should only allow the climb to be
made without incident if the party has at
least one experienced climber or mountaineer
(thief, mountain dwarf, or the
like) who can lead the way, locating or
manufacturing handholds and footholds
for the other characters. If the party does
not contain an experienced climber, every
member of the party must check after
each 75 feet of climbing to see if he or
she makes a saving throw against falling.
This save is rolled on d20; the save is
successful if the resulting number is less
than or equal to the characters dexterity.
The trail connecting the remaining
seven caverns is only wide enough for
one person at a time. If a ranger should
look for tracks on the trail, he or she has
a 75% chance of finding the following
tracks in the appropriate area: bonesnapper
tracks around Cavern 3; ogre
tracks around Cavern 5; and chagmat
tracks around Caverns 5,6,7, and 8 (the
ranger would not necessarily know these
are chagmat tracks). Strong emanations
of evil are detectable in and around Caverns
5, 7, and 8.
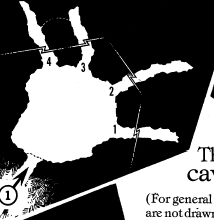
<check>
inside an entranceway which is 20 feet
wide lies the main chamber of this cavern,
roughly 200 feet in diameter with a
15-foot ceiling. Four passages, all 8 feet
tall and ranging in width from 3-5 feet,
branch off from it similar to fingers from
a hand. Passage #1 goes 400 feet further
into the mountain and dead-ends. Passage
#2 goes 200 feet into the mountain
and dead-ends. Passage #3 goes 300
feet into the mountain and has numerous
side passages which branch off for
10 to 50 feet before dead-ending. The
first such branch on the west side of the
passage loops around and joins Passage
#4. This is a small side cavern with a
branch in the northeast corner that joins
with Passage #3 and a branch in the
northwest corner that goes about 400
feet into the mountain and dead-ends.
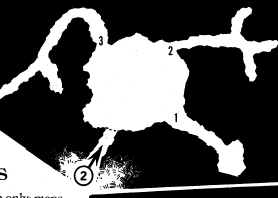
A 10-foot-wide entranceway tapers
down to a roughly straight 3-foot-wide
passage leading some 40 feet into the
cavern proper, which is about 50 feet in
diameter with a 20-foot ceiling. Passage
#1 goes southeast for about 50 feet and
then opens up into a small dead-end
cavern. It is 6 feet wide. Passage #2 goes
northeast for about 20 feet and opens
into three small dead-end caverns. This
passage is about 4 feet wide. Passage #3
goes northwest for about 75 feet, then
bends to the south, going another 60 feet
to a fork where two spurs go about 15
feet southeast and southwest before
dead-ending. Where the passage forks is a
human skeleton partially protruding
from a pile of rocks. On the skeletons
left hand (not visible unless characters
move the rocks) is a finely crafted gold
ring with a translucent green stone in
it.
The ring is worth about 200 gp simply for
the gold, but it is also a Ring of Etherealness
with two charges left in it. Inside the
ring the word Darandara is inscribed in
Common script. If the ring is put on and
this word pronounced, the wearer becomes
ethereal. To reverse the process,
the word must be pronounced backwards
(Aradnarad). If the two charges are
expended, the green stone will darken
and the ring will be non-magical. It will
still be worth 200 gp, however. The skeleton
is the remains of a bold adventurer
who got caught in a cave-in.
This chamber is reached through a
narrow entranceway as in Cavern 2. This
cavern, shaped in an oval 75 feet by 50
feet wide with an 8-foot ceiling, is the lair
of a bonesnapper (see description
in the
FIEND FOLIO Tome); AC 4, MV 6,
HD 4, HP 18, #AT 2, D 1-8/1-4. When the
adventurers enter the cavern, they will
see a number of human jawbones and
other bits and pieces of skeletons scattered
on the chamber floor. Predominant
among them is a more or less intact hu
man skeleton visible along one wall, with
a metal helmet still adorning the skull.
This is a Helm
of Comprehending Languages
and
Reading Magic.
Roll d4+1 when the party enters the
cavern, to generate a number from 2-5.
This result indicates the distance, in tens
of feet, between the entrance to the main
chamber and the current position of the
bonesnapper.
This chamber, unlike Caverns 1 and 2,
does not have passages branching off
from it. Bunched in an inconspicuous
hollow at the base of the eastern wall is a
50-foot rope (actually a Rope of Climbing),
which will be discovered if the party
kills the bonesnapper and then searches
the cavern thoroughly. The rope will
spring to life as soon as the command
word Spider is spoken, shaping itself
into a tight coil with one end rising until it
hovers 5 feet off the ground, awaiting a
further command. If no other direction is
given to the rope within one round, it will
fall lifeless to the cavern floor again.
A five-foot-wide entranceway opens
into an irregularly shaped chamber 80
feet across at its widest point with a ceiling
at least 15 feet high in all locations.
Passage #1 goes straight into the mountain
about 350 feet, with a constant width
for of 6 feet and a ceiling height of 5-9
feet, and dead-ends. Passage #2 goes
about 50 feet into the mountain and is
only 2 feet in diameter. The passage is
more or less straight and ends in a small
dead-end cavern.
Cavern 5
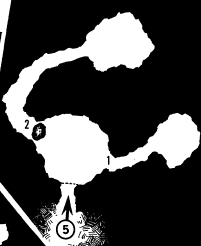
This is the lair of Muddah Rateater, an
ogre. The main chamber is an almost
circular cavern some 30 feet in diameter
with a ceiling varying from 12 to 18 feet in
height. It is reached by entering through
a 7-foot-wide, 10-foot-high corridor from
the south. Two passages lead from the
main chamber to the ogres sleeping
quarters (#1) and the treasure room (#2).
Passage #1 is 15 feet long and 7 feet wide
with a 10-foot ceiling. Passage #2 is
blocked off by a large boulder across the
exit from the main chamber. Behind the
boulder the passage bends to the
northwest, then curves to the east, a total
distance of 50 feet.
The main chamber is lit by a torch
stuck in a carved-out hole in the north
wall. A crude table, made of a large flat
stone balanced on another rock, is in the
center of the room with another large
rock set beside it as a chair. Piles of rat
bones are everywhere within this area.
The sleeping area is a circular chamber
25 feet in diameter. It is dark but can be
illuminated by lighting a candle stub in a
carved-out niche on the south wall. A
bed made of old blankets and dirt is
against the north wall, and more piles of
rat bones are evident. Muddah the ogre
is asleep in his bed, under a heap of
blankets. Characters will be immediately
aware of the presence of an occupant in
the chamber when they reach the end of
the passage. Muddah will not awaken
when characters enter his sleeping chamber
unless the candle is lit or unless the
party approaches the bed and disturbs
the blankets covering the ogre. Muddah
is AC 5, MV 9, HD 4+1, HP 24, #AT 1, D
1-10 (no weapon immediately at hand).
Under a large pile of refuse near the
southeast portion of the sleeping quarters
is a decrepit-looking war hammer.
This is actually a Hammer
+3, Dwarven
Thrower, with
its full powers usable by
any dwarven fighter who wields it and
utters the command word Glanya,
which is inscribed in dwarvish on the
shaft. In the hands of any other type of
character, the hammer will perform as an
ordinary weapon.
The entrance to the passageway leading
to the ogres treasure room is blocked
by a large boulder that requires a combined
strength of 20 to roll aside. The
noise caused by the moving of the boulder
will awaken Muddah, and he will
emerge from his bedchamber one round
later to investigate the disturbance.
If the party gets the boulder out of the
passageway to the treasure room and
avoids or vanquishes the ogre, they will
find in the room a small locked chest,
around which are scattered various valuables:
9 gem-studded silver goblets,
worth 10 gp each; 5 gold-plated dishes,
worth 5 gp each; and three small leather
pouches, each containing 200 copper
pieces.
In the chest itself (the lock can be
picked, or the chest can be simply
smashed open by inflicting 10 hit points
of damage on it) are the following items:
A vial containing 3 ounces of Oil of
Transparency. When an ounce is spread
on a solid surface (covers about 25
square feet), it makes the surface transparent
for 11-20 (d10 + 10) rounds. Up to
a 2-foot thickness of any material will be
rendered transparent. The oil smells like
burnt leather and tastes awful but has no
adverse effect on an imbiber if drunk.
The oil is worth 100 gp per ounce.
A leather belt with a buckle of finely
wrought platinum in which are etched a
set of undecipherable symbols (the initials
of the chagmat who originally
owned it). The buckle is worth 100 gp.
A gold locket with the symbol of Chag,
the Spider-Spirit, on it. The locket has a
catch which can be opened to reveal an
octagonal purple gemstone inside. The
locket was at one time in the possession
of a follower of Chag.
A square metal cylinder with each side
a different color (red, blue, yellow, green
reading clockwise) and a small striker
bar attached to the edge of the cylinder
by a thin cord. This is a special Chime of
Opening (worth 5,000 gp) attuned only
to the chagmat temple. This device will
open the secret door leading to the temple
from Cavern 7, and can be used to
manipulate any of the doors in the
Stomach of Chag area of the temple.
Cavern 6
This is a large, irregularly shaped cave
with a ceiling varying from 15 to 20 feet in
height. Two small alcove-type caverns
extend to the northwest and northeast.
Nothing of interest is to be found here.
The northwest passage goes deep into
the mountain, some 600 feet, before
coming to a dead end. After an initial
straight stretch of 25 feet it becomes very
twisty. The passage varies in width from
3 feet to 10 feet (the straight stretch is 10
feet wide) and the ceiling height varies
from 5 to 8 feet.
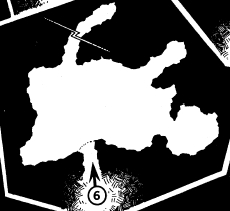
Cavern 7
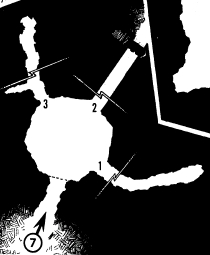
This cavern contains, among other
things, the entrance to the chagmat
temple. Adventurers will note that this
cavern, unlike the previous six, has apparently
been worked on by someone
other than Mother Nature. It has been
sculpted in the shape of a rough octagon.
The cavern proper is reached via
a 10-foot-wide passage which leads into
it from the south. The cavern has a uniform
10-foot-high ceiling. Passage #1,
leading off to the southeast, runs deep
into the mountain and originally ran all
the way through to the north face. Now it
goes about 1,000 feet before ending in a
mass of several tons of stone. Passage
#1 varies from 3 to 8 feet in width and the
ceiling varies from 6 to 12 feet high. Passage
#2 is a perfectly straight corridor 6
feet wide that runs 100 feet to an apparent
dead end. This is actually the site of
the temple entrance, disguised to look
like impassable terrain. Passage #3 extends
to the northwest about 50 feet until
reaching a dead end. It is about 4 feet
wide all the way along, and there is a
short side spur about 20 feet inside the
passage entrance that runs east for 10
feet. At the most secluded spot inside
this side spur is the body of one of the
members of the missing search party.
The man apparently suffered injuries
from some cause and staggered this far
before dying There are no signs of a
struggle in the immediate area.
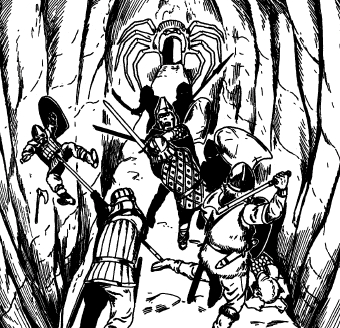
The lair of a huge (trapdoor) spider
is
located 15 feet before the dead end in
Passage #2. This spider is AC 6, MV 18,
HD 2+2, HP 14, #AT 1, D 1-6 plus poison
(+1 to s.t.). It surprises on a roll of 1-5 and
will attack any non-chagmat who dares
to venture this close to the temple. It
leaps out at lightning speed from beneath
the floor where its lair is. If it hits, it
will drag its victim back into its lair,
which is 6 feet wide, 8 feet long and
about 7 feet deep. In the spiders lair are
two half-eaten bodies, other members of
the missing search party. There is also a
quiver of 10 arrows for a longbow (three
of them +1 arrows) and a broken longbow.
There is also a usable shield, a twohanded
sword, two daggers, and a heavy
mace, none of them magical but all usable
as normal weapons.
Passage #2 ends in a seemingly solid
rock wall which is actually a secret door
made of a six-foot thickness of stone.
Detect Magic will reveal the
existence of
the secret door. The door can be opened
from the outside by using the special
Chime of Opening found in the ogres
lair (Cavern 5). The chime must be
sounded while the holder is standing
within 5 feet of the door. If properly activated,
the door will slide to the west very
silently and remain open for 1-6 rounds
before sliding shut automatically. A
Knock spell will not work on this door,
and the 6-foot thickness of stone will resist
any attempt to move it forcibly or
blast it out of the way. On the interior
side of the door, set into the wall adjacent
to the portal, is a lever which moves
the door when pulled up (to open) or
down (to close).
Cavern 8
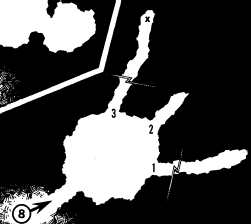
This was once a meeting hall for the
chagmat living in the mountain. It shows
signs of handiwork, as in Cavern 7.
There are a number of stone benches in
the cavern proper, some in ruins and
others still intact. The ceiling of the cavern
is about 12 feet high, and walls and
ceiling are covered with spider webs.
The entrances to the three passageways
are all covered by these webs. Scuttling
around in the webs are several dozen
large spiders; AC 8, MV 6*15,
HD 1+1,
HP 4 each, #AT 1, D 1 point plus poison
(save at +2). From 1-6 of these spiders
will leap on any non-chagmat character
who enters this area.
Passage #1 goes back about 200 feet
into the mountain and is about 3 feet
wide most of the way. The ceiling is
about 5 feet high, and the walls of the
passage have been purposely weakened
so that there is a 20% chance of a cave-in
for every 50 feet traveled. A cave-in will
clog the passageway, depositing a pile
of rocks and earth from 1-3 feet thick
between the victim(s) and the rest of the
chamber. Comrades can dig through the
debris at the rate of 1 foot per turn until
the barrier is broken through.
Passage #2 is a short spur 6 feet wide,
35 feet long, and basically straight, culminating
in a dead end.
Passage #3 is another spur, this one 25
feet long, 6 feet wide, and straight. It
dead-ends at a rock wall. However, this
wall glows slightly because of its magical
nature. This area is the receiving end
of the Mirror of Teleportation in Byaculuses
quarters (see The Stomach of
Chag). Detect Magic will show this wall
as magical, but it has no use other than
to teleport people out of the temple.
The temple
There were at one time a total of eight
Temples of Chag throughout the land,
one for each color of spider found in the
world. The temple located inside Little
Boy Mountain is dedicated to the gold
spider. Temples have a standard form,
consisting of eight rooms, each octagonal
in shape (though of varying sizes)
and of a different color, plus an entry
room, also octagonal. All rooms are
joined by long, gently sloping corridors.
These rooms constitute the first (upper)
level. The second (lower) level of a
chagmat temple is primarily made up of
a huge chamber with the quarters of the
High Priest and various spider dens adjoining
it. This huge chamber, reached
only by traveling through treacherous
corridors and shafts, is known as The
Stomach of Chag.
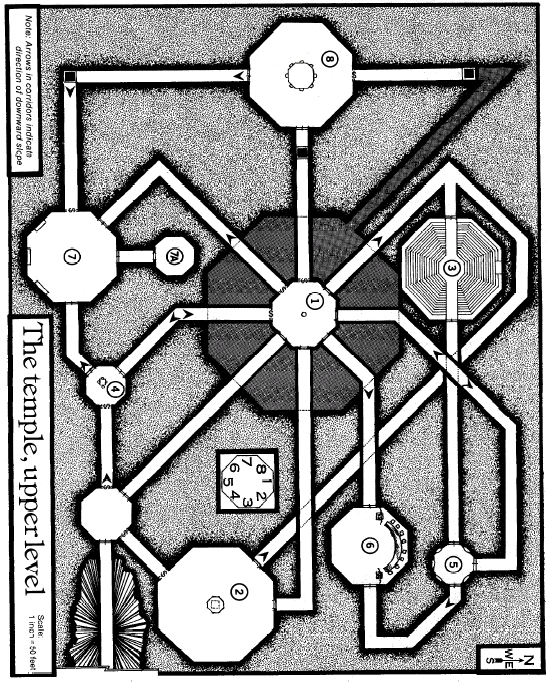
One room of each temple is located at
the center of the web-like configuration
and always represents the color of spider
to which the temple is devoted. In
this case the center area is the Gold
Room, also known as The Heart of Chag.
The floors and ceilings of the Gold
Temple (in all rooms, including those
named for other colors) are all made of
stone colored by gold dye, with a weblike
tracery of fine black lines running
across the surface. Ceilings are always
10 feet high on the first level, unless otherwise
specified.
The walls of each room are stone,
stained a certain color, denoting the color
of spider the room represents, and
(on walls that do not contain doors)
adorned with a hideous bas-relief depiction
of Chag, the Spider-Spirit.
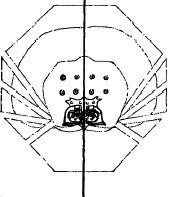
On the first level all doors (except secret
doors) are double doors of halfinch-
thick iron, gold plated and etched
with a depiction of Chag. The eye sockets
of these depictions are raised holders,
each containing a tiny gem or semiprecious
stone the same color as the
room the door is in. These gems are so
small as to be virtually worthless as treasure;
their purpose is decorative only.
Each door has two semi-circular handles
of carved metal (see accompanying diagram),
by which the door is pushed or
pulled. Doors are usually locked; on all
doors, a keyhole will be found behind
one of the eight eyes (which is simply
slid to the right to reveal the keyhole).
The DM may generate a number from 1-8
at random to determine which eye the
keyhole is behind, or may simply designate
a particular eye as the location of
the keyhole. A lock on one of these doors
can be picked as long as the keyhole is
located. Because the doors are thick metal,
it is difficult to hear noise through
them; a roll of 1 on d6 indicates success
in such an attempt. Doors are 8 feet high
and 6 feet wide (each of the two sections
is 3 feet across).
Secret doors are opened by using a
combination of numbers and sliding to
the left those eyes corresponding to
that combination in the depiction of
Chag on the wall containing the door. In
any Particular room, the combination for
any secret door is the number(s) of the
wall(s) on which all the secret doors in
the room are located. For instance, the
combination for secret doors on walls 3
and 5 of a room would be 3-5. Only one
secret door can be opened at one time;
the combination will not open all doors
at once. Eye sockets on secret doors do
not contain gems but are otherwise identical
to sockets on regular doors. All secret
doors are single panels 3 feet wide
and 5½ feet high. When activated, they
swing open for 1-4 minutes (roll for each
door each time it is opened) and then
swing shut. Some of the secret doors are
trapped.
Corridors in the temple are 10 feet
wide with 8-foot ceilings. Floors and ceilings
of corridors are gold with black
webbing, the same as for rooms. Corridor
walls are smooth, natural stone
with no carvings or other decorations.
Rooms are sometimes lit by octagonal
glow lanterns, made of iron and holding
glands from fire beetles which produce
a constant but fairly dim light.
Lanterns are hung from the ceiling and
can be easily removed and transported.
The Gold Temple is being restored by
the powerful chagmat cleric Byaculuse;
though long out of operation, areas of it
have been cleaned and restored in recent
weeks. In the restored areas, doors
and other movable surfaces have been
lubricated, cracks in the walls have been
patched, and so forth. This renovation
will be apparent to characters, where it is
present, as the temple is explored.
The High Priest Byaculuse is determined
to restore the reign of Chag to
prominence and dominance in the land.
He is responsible for the disappearance
of the five women from the town of Byr.
He intends eventually to take three more
women, making a total of eight, and use
the group of them as part of a ritual
which he hopes will summon Chag to the
Prime Material Plane. He has ordered the
kidnappings to take place intermittently,
to guard against the discovery or capture
of any of the members of his rather
small band of followers. This force consists
of 10 chagmat fighters and 4 other
chagmat clerics. Also at the high priests
service are some spiders, including Pagoyak,
a giant gold spider which is
Byaculuses personal pet. The priest is
also in the midst of a plan to hatch
hordes of normal spiders to infest the
surrounding terrain, and intends to release
his spider plague upon the surrounding
countryside.
In addition to the women, Byaculuse is
holding another prisoner, a human druid
named Cosmo. The priest had Cosmo
kidnapped several days ago, when the
druid traveled too close to Little Boy
Mountain for his own good. Byaculuse
intends to force the druid to divulge
some of his spell-casting knowledge to
help the chagmat priest devise a way of
magically reproducing mass quantities
of spiders for the plague. More details
about Cosmo will be found in the description
of Room 7A.
Byaculuse also employs the services
of a small group of hobgoblins who
guard the outer reaches of the temple.
These hobgoblins are the same creatures
who have been spotted by townspeople
from time to time in the area.
They know nothing about the operation
of the temple and have gone nowhere
inside it, except for Rooms A, 1, and 4.
Encounters
The DM should roll for a random encounter
(on d6, a result of 1 indicating a
positive result) once every three turns
after the party enters the temple area. If
an encounter occurs, roll d4. If the result
is 1-3, use the creature type indicated on
the following list. If the first result is 4,
roll again and use the second result as
the indicator of the creature type. The
encounter will not take place at the spot
where the party is located when the rolls
are made, but will occur the next time the
party passes through a door or turns a
corner in a corridor. Any of these creature
types may be encountered more
than once.
1: 2-12 Giant Ants; AC3, MV 18,
HD 2,
HP9,12,12,6,5,8,9,6,11,4,14,5.#AT1,
D 1-6 plus poison for warriors.
2: Black Pudding; AC 6, MV
6, HD 10,
HP 25 + 2d6 (roll for each separate encounter),
#AT 1, D 3-24, dissolve wood
and metal.
3: 11-20 Giant Centipedes;
AC 9, MV
15, HD 1/4, HP 1 apiece, #AT 1, D nil.
Characters save at +4 against the centipedes
poisonous bite; failing one of
these saving throws causes the victim to
be weakened (movement halved, no attack
or defense possible) for 1-3 turns.
4: 1-4 chagmat fighters, chosen at
random from the chagmat fighter list
given below. If 3 or 4 fighters are encountered,
there is a 25% chance for one
chagmat cleric (again chosen at random)
to be with them. There can be no
more than the 10 fighters or 4 clerics
available; the DM must keep track of any
that are slain. Chagmat who encounter
intruders are 50% likely to try to get back
to the Stomach and warn their comrades.
If they attempt this and succeed,
Byaculuse and his minions will be on full
alert.
Chagmat force
All chagmat have the same general
characteristics, as spelled out in the statistical
information given earlier. Chagmat
fighters and clerics that might be
encountered differ from one another
only with regard to hit points, weaponry
(fighters use short swords, clerics use
clubs), whether or not they use a shield
or shields (indicated by an armor class of
5, 4, or 3, whichever applies), and spellcasting
ability (if any).
Chagmat fighter list
F1: AC 3, HP 4.
F2: AC 3, HP 10.
F3: AC 5, HP 6.
F4: AC 5, HP 7.
F5: AC 4, HP 12.
F6: AC 4, HP 13.
F7: AC 3, HP 10.
F8: AC 5, HP 10.
F9: AC 5, HP 12.
F10: AC 4, HP 6.
Chagmat cleric list
C1: Yellow Acolyte; AC 4, HP 5. Spells:
Protection
From Good, Cause
Light
Wounds.
C2: Orange Acolyte; AC 3, HP 8.
Spells: Cause
Fear, Darkness.
C3: Black Acolyte: AC 5, HP 4. Spells:
Cause
Light Wounds, Sanctuary.
C4: Red Acolyte: AC 4, HP 5. Spells:
Putrefy
Food & Drink, Protection
From
Good.
The entrance
If and when the party breaches the entrance
to the temple in Cavern 7, they will
see a set of stone stairs descending to
meet an arching, 100-foot-long stone
bridge that spans a virtually bottomless
abyss and leads to the Temple Face, a
grotesque and hideous sculpture of a ferocious
giant spider that extends like a
canopy over the double doors that lead
to Room A. Crossing this bridge (or otherwise
spanning the abyss) is the only
way to reach the temple area.
There is a 65% chance that the double
doors presided over by the Temple Face
will be ajar; otherwise they will be locked.
If the doors are ajar, there is a 35%
chance that the hobgoblin guards in
Room A will hear a party coming and
either ambush them when they enter
Room A or try to head them off on the
bridge (50% chance of either). Picking
the lock on the double doors will always
alert the guards.
The party should not be able to actually
see the Temple Face until they have
reached at least the midpoint of the
bridge, since this area is dark. If a fight
breaks out on the bridge, any combatant
hit by a roll of natural 20 must roll his or
her dexterity or less on d20 to avoid falling
off the bridge to death below. (For
this purpose only, consider all hobgoblins
to have 13 dexterity.)
Room details
Room A: The entry room, lit by four
hanging glow lanterns. Each of the walls
of this room is colored differently, representing
the eight colors of the chagmat
worship (green, red, gold, black,
orange, purple, yellow, and blue, in no
particular order). Walls are numbered in
a clockwise order, with the north wall
being number 1. The doors leading from
the stone bridge are on wall 3. Wall 8 has
a set of double doors, unlocked. Secret
doors are located in walls 2 and 7, so the
combination for each one is 2-7.
This room is where the hobgoblin
guards are on duty. There are 8 hobgoblins
in the service of Byaculuse, and from
3-6 of them will be present in this room at
all times. All hobgoblins are
AC5, MV9,
HD 1 + 1, #AT 1, D 1-8 or by weapon.
Each of them differs from the others with
regard to hit points and weaponry, as
follows #1: HP 6, broadsword; #2: HP
6, spear; #3: HP 5, broadsword; #4: HP 7,
spear; #5: HP 9, morning star; #6: HP 7,
long sword; #7: HP 9, +1 morning star
plus the key to the chest in Room 4; #8:
HP3, spear. Any hobgoblins not on duty
in Room A will be in Room 4. If the party
members outnumber the hobgoblins on
duty in Room A, the guards will attempt
to exit through the secret door in wall 7
to Room 4 and get reinforcements.
Any captured hobgoblins can tell adventurers
(if in a language known by
both speakers) only that two women
were brought here by their chagmat
bosses. They have no idea where the
women were taken or why. They do not
know the combination to the secret door
in wall 2 (that is, they do not know it is the
same as the combination for the door in
wall 7). Each hobgoblin carries 50-100
(d6 + 4) silver pieces.
Room 1
This area is not lit by glow lanterns.
There are five normal doors, all locked,
on walls 1,2,3,4, and 8. Walls 5,6, and 7
contain secret doors, so the combination
for each of them is 5-6-7. The floor
on either side of each secret door is a
5-foot-square trap door that will open
onto a 10-foot-deep pit if the wrong
combination of eye sockets is pushed.
Room 1 is the Heart of the temple,
and all its walls are gold-colored. In the
center of the room is a 3-foot-high stone
pedestal in which is embedded a goldhued,
octagonal stone giving off a pulsating
light. The stone has four T-shaped
handles inside depressions which are
spaced evenly around its visible surface.
If all four handles are grasped in the
space of one round or less, all characters
or creatures involved will be affected as
though Cure
Light Wounds had been
cast on each of them. If less than all four
of the handles are grasped within a
rounds time, the character(s) or creature(
s) holding the handle(s) will suffer
as though Cause
Light Wounds had
been cast on each one.
Caught in the door on wall 8 is a piece
of homespun green cloth. This is a scrap
from the scarf of one of the captured
women. Any player character has a 50%
chance of catching sight of it if that
character comes within 5 feet of the
door; the cloth will always be spotted if
the door is examined.
Room 2
The walls of this large room are green.
The room is not lit by glow lanterns.
There are double doors, both locked, in
walls 1 and 8 and a secret door in wall 6.
In the center of the room is a bloodstained,
octagonal altar, 15 feet in diameter,
made of green stone. If any Detect
spell (Detect
Magic, Detect Evil/
Good,
etc.) is cast on the altar, it will
pivot to one side, revealing a 10-footdeep,
6-foot-diameter hole beneath it.
Characters will immediately see the contents
of the hole: three small brass
coffers, closed with sturdy latches but
not locked, and what appears to them to
be a huge spider but is actually a phase
spider:
AC 7, MV 6, HD 5 + 5, HP 20, #AT
1, D 1-6 plus poison (save at -2), SA
phase shift. The spider will go out of
phase within a few seconds after being
seen, having been alerted to possible
danger by the moving of the altar. It will
not leave the treasure hole or attack unless
one or more party members descend
into the pit.
The first brass coffer the characters
examine (if they overcome the phase
spider or are able to get the coffer out of
the pit without defeating the spider) will
contain a choker of 10 matched emeralds,
worth 5,000 gp altogether. It acts
similar to a Necklace
of Strangulation; if
donned, it will begin strangling its wearer
to death after 1-4 more rounds have
passed. It does 1 point of damage per
round and can only be removed by a
character other than the wearer, at a
chance equal to that characters bend
bars/lift gates percentage. One such
removal attempt may be made per round.
The necklace will register positively to
Detect Magic
and/or Detect Evil.
The second coffer characters will open
contains a leather belt with a metal buckle.
There are two words in the chagmat
language engraved on the buckle. The
one on the front is pronounced Graa,
and the one on the back is pronounced
Yegraa. If the words can be translated
(via Comprehend
Languages or similar
means), the belt can be used by any
character. When the wearer says the
word Graa, he or she phases out, exactly
like a phase spider. The command
word Yegraa reverses the process. The
belt has a sale value of 3,000 gp.
The third coffer contains a bandolier
with eight identical daggers (1,000 gp
value each) in its sleeves. These weapons
will act non-magical if used as
hand-held weapons, but will be +2 weapons
if thrown at a target.
Room 3
The walls of this room are black, and
the room is not illuminated. Sets of double
doors, both locked, are on walls 3
and 7. This room was employed in the
past as an arena and auditorium, but is
not currently in use.
Sets of bleacher-style seats fill the
north and south walls and adjacent areas
(see map), with open passageways leading
east and west to the doors and a
20-foot-diameter open area in the center
of the chamber. On the north wall, at the
highest vantage point of any location in
the room, is a large, ornate throne.
The throne is made primarily of rich,
dark hardwood. Eight gems (eyes) of
100 gp value each are imbedded in the
backrest, and the arms and sides of the
throne contain dozens of other less valuable
(10-60 gp maximum) gems and
semi-precious stones. Protruding from
the backrest are eight arms, actually
thin metal rods meant to simulate the
legs of a spider. Each of the arms can
be manipulated up and down to a small
degree. One of them has a special property
which this movement will activate.
Moving the lowest arm on the left side
(as seen from in front of the throne) will
open a hatch in the ceiling above the
open area at the center of the room and
cause a Web of Entanglement to fall onto
that area, trapping all characters or creatures
in that location. This magic item is
similar to a Rope
of Entanglement in its
effect on victims, except that the webrope
cannot be rendered harmless by
cutting it. It is susceptible to fire, but any
character in contact with a part of it
when it is set aflame will suffer 2-8 points
of damage from burns before the fire
dies out.
Room 4
This blue-walled chamber is the guard
room, where the hobgoblin
guards can
go when off duty. Any hobgoblins not
already encountered as a result of the
partys entrance into Room A
will be
found here. The room is lit by a single
glow lantern. There are locked double
doors on walls 6 and 8. On wall 3 is a
secret door.
In the center of the room is a makeshift
table with four chairs around it. The table
consists of an overturned crate which
supports a slab of wood. There is a small,
locked iron chest under the crate. The
key to the chest is (or was) in the possession
of the most powerful hobgoblin (the
one with 9 hit points and the magic weapon).
In the chest are the following
items: a gaudy-looking gold-plated necklace
with large imitation diamonds, worth
a total of 20 gp; four jade bracelets,
worth 500 gp each; a tiara of silver with a
large sapphire set in it (silver worth 50
gp, sapphire 1,000); and a small pouch
containing 20 small spheres of red, green,
and blue glass-like substance (these are
marbles, and they are worthless, but the
hobgoblins dont know that).
On the table, amidst scraps of food
and a scattering of hobgoblin playing
cards, is a two-handled earthenware jug
with three triangular symbols on it, written
in the chagmat script. The jug looks
worthless and is presently filled with
horrible-tasting wine. The symbols stand
for Heal, Slay, and Protect. If one
character grips the handles of the jug
and speaks one of those words, one of
these things will happen:
Heal: Any liquid in the jug will become
one dose of a healing
potion that will
cure 1-12 points of damage, either from
wounds or poison. This can be done up
to three times a day, and the command
word must be repeated each time.
Slay: Any liquid in the jug will become
one dose of a deadly ingestive poison
doing an immediate 4-32 points of damage
to anyone who drinks it. This function
can be performed twice a day.
Protect: Any liquid in the jug will become
one dose of a potion
of invulnerability
usable by fighters only with a
duration of 2-20 rounds. This function
can be used once a day.
In all cases, the jug must contain a
liquid to begin with, and the subsequent
potion or poison must be drunk directly
from the jug (it cannot be poured out and
kept). The jug is worth 3,000 gp, and the
hobgoblins have no idea it is magical.
Room 5
The walls of this room are red, the
symbolic color of magic in the chagmat
culture. The area is lit by four glow
lanterns.
When the chagmat were a more powerful
race many years ago, this room was
a very powerful chamber. Three sets of
double doors lead through walls 1, 3, and
7. Embedded in all the other walls are
irregularly shaped pieces of translucent,
smoky glass, one large piece to a wall.
These served as magickal "cells" in the
old days, holding captured demons the
chagmat priests could summon forth
and command into their service. The
cells do not serve this purpose now;
many years of disuse have caused them
to malfunction. But Byaculuse has turned
this into a convenience, employing the
room as a sort of security system to keep
an eye on his captives from this remote
location.
When characters enter the room, nothing
will be visible in ("behind") the
cells, but it will be apparent that the
smoky glass is translucent. Appearing
on each cell, written across the top in
chagmat script, is a single word. Starting
with the cell on wall 2 and reading
clockwise, the words are "Yastorah,"
Burkesha, Colozag, Mendar, and
Lofath. (These are the names of five of
the most revered chagmat priests from
the old days. Calling on their spirits is
part of the process which was used to
summon forth the imprisoned demons.)
Each cell has a perfectly smooth surface,
and feels like normal glass to the
touch but is practically invulnerable. The
cells can only be damaged by blows
from magic weapons or spell attacks,
and one cell will absorb 50 hit points of
damage before cracking. It takes an additional
50 points of damage to cause a
cell to shatter and when it does, the
pieces will fall to the floor, revealing a
solid, blank wall beneath. The pieces are
worthless.
In the center of the room is a small
octagon formed by colored stones set
into the floor. Each side of the octagon is
a different color, corresponding to the
eight colors of the chagmat temple (as in
Room A).
The cells presently function in this
manner: If a single character or creature
(chagmat) steps into the small octagon
in the center of the room (there is only
space for one man-sized character at a
time, comfortably), faces one of the cells,
and pronounces the name labeling that
cell, the glass will shimmer and show an
image of a woman (one of the missing
maidens), seeming to come from inside
the glass. If the speaker faces a different
cell, the current image will fade and
another woman will appear in the new
cell when the proper name is uttered. If
the speaker steps out of the small octagon,
the cell which was on at the time
goes blank. The cells will not function if
two or more figures try to occupy the
space inside the octagon at the same
time.
If Akron Oheeyo is with the
party, he
will recognize any and all of the women
as the kidnap victims and be able to identify
them by name. Again reading clockwise
from wall 2, the images will be those
of Lurati, Wilaine, Cerasa, Henna, and
Myrella. Each of them is shown in leg
irons, chained to the side of a structure
or large piece of furniture which cannot
be identified. Their dress and physical
appearance are each distinctive, so that
even if Akron Oheeyo isnt around, the
adventurers will know them to be the images
of five different women, and they
may safely make the logical assumptions
that (a) these are the kidnapped
women and (b) they are all still alive
somewhere in this complex.
Room 6
The walls of this room are purple. Sets
of doors, both locked, lead through walls
3 and 7. The room is not lit by glow
lanterns.
This room was formerly used as a judicial
chamber where chagmat priests
would hear cases and pass sentence
on the accused. A 6-foot-high stone
bench with eight empty seats behind it
curves across the northern half of the
chamber. On the bench in front of each
seat is a gold headband with a single
jewel set in it. Facing the front of the
judges bench and reading from left to
right, the jewels are colored yellow,
orange, purple, gold, green, black, blue,
and red.
At each end of the judges bench is an
8-foot-tall metal statue of a chagmat
warrior, its six arms outstretched. The
three arms of each statue nearest the
chamber walls are imbedded in those
walls. The topmost arm on the side away
from the wall on each statue is imbedded
in the 10-foot-high ceiling. The other two
arms of each statue are extended in what
looks like a natural position, so that opposing
arms of each statue are lined up
across from each other.
Anyone who walks upright between
the two statues will trigger a discharge of
electricity, arcing between the two pairs
of opposing arms, which will do 2-8
points of electrical damage (save vs.
wands for half) to any and all in the path
of the arcs. The damage can be avoided
by those who crouch down or crawl
across the space, since the lower of the
two arcs goes straight across between
the lower pair of opposing arms 3 feet
above the floor. Crouching or crawling
will still set off the electricity, and anyone
in its path who is in an upright position
will take damage as usual. Non-living
matter will not trigger the electricity.
If a character or creature advances to
the judges bench and puts on or picks
up a headband, then moves back toward
the south half of the chamber, the statues
will give off electricity as usual. Anyone
holding or wearing a headband will not
be harmed. Instead, the bearer will be
transported instantaneously to the lower
level of the temple area, reappearing in
the doorway of the spider den (see lower
level map) corresponding to the color of
the jewel in the headband.
What a transported character sees and
experiences after appearing in the doorway
depends on whether the chagmat
force is on full alert or is not yet aware of
the intruders. (See The Stomach
of
Chag for details.) If
the character remains
in the doorway or proceeds into
the spider den adjoining the doorway, he
or she will be transported back to the
judicial chamber after one round. If the
character advances into the chamber
containing all the altars, he or she will
hot be transported back unless and until
the character goes through a doorway
(any doorway will do). If the character
loses or discards the headband after being
transported once, he or she will not
be able to return to the judicial chamber
in this manner unless the headband is
somehow reacquired.
Room 7
The walls of this room are orange. It is
not lit. If characters have their own light
source, one of the first things they will
notice is the poor condition of all the
room surfaces; floor, walls, and ceiling
have all developed cracks, some of them
actually gaping holes. There are unlocked
double doors on walls 1,3, and 8, and the
doors on the north wall are open. A secret
door is located on wall 7, and is
trapped (as in Room 1) with a pit on either
side of the portal.
Positioned along walls 4, 5, and 6 are
massive wooden cabinets with glass
doors. The doors are closed and latched
but not locked. Inside the cabinets is a
wide variety of what appear to be edible
foodstuffs (roots, tubers, leaves and
greenery), plus several sets of crude
dishes, pots, and eating utensils. If adventurers
open and thoroughly investigate
each cabinet, they will discover in
the third cabinet examined a small pouch
containing seven sprigs of mistletoe.
Against wall 1, partially obstructing
the open doorway leading through that
wall, is the carcass of a fire beetle being
feasted upon by 6 giant ants. These ants
will pay no heed to anyone or anything
else in the room unless their feeding is
disturbed. Above and behind the carcass,
characters will notice that there is a
corridor leading directly north which is
illuminated by glow lanterns.
There is a 1-foot-wide crack running
through the south wall which serves as
the ants lair. If the ants feasting on the
fire-beetle carcass are disturbed by the
partys attempt to pass through the north
doorway, another 11-20 ants will emerge
from the crack and attempt to attack the
group. None of the ants will pursue the
adventurers down the corridor leading
to Room 7A (instinctively choosing to
remain close to their queen, who always
stays in the lair), but the party will certainly
have to engage the ants a second
time when they return from Room 7A to
the larger chamber. All the ants
encountered
here are workers: AC 3, MV 18, HD
2, HP 7 each, #AT 1, D 1-6 (workers have
no poison).
Room 7A
This is a small octagonal room with
walls of natural stone, lit by a single glow
lantern. The door at the north end of the
corridor is a 3-foot-wide, 6-foot-high
barrier of oak and banded iron. It is
barred on the side facing the corridor,
but is not otherwise latched or locked.
The corridor, 30 feet long, is made of
featureless natural stone and is not remarkable
in any way.
The room is a prison cell. Its present
occupant is Cosmo, the human druid referred
to earlier in the text. Cosmo is a
6th-level druid, AC 9 (due to dexterity
bonus), HP 19, Str7, Int 12, Wis 16, Dex
15, Con 9, Cha 17. When he was abducted
and taken prisoner by the chagmat,
Cosmo carried the following spells, which
he will be able to employ if and when he
is reunited with his mistletoe: Detect
Magic (x2), Predict
Weather, Purify Water,
Create Water, Cure
Light Wounds
(x2), Neutralize Poison,
and Repel Insects.
(Cosmo did have a full complement
of spells when captured, but has
since cast a Summon Insects spell under
duress during one of the interrogations
he has undergone.)
Cosmo is attired in a simple, thin robe
and has no belongings on his person or
anywhere in the room. He will say he is
proficient with the dagger, staff, and
hammer, should the party see fit to give
him the use of a weapon. He knows virtually
nothing of his whereabouts (almost
certainly less than the party would
have already learned), but he does have
an idea about the purpose the chagmat
intend to employ him for, and he will
briefly describe this purpose to the party
if questioned. If he is released from captivity,
he will try to persuade the party to
accompany him out of the complex by
the most direct route possible although
he will have no idea what the best
route is. Adventurers will be able to convince
him to change his mind by one of
two methods: promising him a share of
the reward for rescuing the women, or by
impressing on him the importance of
helping to vanquish the chagmat before
the spider plague is brought down on
the countryside.
Room 8
The walls of this room are yellow. The
area is lit by four glow lanterns hanging
from the ceiling. Sets of double doors,
both locked, are on walls 3 and 5. Wall 1
contains a secret door. Walls 6 and 8
have features on them that appear to be
other secret doors, but are actually
hinged panels, behind which are sets of
bookshelves. (The combination for
each bookshelf panel is simply the
number of the wall on which the panel is
located, either 6 or 8.) If one of these
panels is activated, a 3-by-6-foot section
of the wall will swing outward, revealing
five shelves liberally packed with important-
looking (but meaningless and virtually
worthless) books and documents.
This room was formerly used as a conference
room and library.
None of the
information in any of the literature will be
of any use to adventurers even if it can be
deciphered. The books might be worth
10-50 gp each to a collector if someone
takes the trouble to carry one or more of
them out of the temple.
The shafts
Three vertical shafts are located in the
vicinity of Room 8, one in each corridor
connecting that room with other parts of
the temple. Each of the shafts is 10 feet
wide and 60 feet long (just like the corridors)
and sheer, although not literally
smooth (having been hewn from the
rock). Chagmat can negotiate the shafts
without the aid of other equipment;
characters will need rope, climbing
equipment, or magical means to ascend
and/or descend safely.
The temple,
lower level
The predominant feature of the lower
level of the chagmat temple is a 150-footdiameter
octagonal chamber used for
worship services and sacrifice. The area
also includes eight smaller chambers,
roughly octagonal and each about 20
feet across, employed as dens for the
various colors of spiders. In the vicinity
of the spider dens are other small hollows
that serve as living quarters for the
chagmat clerics. Twisting their way
under the mountain are dozens of narrow
tunnels, some of them opening onto
larger areas that have been (and may
again be) used as hatcheries for great
quantities of spider eggs.
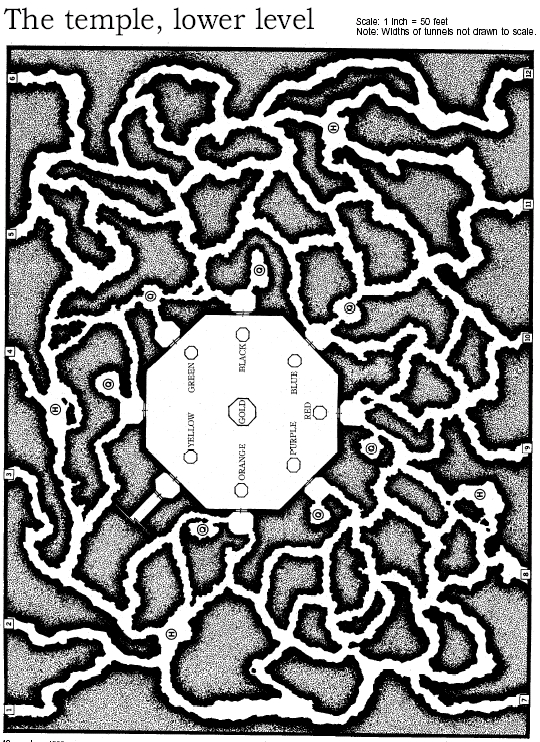
The Stomach
This chamber has a 50-foot ceiling.
The Great Altar, a 20-foot-diameter octagon
of gold-colored stone 8 feet high,
is in the center of the room. Seven
smaller stone altars (10 feet across, 4
feet high), one for each of the other colors
of spiders, are spaced evenly around
the perimeter of the chamber, each one
10 feet away from the nearest wall. Starting
with the one nearest wall 2 and reading
clockwise, these altars are colored
green, black, blue, red, purple, orange,
and yellow.
On each wall is a 15-foot-high, 10-
foot-wide doorway leading to a spider
den for the same color of spider as the
altar nearest it. The doorway on wall 1
leads to the gold spider den, which is
larger than any of the other dens. Each
doorway has a set of double doors opening
into the dens, made of metal and
appropriately colored, which can be used
to seal off the spider dens from the main
chamber. At present, all of these doors
are jammed wide open because the
only way to operate them is with the special
Chime of Opening from
the ogres
treasure hoard in Cavern 5. Any set of
doors can be made to open and close by
striking the chime within 10 feet of the
doorway (on either side). It takes 5 segments
for the doors to swing completely
shut (from the wide-open position) or to
reopen.
The main chamber is illuminated by a
three concentric rings of hanging lanterns
upon which have been cast soft,
golden-tinged Continual Light spells.
Each altar has a bas relief of Chag
sculpted on each of its sides, with the
usual sets of sockets containing eyes.
Each of the gems or semi-precious eye
stones is worth 5-50 gp.
The only entrance to the main chamber
(other than through the use of the headbands
from Room 6) is down a sloping
corridor leading from Room 8 through
the yellow spider den.
If the adventurers get to the main
chamber before the chagmat have been
alerted to their presence in the temple,
the chagmat force can be surprised. All
four of the chagmat Acolytes will be
present in the chamber, along with 1-6
fighters. Byaculuse will be in his quarters,
in the cavern to the northeast of the
gold spider den. The remainder of the
fighters (those not initially present) will
arrive at the chamber 1-20 rounds after
the first party member appears on the
scene. Pagoyak, the giant gold spider,
will arrive in the Chamber 11-20 rounds
after the party gets there, or in 7-14
(d8+6) rounds if Byaculuse is able to
summon the creature.
If word of the adventurers presence
has reached the chagmat, the force will
be on full alert, the conditions of which
are as follows:
The Continual Light spells
will be selectively
toned down, leaving only soft
pools of light (equal to a Light
spells
brightness) shining down on each of the
lesser altars. Any surviving chagmat Acolytes
will be hidden behind the altars of
their respective colors, crouched down
along the side closest to the nearest
doorway.
All the chagmat fighters who are left to
defend the temple will be clinging to the
walls in pairs. The first two will always be
stationed on either side of the doorway
by the yellow altar, and any others will be
in positions where they can support and
defend the clerics if necessary.
If the chagmat force is on alert, Byaculuse
will have summoned Pagoyak, and
the spider will be lurking in Byaculuses
quarters, waiting for a signal from his
master to attack. Byaculuse will be hiding
atop the gold altar in the form of a
small gold spider. All members of the
chagmat force will initiate an attack simultaneously
at the first good (for them)
opportunity.
Byaculuse
The reigning High Priest of this chagmat
temple is a 5th-level cleric,
AC 3
(counting dexterity bonus and benefit
from Amulet of Chag), HP 21, Str 13, Int
16, Wis 16, Dex 16, Con 14, Cha7 (16 to
chagmat). He carries the following spells:
Dispel Magic, Silence
15 Radius, Hold
Person (x2), Cause
Light Wounds (x2),
and Sanctuary.
Byaculuse, like other chagmat clerics,
wields a club (when in his humanoid
form). He wears on his person two magic
items: a Ring of Regeneration
and an
Amulet of Chag. This device functions as
an Amulet of Protection
+1 and also allows
the holder or wearer to polymorph
into a small gold spider while retaining
normal intellect (spell-casting ability).
The holder, if a chagmat, can assume
spider form as often as once per turn (the
process takes 1 segment), and can revert
to humanoid form at will. A non-chagmat
using the amulet can polymorph into a
small gold spider once per day and can
resume normal form whenever desired,
but each time a transformation occurs
the holder must make a system shock
roll at -15% to survive. The polymorphing
power is activated by uttering the
command word Shobaya, which is engraved
on the amulet in the chagmat
language and must be spoken in the
chagmat tongue.
Pagoyak
This giant gold spider is the pet, protector,
and servant of Byaculuse: AC 4,
MV9*18, HD4+4 (hits as a 6 HD monster),
HP 32, #AT 1, D 2-8. Pagoyaks bite,
in addition to the damage it does, injects
a poison into its victims which causes
dizziness (-4 to hit, +4 to be hit) for 1-6
rounds, followed by unconsciousness
for 1-3 turns thereafter. A save vs.
poison at -2 will negate this effect. Pagoyak
will be wandering through the
tunnels if the chagmat have not been
alerted to the partys presence. If the
chagmat force is on alert, Pagoyak will
be in Byaculuses quarters awaiting further
instructions from its master. The
High Priest (and only he) can summon
the spider by sounding a gold-colored,
octagonal gong hanging on the wall of
den gold spider den. <>
The yellow
den
This chamber, unlike the other seven
dens, is strategically important to the defense
of the main chamber and is always
occupied by a guardian spider. If the adventurers
enter the den by way of the
corridor leading from Room 8, they must
pass through a set of lo-foot-high, 6-
foot-wide double doors (each door is 3
feet across). These doors are unlocked
and will swing open easily.
This den, instead of a floor, is covered
by a web anchored at several points outside
the perimeter of a 20-foot-deep pit
that is virtually as large in diameter as the
den itself. The webbing is somewhat
sticky and difficult for any characters or
creatures other than chagmat or spiders
to negotiate; the movement rate of an
encumbered character is cut to onethird
of normal when crossing the web,
and characters not so encumbered travel
at one-half their normal rate. The yellow
spider den is illuminated by a single
glow lantern, hanging in the center of the
chamber, so that the edges of the webbed
area are in deep shadow.
Lurking along the southwest edge of
the room is a giant
yellow spider that will
advance and attack when anyone enters
the den from either direction. The doorway
leading to the corridor is too narrow
for the spider to pass through comfortably,
and it will not pursue characters or
creatures that try to escape in that direction.
It will follow an adversary through
the doorway leading into the main chamber.
The spider is AC 4, MV 3*12, HD
4+4, HP 15, #AT 1, D 2-8. The yellow
spiders bite is poisonous, causing an
extra 1-6 points of damage if a save vs.
poison (at +2) is not made.
Living quarters
The only chamber used for living quarters
that contains anything of note is the
residence of Byaculuse. The only ordinary
furnishings in the High Priests
quarters are a crude bed and a simple
chair. A single glow lantern provides dim
illumination. Under the bed is an iron
box, measuring 2 feet on a side, that at
first appears to be solid metal. It has a
hidden seam and lock (same chance to
find as for a secret door) which must be
found before it can be picked. Byaculuse
has the key to the box in the pocket of his
robe. In the box are two items:
A Wand of Darkness (acts as a spell
of
the same name) with 6 charges left. Its
command word is Nyagoa, which is
written on the wand in chagmat script
and must be spoken in the chagmat
language.
A book describing the spider-plague
Byaculuse is planning to cause. Since
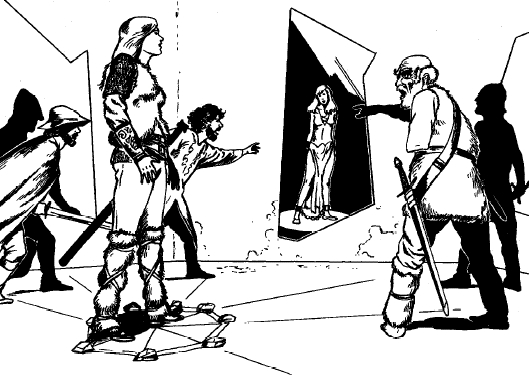
the High Priest has not succeeded in
gathering all the information, materials,
and assistance needed to carry out the
plans, the information in the book is not
important to the adventurers.
On the east wall of Byaculuses quarters
is a 6-foot-high, 3-foot-wide mirror
of gold-tinted glass, its frame etched
with chagmat runes. It is embedded in
the wall and cannot be removed without
shattering it. This is a Mirror of Telepor-
tation linked to the receiving chamber in
Cavern 8.
The runes are pronounced Agak fur
Agaa. If they are spoken by a character
or creature standing within 2 feet of the
mirror, the glass will shimmer. That
character or creature may then step
through the mirror and will emerge in
Cavern 8. This teleportation works in
only the one direction (to the cavern, but
not back), and can be performed by only
one character or creature at a time.
Spider tunnels
These relatively narrow passages (all
roughly 5 feet wide and 6-7 feet high) zig
and zag throughout the interior of the
mountain. Occasionally a tunnel will
open onto a chamber or alcove designed
to serve as either a priests quarters
(chambers marked Q on the map) or as
hatcheries for spider eggs (marked H).
Unless one or more of the chagmat clerics
chooses to head for home and go into
hiding after the adventurers arrive in the
main chamber, none of the living quarters
or hatchery areas will be occupied.
Each of the living quarters is illuminated
by one glow lantern, but contains no
other items or objects. Otherwise, the
tunnel areas and hatcheries are not lit.
The tunnel network is self-contained
and entirely interconnected; that is, there
are no exits out of the mountain to be
found by traveling through the tunnels,
and there are no dead ends within the
network. The system is actually on two
levels; the numbered passages around
the edge of the lower-level map represent
places where the tunnels slope
gradually downward and turn inward,
forming an even lower level composed
entirely of twisting, maze-like passages
with no chambers or alcoves.
If one of the characters in a group traveling
through the tunnels is able to detect
sloping passages and succeeds in
an attempt to do so, the party will be
aware that it is on a descending route
and may decide to turn around, going
back the way they came and returning to
the area on the lower-level map at the
numbered location where they left the
area. If the downward slope is not detected
and the group descends for longer
than one turn before reversing its route,
the group is lost on the next lower level
of tunnels. It will take 7-12 turns of aimless
wandering before the lost group will
accidentally discover a passage that
slopes upward. If the group continues
along that course, they will reappear
on the map at one of the 12 numbered
locations, determined at random.
Note: The chagmat, knowing the configuration
of the tunnels prevents anyone
or anything in them from escaping, will
not pursue intruders into the tunnel network
any further than the areas of the
living quarters. Sooner or later, any characters
who seek refuge or escape in the
tunnels must re-emerge in the main
chamber (where the surviving chagmat
will be ready and waiting) or eventually
die of thirst and starvation.
The prisoners
The five kidnapped women are being
held prisoner in the Stomach, each of
them bound by a single chain and leg
iron to the side of one of the lesser altars.
Lurati is chained to the side of the black
altar, Wilaine to the red, Cerasa to the
purple, Henna to the orange, and Myrella
to the green. If the chagmat force is on
full alert, the women will have been
knocked unconscious. Freeing a prisoner
requires a key to the altar chains (both
Byaculuse and the Red Acolyte have
one), or the chains can be broken open
by repeated blows (at least 25 points
worth of damage) from edged weapons
The women have no knowledge of the
temple and cannot provide any useful
information. They are, of course, happy
that rescuers have come onto the scene,
and they will cooperate fully in any attempt
to escape the temple area. However,
they will not willingly put their own
lives in jeopardy and will resist any attempt
by another character to do so.
They are not proficient in the use of any
weapon, but can manipulate any weapon
weighing less than 100 gp and will
not hesitate to fight back in self-defense.
But more than anything else, they simply
want to get out. And, by this time, the
adventurers should feel the same way...