A tournament adventure for the AD&D game
| The Twofold Talisman | - | The Heart of Light | - | The Ebon Stone |
| Player's Introduction | DM's Introduction | The approach | Upper Level | Lower Level |
| 1st Edition AD&D | Dragon magazine | - | Adventures | Dragon #85 |
Adventure 2: The Ebon Stone
Players' introduction
Safely back in Jalkive after your harrowing
experience at the mansion of Mekkari,
you meet once more with the wizard's servant.
In a deserted inn, you give him the
Heart of Light. He thanks
you profusely
and hides the gem.
"And now," the servant says, "one mission
remains for you to accomplish. Someone
stole the Ebon Stone, the other half of <link>
the talisman, while a guardian was taking it
to a hiding place. The evil guildmasters of
Jalkive now keep it in a small but heavily
guarded fortress in the mountains nearby.
There they'll keep it until they can find a
way to release the terrible powers within it.
You must make all haste to get to that fortress
and take the Ebon Stone away from
them. The fate of our kingdom rests with
you and your abilities."
The servant hands you a map showing
the way to the fortress you must penetrate.
Unfortunately, the servant knows nothing of
the traps or guardians you will find, but he
believes you'll encounter many. Once again
he asks you to leave at dawn and provides
some equipment. (See the character sheets <link>
in the center of this magazine.) Treasure
taken in the last adventure will not be used
on this trip; it is assumed to be safely hidden
away in town somewhere.
DM's introduction
Hand out the spell lists (see the end of <link>
text) to the players who need them for their
characters, and let them choose which spells
they wish to take on the trip. Note that
players don't have to play the same characters
that they did in The Heart of Light
adventure; they can choose different ones in
tournament play, as long as the group
reaches mutual agreement.
The players should be told that the saving
throws on their characters' sheets reflect all
bonuses for CON and magic
items.
However, the "to hit" information shows
only the characters? base scores; bonuses for
strength and magic must be added when
appropriate.
All PCs are fully healed at
the start of this adventure.
The adventure ends when 4 hours of
play have elapsed, or when the characters
escape from the fortress with what they
believe is the Ebon Stone. <link>
The approach
The following text should be read aloud
to the players to start the adventure:
"You head toward the sun as it rises over
the mountains near Jalkive. The servant's
map directs your party to a secret footpath
which lies in the rockier ground. It leads to
a barren plain on a mountainside where
nothing stirs but the wind. The climb up
the mountain takes its toll, and you rest that
night in the cold.
"After continuing the climb the next <optional=wsg>
morning, you see a building in the distance.
The structure lies exactly where the map
locates the fortress, but the building is no
fortress at all. Rather, you see a sprawling
structure made of timber and stone, with a
scraggly path leading toward it. On the
path in front of the building, four humans
stand guard. You hide and watch them from
100 yards away, but cannot discover any
further details about them. The building
lies on a flat area of ground. Rocky terrain
surrounds it, extending 100 yards in all
directions."
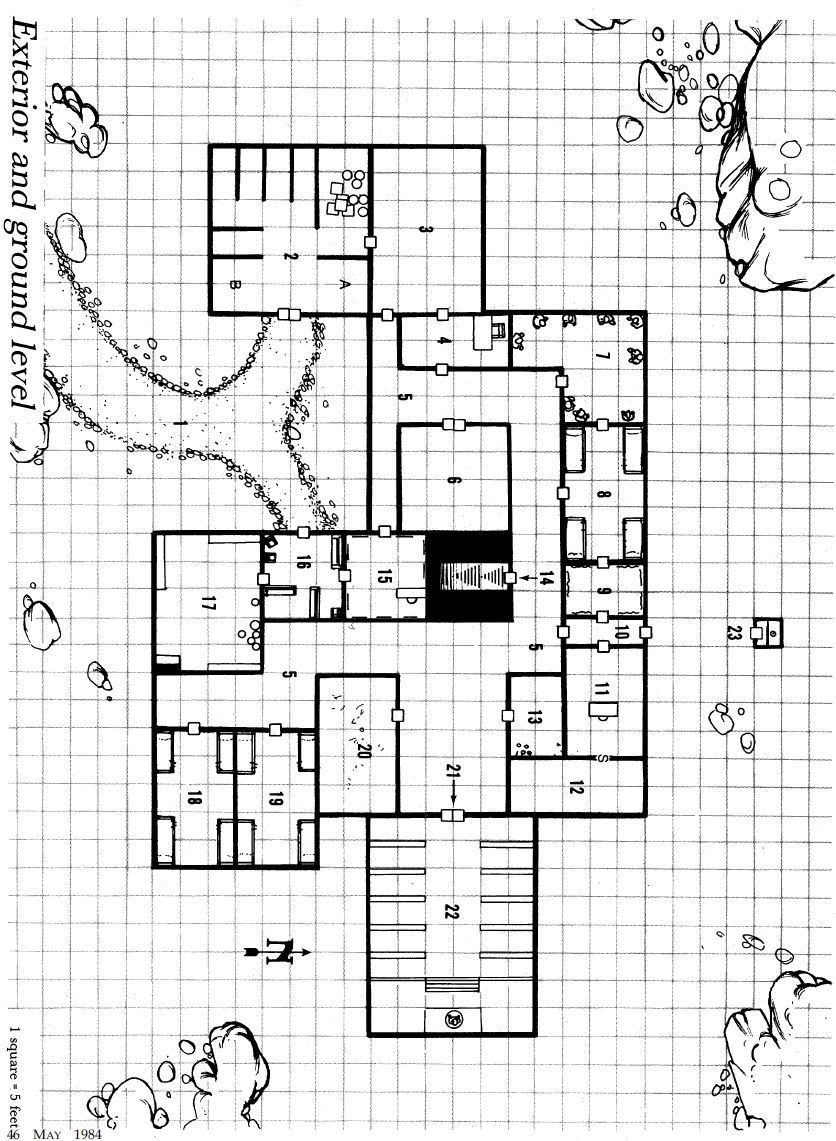
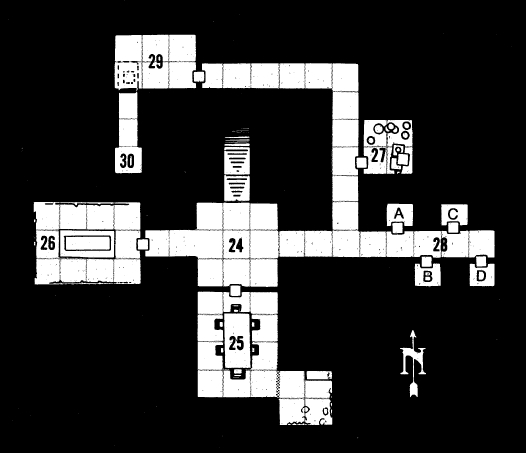
THE BUILDING: UPPER LEVEL
All ceilings in the building are 10 feet
high. Doors require a strength roll to open,
unless otherwise stated; this applies only to
characters, since the monsters (even the
weak ones) know how to open "jammed"
doors easily. A locate object spell will not
find the Ebon Stone, but will otherwise
work normally. Characters should not be
allowed to cut, chop, or saw through walls
or floors in the building in tournament play.
work normally. Characters should not be
allowed to cut, chop, or saw through walls
or floors in the building in tournament play.
| Area 1 | Area 2 | Area 3 | Area 4 | Area 5 | Area 6 | Area 7 | Area 8 | Area 9 | Area 10 |
| Area 11 | Area 12 | Area 13 | Area 14 | Area 15 | Area 16 | Area 17 | Area 18 | Area 19 | Area 20 |
| Area 21 | Area 22 | Area 23 | - | - | - | - | - | - | - |
1: The guardians
The 4 guards in front are Initiates of the
Principles, of LE alignment. They are
dressed in white trousers, sandals, and
pink-and-green striped shirts. From close
up, the characters will notice that there are
small green alligators on the left side of each
of the guardians' shirts.
If attacked at long range, the "preppies"
will run for the building, entering at the
door to area 16 where they'll sound an
alert. They will not notice the PCs automatically
if the party tries to sneak up on them
(see below). If approached, the monks will
look nonchalantly at the party and ask
about their business. The "preppies" will
also make rude comments. ("Oh, tacky
platemail you're wearing; last year's style?"
"You really haven't had a bath for awhile,
have you?" If the party attacks the "preppies", suddenly four more
4th-level monks
in preppie garb will join them (they are
hidden in the rocks nearby) and attack with
surprise on a roll of 1-4 on d6 (allow automatic
surprise for the monks in tournament
play if desired).
If the party doesn't attack and asks to go
inside the building, the monks will go with
them to the door at area 2, explaining that
the doors to area 16 lead to the bureaucrats,
"and you know how dull they are." Once at
area 2, 2 monks will unbolt the stable
doors, open them, and scream "Go get
'em!" The 2 giant lizards kept inside (see
description of area 2) will leap out at once
and attack the party, while all eight monks
join in the fray as well. The giant
lizards are
AC 5; MV 15?; HD 3+1; HP 15 each;
D/Att 1-8 (or 2-16 on a roll of 20 "to hit").
They will never attack the monks.
The monks are AC 7; MV 18"; 4th level;
and have 15 HP each. They do 1-6 HP per
attack, getting 5 attacks/4 rounds (2 on the
4th round of combat). They can also speak
with animals at will,
evade normal missiles
if they save vs. petrification (needing a 12
or better), and will take no damage
vs.
certain attack forms if they save
vs. spell, as
per the Players Handbook.
The monks will continue to fight until
half of them have been slain or incapacitated.
The rest will break off the fight and
flee into area 2 to get to area 3.
The party
may be allowed one free round of spells or
missile combat as the monks leave, since the
party won't be able to catch them without
using haste spells on themselves
or slow
spells on the monks.
Any monks who escape to inside the
building will sound an alert, either to area 3
if escaping from area 2, or to areas
15 and
17 from area 16 (if they happen
to head in
that direction). The alert will spread no
further in tournament play, and no one will
retreat from the alerted areas. The alert
may be carried as far as the DM likes in
regular campaign play.
If the party, upon first seeing the "preppies,
" decides to creep up on them, roll for
the monks' chance to notice the party when
the characters get to within 60 yards. There
is a 28% chance that the monks will not
notice the intruders, and will be surprised
when the party gets close enough for combat.
The party has no chance to find the
4 hidden monks until the visible monks
attack |or| are attacked. The party can successfully
creep around to the rear of the
building if they don't come within 60 yards
of the monks. The building has no windows,
so no one will see the party from
inside.
Also, any noise heard from outside will
be ignored by those inside the building.
"It's just those guards cutting up again,"
they'll say.
2: Lizard stables
30' x 30' ; 3 doors; earth floor.
2 giant lizards (at A and B)
are curled
up here. They are pets of the monks and
only know one command: "Go get 'em!"
Anyone who opens the stable doors and is
not a monk, an orc, or a half-orc
will be
attacked and (possibly) eaten. The stables
are dark and unlit; some barrels of wine
and crates of horsemeat are in the northwest
stall. The other stalls are empty. See the
area 1 description for the giant lizards'
statistics.
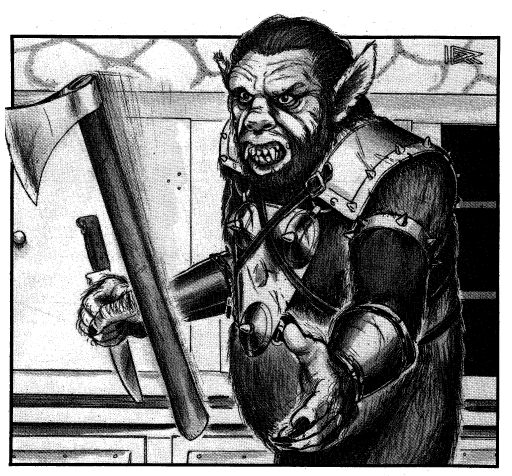
3: Supply room
20' x 30' ; 3 doors; hardwood floor.
A lone torch burns on the west wall. The <optional=wsg>
supply room has 4 ogrillon guards
who,
unless they have been alerted by the monks,
will be arm-wrestling. The ogrillons look
like orcs except for being slightly
bigger and
wartier, and are 90% likely to be mistaken
for orcs by the party. The "orcs" have no
weapons. They wear black leather jackets
with the words "Mess with the Best, Die
like the Rest" written on their backs. The
ogrillons will attack anyone who is
"preppie" monk or an orc, half-orc,
ogre,
or ogrillon. They refuse to go for help even
if outnumbered. Any monks who fled here
from area 2 will be found here as well (prevented
from escaping by the ogrillons) and
will fight to the death. If alerted,
the ogrillons
cannot be surprised.
The ogrillons are AC 6; MV 12?; HD 2;
HP 10 each; and attack twice per round for
2-7 points per attack. Rangers get
all bonuses
to damage vs. "giant class" humanoid
monsters when fighting ogrillons.
The supply room contains 300 new white
preppie suits on racks, 40 black leather
jackets in boxes, 150 pairs of sandals,
and
two cartons of Dr. Denton sleepwear with <image>
footsies. Also found will be a memo from
one bureaucrat to another in Common,
saying, "Why are we getting all these
clothes and no weapons? Who's in charge
around here?" If any PCs search for 10
minutes through the clothes (any batch), a
pearly-white, spindle-shaped ioun
stone will
be found. If it is tossed into the air or otherwise
set in motion, the stone will circle the
PC's head and will regenerate 1 HP turn for
as long as it remains in place.
The door to area 4 has a sign reading
"Knock before entering, please" in the
common tongue.
4: Efficiency expert's office
20' x 10'; 2 doors; hardwood floor.
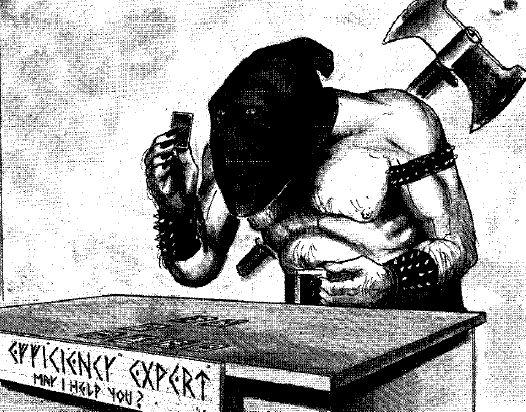
A lone torch burns on the south wall. <optional=wsg>
This whitewashed room has a desk in the
northern end with an enormous ogre
seated
behind it, playing solitaire poker. The ogre
wears a black executioner's mask, and a
huge axe rests on a rack behind him. A sign
on the desk says: "Efficiency Expert ?
May I Help You?" The wood floor is splattered
with dried blood.
The ogre says nothing if the party enters,
but will stare at the intruders through his
mask (conduct surprise rolls
normally unless
the PC party knocked before entering, in
which case surprise is not possible). If the
ogre is able to react first, he will drop his
cards, snatch the axe, and step over the
desk to reach the party; otherwise he will
fight from behind the desk (improving his
AC by 1). He will never retreat or surrender.
The ogre is 10' tall (AC 7; MV 9";
HD 7 [leader type]; HP 30) and attacks
once per round for 3-12 points damage.
A search of the desk drawers reveals 140
gp, 5 gems worth 50 gp each, and a note <boakhars>
written in orcish (anyone who speaks the
language can translate it) that says: "The
Guildmasters are pleased with your performance.
Maintain your high standards
and you will be well rewarded. (Signed)
D.V." Also found will be a drawing of a
black gem, crudely done, with the comment
(in orcish) "Kept downstairs." Nothing else <link>
is in the room.
5: Main hall
Extends around the central part of the
building.
The hall is unlit and will be empty most
of the time. On a roll of 1 on d4 (checked
each turn), a kobold (AC 7 ; MV
6?; HP 1;
LE; no attacks) will walk around a corner
on an errand. If the kobold is surprised it
will instantly faint for 2-12 rounds. If not
surprised, it will run at the nearest party
member before anyone can react and grab
the character's leg (no "to hit" roll needed)
and hang on, whining "Spare me! Spare
me! I'm just a wimp! I'll do anything, just
spare me!" in the common tongue.
Prying the kobold loose requires a roll to
open doors (one attempt per round); otherwise
the grasped character cannot move.
The kobold will not attack and will beg
that it be taken out and set free because
everyone here has been mean to it. If the
kobold is pulled loose, it will run away to
area 4, knock on the door, and get the Efficiency
Expert to stomp the PCs; if the
Efficiency Expert is no longer there, the
kobold will pass out for 1-4 hours, then flee
the building.
6: Recreation room
20 x 20; 2 doors; hardwood floor.
2 torches burn on the north and south <optional=wsg>
walls. A 10-foot-square mat lies in the center
of the room. Two Disciples (LE;
AC 6; MV 20; HP 20 each; 3 attacks/2
rounds for 2-8/Att; immune to haste
and
slow; evade nonmagical missiles on
d20 roll
of 11 or better; may speak
with animals) are
practicing hand-to-hand combat here. If
surprised (24% chance), they may be attacked
for one free melee round. Otherwise
they will turn, bow to any intruders, and
leap to the attack. Neither will surrender or
go for help. Both monks are dressed in
preppie white pants, shirt, etc. Nothing
else is in the room.
7: Hall of orcish heroes
L-shaped room, 25 x 20' ; 2 doors;
hardwood
floor.
This room is unlit. Lining the walls of
this room are the stuffed remains of 12
famous orc heroes who were preserved
for
posterity. The air in the room smells so bad
that any character who opens the door or
steps inside the room must save vs. poison;
failure results in a loss of 2-8 strength
points
for 10 rounds. (Inhabitants of the building
are immune to this effect.) The stuffed
bodies are ugly and disgusting. Each has a
sign on the floor before it reading in orcish,
This orc was a great hero. Someday you
will be great like him, too. Nothing else is
of interest here.
8: Monks bunks
15 x 25 '; 3 doors; hardwood floor.
This is the bunkroom for the 8 Initiates of
the Principles who are encountered outside on
guard duty. Four double bunks are here,
one in each corner of the room, and trunks
under each pair of beds are full of preppie
clothing and nothing else. On the
center of the north wall is a poster beneath a
burning lantern on a peg. The poster depicts
a huge man wearing full-length black
platemail, with a strangely rounded shiny
black helm. He holds a red-glowing two-handed
sword, and a black robe hangs from
his shoulders. The picture is unlabelled.
The door leading to area 9 contains a
message: Remember, grasshoppers, the
wisdom of the owl is like the dew
on the
grass at dawn before the first bird sings.
Master Po has spoken.
9: Master Po's room
15 x 10 '; 2 doors; hardwood floor.
Both of the doors to this room open very
easily; anyone who charges forth to smash
one will fall into the room, losing all attacks
that round and doing 1-4 HP of damage to <save vs. falling damage>
himself. Inside the room, incense burns and
beautiful wall hangings abound. On a floor
mat in the southeast corner of the room sits
an old man wearing a kimono, apparently
meditating. He does not react if the players
enter and will not even open his eyes.
Unseen by the characters at first are 2
huge tigers
perched on ledges 8 above the
floor (AC 6; MV 12; HD 5+5; HP 30 each;
D/Att 2-5/2-5/l-10 plus 2-8/2-8 if first 2
attacks (claws) connect; surprised 1 in 6, or
not at all in tournament play). These pets of
the old man will leap on intruders, surprising
them on a roll of 1-5 on d6.
As the tigers attack, the old man will
awaken from his meditation, sigh, get up,
and join the fray. This is Master Po, who
looks very frail and sickly but he isnt
(Immaculate; LE; AC 3; MV 23; HP <AC
1, HP 40>
30; 2 attacks/round for 3-12 damage). He is
immune to haste and slow,
can speak to
animals, can heal himself
once per day for
4-7 points, is 50% resistant to charm,
hypnosis,
and suggestion, takes half damage
at
most from spells that he fails to save against
(no damage if he does save), and evades
nonmagical missiles on a roll of 10 or better
on d20. When he attacks, he will stun opponents
when rolling 5 or more over his base
to hit score; a stunned opponent cannot
attack for 1-6 rounds. Master Po can kill a
stunned opponent on a percentage roll
equal to the opponents AC plus 2.
If Master Po is reduced to half of his HP or less at the end of a round
of combat,
he will spend the following round trying
to move away from his opponents so he
can use his ability to heal himself. If he is
attacked during the round in which he is
healing himself, he will not gain the 4-7 HP
and wont be able to heal himself again for
the rest of the day.
A SEARCH of the room will reveal a message
in common on a piece of parchment
under the monks floormat: The Dark One
is safe below, dont worry D.V.
10: Back entry hall
15 x 5'; 4 doors; hardwood floor.
This hall is empty. The floorboards
squeak horribly, so only a thief with a successful
move silently roll will get past
without alerting Master Po in room 9 or the
guards in room 11. Above the
doorway to
area 9 is a sign that reads: The way to
enlightenment is the grasshoppers path
along the riverside of the summers fultillment.
Master Po has spoken.
Above the door to room 11
is a sign that
reads: Mess with the Best, Die like the
Rest with a flaming skull painted on the
door itself.
11: Office of the Guildmaster
15 x 20' ; 1 door, 1 secret
door; hardwood
floor.
This room is the office of Skrunge, one of
the Guildmasters of Jalkive. He is a half-orc:
<Crusader> (Curate+Lord;
LE; AC 3; MV
6; HP 40; 60 infravision;
3 attacks/2
rounds with +2 broadsword
for 4-10 damage;
Spells: silence 15 radius,
hold
person,
protection
from good, command (x2)).
If Skrunge is surprised, he will be writing
at his desk, cancelling leave orders for all
his troops (because he feels like it, and
because hes a scummy guy). His assistants
stand on either side of the door, far enough
away that they wont be hit if the door
opens suddenly.
If he has advance warning of the partys
approach, Skrunge will have his 2 half-orc:
<Skirmisher> assistants (Hero+Robber;
LE; AC
8; MV 9; HP 20 each; 60 infravision;
leather armor; armed with broadswords)
stay on either side of the door while he
stands across the room and casts protection
from good on himself.
Anyone who opens the door will immediately
see Skrunge, who will promptly cast
hold person (save at -2) at
the intruder.
Anyone who charges Skrunge may be surprised
(1-4 on d6) by the 2 <Skirmishers>,
who (if they get surprise) gain +4
to hit and double damage on a strike
from behind. In such a case, both will strike
at the same TARGET. Skrunge will then cast
silence, 15' radius centered
on the square
just outside the doorway if he has time after
the first attacks, to cause problems for
spellcasters (note that he stands just outside
the spells area of effect).
Skrunge will use a command (Die!
in
the common tongue) on anyone in melee
with him who is also outside the silence
spell. He will then move to slay anyone who
succumbs to the command (see text for
command and sleep
spells in the Players
Handbook). <why see sleep?>
Once his spells have run out, or if he has
no opportunity to use them, Skrunge will
whip out his +2 broadsword and hack away.
He wears black platemail with a
huge red
eye in the center
of it. (If anyone asks, this
is not the same black armor as seen in
the
picture in area 8, and Skrunges sword
glows white, NOT red.) Skrunge and his
assistants will fight to the death
and will
pursue all who attempt to escape.
<Pursuit & Evasion of Pursuit>
In Skrunges desk is a paper saying I
have the stone downstairs for security.
D.V.
12: Gem room
25 x 10' ; 1 secret door;
hardwood floor.
Behind a secret door in the east wall of
room 11 (easily opened by anyone after it is
detected) is a room whose floor is covered in
black gems, all of them identical to the
Ebon Stone. There are 10,825 of these <link>
stones, but detect magick will
show none of
them to be magickal. Each is worth 10 gp
(they are cheap copies). Tacked on the north
wall is a requisition form for another several
thousand of them. A note may be found
that indicates the gems will be distributed to
seedy merchants in Jalkive, where
theyll be
sold as real Ebon Stones. The stones
have an encumbrance value of 1 gp each.
13: Broom closet
10 x 15' ; 1 door; hardwood floor.
Among the assorted mops and buckets in
this room is a single broom a broom
of
animated attack
(AC 7; HD 4; HP 18;
attacks twice/round for 1-3 HP and blindness)
that activates the moment it is
touched. Nothing else is of interest here.
14: Staircase
5' wide, 30' down.
This leads to the dungeon level. Halfway
down is a step with a tripwire across it; a
thief can find it with a "detect
traps" roll (if
light is available). Anyone <who> doesn't know
about the wire and trips over it must make
a saving throw vs. wands or fall the rest of
the way down the stairs, taking 2-8 points of
damage and making all worn or carried
items save vs. fall, as per the DMG,
p. 80.
15: Bureaucrat's
office
15' x 15'; 2 doors; hardwood floor.
This room has many framed pictures of
the building itself, painted from different
angles. Seated behind the desk along the
north wall is an orc (2 HP, AC 10)
who is
sound asleep. He will automatically be
surprised if anyone enters. If he has a
chance, he will shout out an alarm to his
friends in room 16, who will come to his
rescue. The orc is a weak one with no effective
attacks. <revision: orcs can be bureaucrats>
16: Guard room
15' x 15'; 3 doors; hardwood floor.
Six tough young orcs lounge about in
here on the benches and chairs, reading
comic books and belching. They are wearing
chainmail armor and carry battle
axes
with them; they will attack any adventurers
who enter the room and will come to the
aid of the bureaucrat in room 15 if he calls.
Each orc has AC 5; MV 9"; HD 1 HP 5;
D/Att 1-8.
17: Kitchen
20' x 25' ; 1 door; hardwood floor.
The kitchen is currently in use. The walls
are lined with cabinets and casks of meat
&& drink; an oven sits in the southeast
corner of the room. The cook, a huge bugbear
who gains a +1 on damage due to his
STR, is rummaging around on the
northeast end of the room looking for pickled
dwarf fingers for dinner. If anyone
enters, the cook (who has a hairtrigger
temper) will throw a handaxe
at the intruder
and will then seize a large butcher
knife and continue to attack. Nothing but <cf.
Dragon #97>
disgusting food is in here, except for a <food=x>
calendar with a female bugbear on it (Miss
July).
The bugbear has AC 4; MV 9?; HD 3+1;
HP 25; surprises opponents on
a 1-3 on d6;
will attack once per round for 2-7 (hand
axe, -2 ?to hit? when thrown) or 2-7
(butcher knife).
18: Ogrillons'
bunk room
15' x 25' ; 1 door; hardwood floor.
This is the bunkroom for the 4 ogrillons
encountered in area 3. The room is a mess,
and the 4 beds are soiled and filthy. A
small paper sign on the east wall reads
"Home Sweet Home." Every round someone
searches the room, there is a 10%
(noncumulative) chance of the character
passing out from the smell for 2-8 rounds.
Under the debris may be found (after 5
rounds of searching) 20 unused bars of soap
and 1 gold piece.
19: Orcs' bunk room
15' x 25'; 1 door; hardwood floor.
Only 1 orc is in this room currently;
he
is sharpening his battleaxe.
The orc has AC
5 <chainmail>; MV 9"; HD 1; HP
5; D/Att 1-8. After
1 turn of SEARCHING, a scroll tube will be <bone? leather?>
found under a mattress. It has a sheet of
paper inside that reads in orcish, "Continue
to maintain your vigilance against all intruders;
if possible, bring them downstairs
to me. -- D.V."
20: Danger room
15' x 25'; 1 door; hardwood floor.
The door to this room is clearly labelled
"DANGER!" in huge
red letters in orcish.
No sounds come from inside. The door has
3 locks on it; each can be picked by a
thief or broken with a successful "bend
bars" roll.
Inside are dozens of bones all over the
floor. Unseen by all, a grell hovers
over the
doorway with its tentacles pulled up, and it
will surprise anyone who steps through the
doorway on a 1-4 on d6, dropping down on
them in silence. No treasure is in this room.
The grell will actively pursue any prey (orc,
human, or whatever) inside the room
or
outside. The grell is not tame. If it catches
someone, it will spend 3 turns eating the
victim if it is not being attacked.
The grell has AC 4; MV 12"; HD 5; HP
30; immune to lightning; 10 attacks for 1-4
damage plus saving throw vs. paralyzation
at +4 (lasts for 2-8 turns) each, plus beak
attack for 1-6 damage. If a victim is paralyzed,
all further attacks automatically hit
(less two tentacles, for a total of 8d4+1d6 per
round).
21: Doors to the temple
The doors are of massive oak boards and
are heavily engraved with runes and dire
warnings in many languages, including
those the PCs speak. If detected
for, they
radiate magic. They may be opened as
normal doors, however, and do nothing.
22: Temple of Watt
30' x 40'; 2 doors; stone
floor.
The temple area is currently deserted.
5 rows of pews stand on either side,
leading up to a podium and a huge statue of
a thin human male, bald and wearing spectacles.
The legend on the base of the statue
reads, in common, "Watt, God of Destruction.
" It will be noticed that the figure is
standing on and crushing many sorts of
plants and animals. The statue radiates
magick but has no detectable alignment. <type=x, power=x>
The 1st PC who touches the statue (and
that character only) receives the power to
kill all plants by touch, permanently. If used
on the yellow musk creeper
in area 29 or
any yellow musk zombie,
this power will
slay the plant |or| cure any zombie completely
of the affliction. This power extends
even to green slime and its
victims, to
shambling mounds, and so
forth. However,
any druid who sees any such character will
immediately recognize the "curse of Watt"
and will summon all available spells, weapons,
and powers in an attempt to destroy
the character.
The character with this power also has
both his thumbs turn black.
Twenty 100 gp gems are hidden in a <garnets>
secret compartment (detectable by elves
and
half-elves) in the statue's back.
23: Outhouse
5' x 5'; 1 door; stone
floor.
The outhouse is currently empty; there is
nothing of interest here, though PCs may
think otherwise. The door of the outhouse is
marked "Secret tunnel entrance" in charcoal.
However, the outhouse "tunnel," 10
feet deep, only leads down into a 30' deep
cistern filled with water. Any character who
drops down into the cistern will not be able
to climb <WSG> out unaided.
Anyone wearing
leather, no armor, or magical armor may
stay afloat; others in metallic and nonmagical
armor will sink and will drown if
not rescued in 5 rounds.
THE BUILDING: LOWER LEVEL
All general notes describing the upper <link>
level also apply here. The ceiling height is
still 10 feet, and going through walls or
digging through floors should not be permitted
in tournament play. Unless noted
otherwise, all areas underground are totally
dark, with no light sources (unlit torches,
for instance) to be found.
| - | - | - | Area 24 | Area 25 | Area 26 | Area 27 | Area 28 | Area 29 | Area 30 |
Underground level
1 square = 5 feet
24: Hall chamber
15' x 15'; 1 door; 2 corridors.
The area here is paved and walled in
black marble. Low streamers of fog roll
along the floor. The door to area
25 is
black-painted iron, labelled "Do not disturb!"
Anyone who listens at the door will
hear the sound of heavy, regular breathing,
resonating as if heard through a mask of
some sort. (The sound is similar to what
Darth Vader sounds like; the DM may do
an imitation of that sound to clarify things
for the players.)
25: The room of "D.V."
20' x 15' with 10' x 10' alcove; 1 door;
stone floor.
The iron door to
this room is very heavy;
add one to any character's die roll to open
doors (treat a roll of 1 as a 2, 2 as
a 3, etc.)
to make it more difficult to open. A knock
spell will open it, however. The door makes
no sound when it does open.
Inside, a torch <WSG> burns
on the south wall. A
table 5' wide and 10' long sits in the center
of the room with 6 chairs around it. The <chairs=x>
southernmost chair is occupied by a huge
(7' tall) human figure in full-length
black
plate armor, with a
shiny black helm and a
black robe. The figure looks at the party
entering the room, but remains silent except
for the sound of heavy, filtered breathing.
The figure is actually an empty suit of
armor and won't move no matter what the
party does. Close inspection of the armor
reveals that the breathing is caused by a
magic mouth inside the helmet;
the back of
the armor opens up to reveal a small open
place where levers and pulleys are visible. A
little seat is visible inside the armor, sized
for a being only 3' tall.
An elf or half-elf
will notice the illusionary
wall in the southeast corner, on the
same chance as detecting a secret
door.
Behind the wall is a cozy little alcove, 10'
square, with thick carpeting, wall hangings,
and throw cushions. Asleep on a small cot is
a <hobbit> who reeks of alcohol;
wine bottles
(Mad Dog #5) litter the floor. The
halfling
cannot be awakened except by physical
attack, and even then will be groggy, incoherent,
and will attack at -5 "to hit." Left
alone, the <hobbit> will sleep another 3-6
hours.
If awakened and questioned, he will
claim to have been held prisoner by "that
big guy," and even if he is confronted with
the armor, he will stick to his story. (The
<hobbit> is a compulsive liar
and will never
tell the truth about anything.) He actually
had the armor built for him and has used it
to fool everyone, including the guildmasters
of Jalkive. The halfling is the only one who
knows how to work the suit of armor, and
he will lie or refuse to answer if anyone asks
about how to work it.
The <hobbit>, who likes to be called
"D.V." (but will not reveal this to the PCs),
is a Footpad, aligned neutral,
with 10
HP (13 while intoxicated). The referee may
role-play the halfling as desired; in tournament
play, he has no effective attacks.
The <hobbit> has 495 platinum pieces,
1278 gold pieces, and 29 bottles of Mad
Dog #5 wine under his bed. He knows
where the Ebon Stone is, but will always lie <link>
about its whereabouts even if pressured. No
weapons are in this area.
26: Undead room
15' x 20'; 1 door; stone
floor.
The door to this room is made of oak;
listening at it reveals no information.
Behind
it is a coffin on a stone table; the room
is obviously a vault of some sort. Wall hangings
seem to indicate that some famous and
powerful person lies buried here, someone
who lived in a huge castle and was named
Vlad. The coffin is not locked and can be
opened easily.
The coffin contains a ghoul (AC 6;
MV
9"; HD 2; HP 15; attacks for 1-3/1-3/1-6
plus paralyzation for 3-12 turns) that serves
as a guardian for the treasure in the coffin
(a potion of frost giant
strength plus 2000
sp). The ghoul will attack as soon as the
coffin is opened.

27: Storeroom
10' x 10'; 1 door; stone
floor.
The door to this area is clearly marked
"Storeroom." Inside the room are food <beans, tubers/roots, fowl,
meat(mutton), meat(wild boar)>
supplies, barrels of flour and wine, and
crates of Mad Dog #5 wine. Also to
be
found is a pile of papers that include orders
for more supplies, one asking for: "One
incredibly horrendous monster, preferably a
god or demigod, to guard the Ebon Stone."
The order is marked as having been filled
2 weeks ago.
28: Cells
5' x 5' each; 1 door each; stone
floor.
All cells have locks on the outside that
may be picked or broken off (with a
successful
"bend bars" roll). The 4 cells have
the following contents:
A. An orc skeleton, and nothing else.
B. A bored "preppie" Initiate of the
Principles,
who was imprisoned for ridiculing Master
Po's philosophical sayings. He's angry at
everyone and will attack the party if he is
released. He has AC 7; MV 18"; 5 attacks/
4 rounds for 1-6 damage; evades normal
missiles if he rolls a 12 or better on d20; can
speak with animals at
will.
C. A live orc. He
smarted off to "D.V."
and has come to regret it (his nose is still
broken). If released, he will run away to
warn Skrunge in room 11 upstairs about the
intruders. The orc has AC 10; MV 9"; HD
1; HP 5; no effective attacks in tournament
play.
The prisoners in cells B and C
hate each
other, and each of them will say anything to
get the other in trouble while trying to SAVE
himself.
29: Plant room
10' x 15'; 1 door; 1 secret
door; earthcovered
floor.
The door to this room opens inward and
is simply labelled "Ebon Stone." This
small <link>
room has a continual
light spell on the
ceiling, illuminating some pretty flowering
vines growing in here. The floor has 3' of
dirt over it (the true floor level is below the
hall's floor, so one walks right in on the
soil).
6 flowers are on the vines, each a bright
yellow and purple
color. The plant is a
yellow musk creeper.
As soon as the door
opens, the 2 flowers next to the door will
puff musk at the nearest character, rolling
"to hit" as 3 HD monsters. If struck, the
victim must save vs. spells or will walk into
the room and into the vines at the end of
that round. On the next round, aerial roots
from the yellow musk creeper will attach
themselves to the victim's head; on the
following round, the victim will be drained
of 1-4 points of intelligence.
This drain will
continue each round thereafter until the
victim is rescued, dies, or becomes a yellow
musk zombie.
Anyone else who enters the room will be
attacked by 1 of the other 4 blossoms;
after each blossom "fires," it won't fire
again for 1 turn. The plant will make one
attack per round until all four remaining
flowers are "out." Hacking at the flowers,
roots, and vines above the ground will not
kill the plant. Any character turned into a
yellow musk zombie will attack all other
characters in the group.
The main bulb-like root (AC 7, HP 20) is
in the southwest corner of the room, over
the buried trap door.
If the root is attacked,
destroyed, and dug up, the door will be
noticed at once. The passageway goes down
and to the south; since it is only 3 feet wide,
only hobbits and gnomes
may travel <cf. The Tight Squeeze,
DSG>
through without trouble. Dwarves
have a 1
in 10 chance of getting stuck, elves
1 in 8,
and humans and half-elves
1 in 6 when
passing through it.
30: Ebon Stone chamber
5' x 5'; 1 secret door;
stone
floor.
When a character crawls into this room,
he or she will see the Ebon Stone sitting on <link>
a pile of gold coins in the center of the
room. It may be picked up without harm.
Note, however, what effect the stone has on
magic items. There are 100 gp and no traps
in the room (the Ebon Stone is enough of a
trap!).
The Ebon Stone
The stone appears to be a black gem of
bright obsidian, 3" in diameter. When it is
touched, the gem will exhibit the following
properties and characteristics:
1) It seems to send a shock through any
character who touches it. The character
suffers no damage, but all magic items
carried by that character must save vs.
magical fire or be destroyed.
2) If it is held out and aimed at another
character within 30', the gem will shoot out
a ray of blackness. The victim is automatically
hit for 4-16 HP of damage (save vs.
wands for half damage). This power may be
used once per round by anyone who holds
the stone.
3) A <know> alignment or
detect evil spell
will reveal that the gem is evil.
<power & type of evil = x>
4) Any character who touches it will
know immediately that it is the Ebon Stone,
and that it must be immediately returned to
Mekkari.
5) Examination reveals that the Ebon
Stone is worth about 20,000 gp.
MAY 1984