| Adventures | Dragon magazine | - | Dragon #61 | 1st Ed. AD&D |
| - | - | - | - | - |
| 1 | 2 | 3 | 4 | 5 | 6 | 7 | 8 | 9 | 10 | 11 | 12 | 13 | 14 | 15 | 16 | 17 | 18 | 19 | 20 |
| 21 | 22 | 23 | 24 | 25 | 26 | 27 | 28 | 29 | 30 | 31 | 32 | 33 | 34 | 35 | 36 | 37 | 38 | 39 | 40 |
| - | - | - | - | - | - | - | - | - | - | - | - | - | - | - | - | - | - | - | - |
| a | b | c | d | e | f | g | h | i | j | k | l | m | n | o | p | q | r | s | t |
| u | - | - | - | - | - | - | - | - | - | - | - | - | - | - | - | - | - | - | - |
The Midas Orb
was much revered by
the people of Gnarda. It was the symbol
of the countrys prosperity (much as the
gold in Fort Knox is a symbol of the
prosperity and wealth of the United
States). None of the common people had
actually ever seen the Orb, but they did
not consider it one of their privileges
to
be able to see or use it; it was enough
that the Orb existed, and by its existence
gave stability to the countrys economy
and the morale of the people.
Everything ran smoothly for a few
hundred years after the
Orb was given to
the country. Then the leaders of Gnarda
discovered and reported to the people
that, suddenly and mysteriously, the
Orb had disappeared! None of Gnardas
leaders and officials seemed to know
what had happened to it, and an extensive
investigation turned up no worthwhile
clues.
Soon after the disappearance of the
Orb, the country began to decay. There
was a serious decline in the morale of
the
people, which led to a similar decline
in
the strength and vitality of the economy
of Gnarda.
The decline in morale continued for
about ten years, until General Bohica
became the ruler of Gnarda. The economic
problems continued, or perhaps
worsened, but the General conducted
such an intense search for the Orb and
gave such promising progress reports
that the people were greatly heartened.
General Bohicas reign lasted for almost
two years, during which time the
people were made to believe the
Orb
would be found very soon. Then it was
inadvertently discovered that the General
had not been completely honest in
his handling of the countrys monies. He
had been pocketing large amounts of
wealth which should have been deposited
into the treasury of the country. Before
the General could be confronted
with evidence of this, he disappeared
just as the Orb had many years before.
Some of the Generals consorts and top
aides travelled to his castle to seek him
out, but none of them even returned with
so much as a report.
The people began to formulate theories
about what had happened. The most
popular theory was that the General had
found the Orb at just about the time he
had been discovered taking the countrys
money and that, allied with his personal
wizard,
Wthai, he had retreated to
his castle to consolidate his wealth and
power. A few people believed that perhaps
Wthai had become power-hungry
and had killed the General, taking the
Orb for himself. Other people went so far
as to report sightings of strange and
hideous creatures in the area of the
Generals castle. No one knew for sure
what had happened, but one thing was
certain: The people of Gnarda were
stricken with fear and dread.
THE MIDAS
ORB
The Midas Orb is
a beloved relic of
Gnarda, but it has
rarely been used. The
economic well-being
of the country does
not depend on the
presence of the relic;
however, the morale
of the people does.
The peoples morale,
in turn, affects the
countrys economy.
The legends of the
Midas Orb are
sketchy. The people
have some idea of
how it works, but
they are not aware of its
specific limitations
or powers. It is generally
regarded by the people
as being
too awesome or powerful
to be seen or
touched by normal
people. Indeed, this
is essentially true.
The Midas Orb has
an intelligence of
10 and an ego of
10; if this combination
equals or exceeds
the combined wisdom
and intelligence
of its possessor, it will
overpower him or
her 60% of the time,
causing insanity
in that person. After a
short time, death
will occur. The Orb in
no way radiates magic.
It is a round gold
sphere, approximately
palm-sized. By holding
the Orb in the
left hand, touching
another object with
the right index finger
and saying Become
gold! the possessor
can turn certain
objects into gold,
subject to these
limitations:
(1) Flesh of any kind, if turned to
gold, will remain so only as long as
no nick, cut or dent is made in it. If
the flesh is damaged by a blow or a
weapon strike, the object creature
or characters form will explode,
causing 2-16 points of damage to
anyone within 1, and 1-8 points of
damage to anyone from 1-2 away
who fails a saving throw against
dexterity (must roll dexterity or
less on d20).
(2) Any other organic or inorganic
substances, with the exception
of refined metal, will turn to a
worthless gold-colored stone.
(3) Only refined metals will become
true and permanent gold.
Special powers of
the Orb are as
follows:
(1) Telekinesis (1,000-6,000 gp
weight) twice per day.
(2) Possessor immune to Magic
Missiles.
(3) Protection +2 when held or
worn.
GENERAL
NOTES FOR THE DM
The Dungeon Master
should become
entirely familiar
with this environment
before conducting
an adventure in it.
The DM should be
careful not to reveal
more than the player
characters will be
able to see or know
at a certain time.
This adventure encourages
creative
thinking by player
characters, rather than
simply having them
encounter difficultto-
handle creatures.
Although some
spells are to be
found within the castle, it
must be assumed that
participating
magic-users will
have acquired some
spells of their own
from previous adventuring.
It will be of great
help to the party
if they can arrange
to take a <wizard>
of as close to 9th
level as possible.
WANDERING
MONSTERS
This list of random
wandering monsters
applies throughout
the castle and
should be checked
frequently, once every
1 or 2 turns. Roll
d10 for the type and
number of monsters
appearing:
1: 2-8 orcs (AC 6; HP: 8,7,7,6,5, 5,4,4;
D/A 1-8).
2: 1-6 bugbears (AC 5; HP: 23, 21,18,17,15,13;
D/A 1-8).
3: 2 wererats (AC 6; HP: 22, 19; D/A
1-8).
4: 1-6 giant rats (AC 7; HP: 4,4,3,
2,2,1; D/A 1-3).
5: 2 bugbears (AC 5; HP: 22,17; D/A
2-8).
6: 1 ogre (AC 5; HP: 29; D/A 1-10).
7: 2 wererats (AC 6; HP: 21, 16; D/A
1-8).
8: 4 men (AC 10; HP: 22,21,19, 16; D/A 1-8, long swords).
These men are wererats in human form.
9: 2 displacer beasts (AC 4;
HP: 38, 35; D/A 2-8/2-8; -2 on opponents attack dice).
10: 1 giant scorpion (AC 3;
HP: 34; D/A 1-10/1-10/1-4, poison).
The orcs and bugbears
are raiding
parties looting the
castle, and the wererats
are hirelings of
the wizard.
THE WIZARD
General Bohicas
wizard, Wthai, is an
11th
level magic-user: S 10,) I 17, W 15, D
15, C 15, Ch 10;
HP: 44. Although he
knows as many spells
as allowed, he carries
his favorites at
all times. These are:
1st level: Charm
Person, Magic Missile,
Hold
Portal, Shocking Grasp.
2nd level: Continual
Light, Invisibility,
Wizard
Lock, Magic Mouth.
3rd level: Dispel
Magic, Slow, Fireball,
Protection
from Normal Missiles.
4th level: Polymorph
Self, Confusion,
Fear.
5th level: Teleport,
Distance
Distortion,
Bigbys
Interposing Hand.
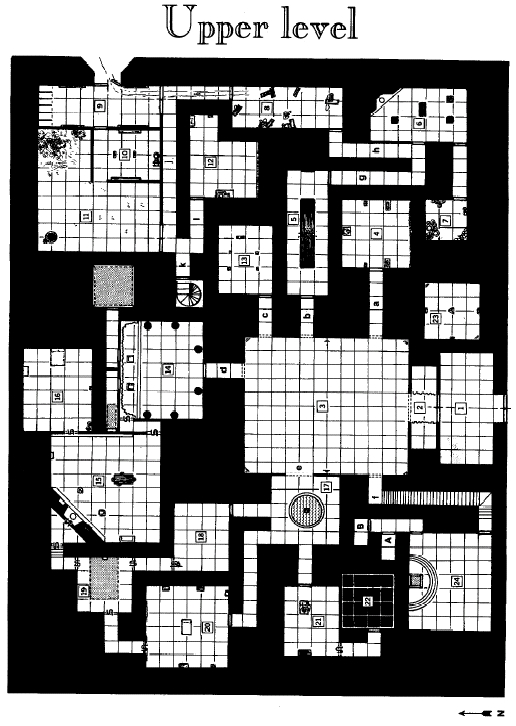
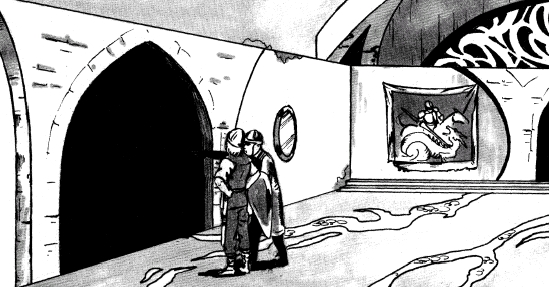
THE CASTLE
Heavy wooden doors
bound with brass
bands lead to an
inner garden courtyard.
(1).
This courtyard has a neat, well-kept
appearance. With
a closer look, an adventuring
party will discover
that there
are many twigs and
branches broken
throughout the courtyard,
and in several
damp places footprints
may be discerned.
The walls surrounding
the courtyard
are of gray
stone. On the south, the wall
is only 10 feet high;
however, on each of
the other sides the
walls are as high as
the castle itself.
Two more heavy banded
doors are set into
the north wall of the
courtyard opposite
the first set.
The
north doors open onto a 20-footwide
corridor (2)
with heavy gold draperies
flanking it. Once
this second set of
doors is passed through,
the outer doors
will shut and become
locked. Behind the
drapes on each side
are 20-foot-square
alcoves with wooden
pegs on all three
walls. The walls
and floor in this area are
made of the same
gray stone as the outside
of the castle. On
a peg in the eastern
alcove is a filthy
cloak; in a secret pocket
in the cloak are
3 sp.
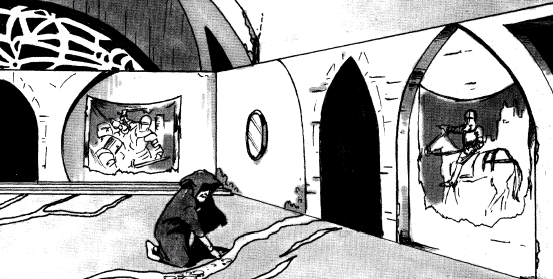
An
archway leads from this short corridor
into a formal ballroom
(3).
This
room is lit by 4-inch-diameter
discs
(magicked with Continual
Light spells)
mounted on the walls
in the corners and
in the center of
the east and west walls
(places marked X).
The ballroom floor
is of highly polished
marble with a gold
vein throughout
(the gold cannot
be removed). On the
walls are five large
tapestries depicting
various knights doing
heroic deeds. The
tapestries are slightly
moth-eaten and,
though they are rather
large, they are not
collectors items.
They are worth (at the
very most) 50 gp
each.
Leading from the ballroom
are six
archways. A
corridor in the southeast
part of the room
(a)
is lined with shiny,
rust-colored tiling
on the walls. There is
moss-green flagstone
on the floors.
Flagstone is rather
noisy to walk upon;
therefore, a party
increases its chance of
attracting wandering
monsters to 2 in 6
while in this area.
This
rust-colored corridor leads to
General Bohicas
trophy room (4). Taking
up the entire south
wall is a hanging
made from the skin
of a red dragon
(which, in reality,
Bohica had help in killing).
A rug made from a
huge white bear
is on the floor,
and scattered throughout
the room on display
are a pair of stuffed
badgers, a stuffed
giant eagle, a stuffed
wild boar and two
stuffed giant rams.
There is a niche in
the wall behind the
dragon skin. However,
as soon as the
dragon skin is touched
or moved, the
two rams will animate
(AC 6; HP: 27,24;
D/A 2-12) and attack
anyone who might
be in the room. The
niche in the wall
behind the dragon
skin contains a velvet
pouch with two diamonds
inside (500 gp
each).
The
corridor leading from the east
central part of the
ballroom (b) is tiled in
red.
Again, the floor is of moss-green
flagstone and will
increase the chance of
wandering
monsters being encountered
while it is traversed. As
the door is
opened to the adjoining
room (5), the
first thing noticed
is the end of a very
long, heavy wooden
table. The table is
constructed of highly
polished oak.
There are no chairs
in the room. A gigantic
chandelier has fallen
from the ceiling
onto the table at
about its midpoint. It
may be noticed that
there is quite a bit of
gold on the chandelier.
If the party is
enterprising enough
to remove all the
gold from the chandelier,
the task will
take approximately
2½ hours to complete,
and the gold obtained
will be
worth 1,000 gp. But
during that time,
three bugbears
will discover the group
(AC5; HP: 21,18,13;
D/A 2-8). There is a
2/3 (1-4 on d6) chance
that the party will
be so engrossed in
gold-picking that the
stealthy bugbears
will initiate the attack.
On the eastern wall
of this room is a
portrait of General
Bohica in full military
uniform. He is an
imposing figure, with
heavy brows over
dark, brooding eyes.
These eyes seem to
follow every movement
in the room. There
is no magic or
deviltry involved
in the picture, but the
artist has so magnificiently
captured the
mesmerizing effects
of General Bohicas
gaze that all who
look at the picture must
save vs. spells (at
+1) or become unable
to break the gaze
for 1-4 rounds. This
may occur at any
time, including during
the fray with the
bugbears.

The
corridor (g) leading south from the
dining room is of
plain grayish-brown
stone, as is the
floor. The stone walls and
floor are fairly
smooth and flat. There is
nothing remarkable
about this corridor.
The
first room off this corridor is a
kitchen (6).
There is a fireplace, containing
cold ashes, in the
northeast corner of
the room. The flue
to the fireplace is
shut; should it be
opened, five stirges will
fly into the room.
(AC 8; HP: 8,7,6,5,5;
D/A 1-3 and blood
drain, 1-3 hit points
per round up to 12
points or until killed.)
There are large chopping-block-type
tables at various
places around the room.
Pots, pans, and utensils
hang from the
ceiling over the
tables.
A
smaller room (7) off the kitchen to
the west seems to
be a pantry. There are
several barrels and
bags of foodstuffs
(untouched and still
good): wheat flour,
rice, pickled cucumbers,
cauliflower and
carrots, and dried,
salted fish. There is
quite a bit of flour
on the floor, and some
bags have been shredded
to make a nest
for the 8 giant
rats that live here. (AC
7; HP: 4, 4, 3, 3,
2, 2, 2; D/A 1-3.) In the
nest are three tiny
rats
(HP: 2, 1, 1) and
several gems: two
clear gems (rock crystals,
50 gp each), two
clear pale bluegreen
gems (zircons, 50
gp each) and
one golden-yellow
gem (topaz, 500 gp).
The
corridor (h) leading north from the
kitchen is made of
the same nondescript
gray stone. The
room at the end (8)
seems to be a barracks.
There is an 80%
chance of finding
a band of 8 orcs
searching this room.
(AC6; HP: 8,8,7,6,
5, 4, 4, 3; D/A 1-8.)
Each orc is carrying
2-12 ep in a pouch.
All the cots and bedding
in this room have
been overturned
and generally disrupted.
There are several
swords and items
of armor: two
chain mail, one plate
mail, a long sword
(non-magical) and
a short sword (+2). If
the adventurers make
a more diligent
search of the mess,
there is a 60% chance
for one character
to find a gold ring.
(Roll percentile
die for each searcher;
the lowest roll under
60 determines who
finds the ring. If
all rolls are over 60, the
ring is not found.
It is a Ring of Fire
Resistance.)
The
door in the north wall opens into a
corridor (i)
which is of the same gray
stone,
although a well-worn path (lighter
in color than the
surrounding area)
seems to have been
trod here. There are
deep (fresh) scratches
running the length
of the hallway, leading
to the double
doors at the north
end of the hall. These
marks give the impression
that something
heavy was recently
dragged from
the barracks to and
through the doors.
Those
double doors open into the stables
(9). The gouging
on the floor continues
across to the doors
on the east
wall. There are water
and feed troughs
along the east and
west walls. Close inspection
will reveal hay in
some troughs
and water in others.
The area has an appearance
suggesting that the
east doors
were left open by
some hastily departing
inhabitants of the
castle.
In the stalls at the
extreme east and
west along the north wall of the stables
are the lairs of two huge
spiders. (AC 6;
HP: 15 (west stall), 13 (east stall); D/A
1-6, save vs. poison.) Each spider guards
a treasure of six platinum pieces. Disturbing
either lair will alert the other
spider, who will come forth and join the
attack.
The room (10) adjacent
to the stable is
a smithys shop. There are two large anvils
here, and many different tools hanging
from the walls. There is nothing extraordinary
about this room.
The area adjacent to the
smithys shop
is the garden (11). This
area has no ceiling
and looks dry and untended. There
is a well in the northwest corner. A pail
with about 30 feet of rope tied to it rests
on the edge of the well. Lowering the pail
into the well will alert five large
spiders
(AC 8; HP: 9, 7, 6,5,5; D/A: 1 point and
save vs. poison at +2) that live in the
well
about ten feet below the rim. These spiders
will rush to the top of the well in one
round and will attack anyone or anything
within reach. The well does contain water,
which can be obtained if the bucket
is lowered 25 feet inside the rim.
A careful search of the surrounding
garden will reveal nothing of value, but
will cause a giant
scorpion (AC 3; HP: 37;
D/A 1-10/1-10/1-4, poison sting) which
lives in the vines and overgrown bushes
in the northeast section to attack the
adventurers.
The section of the corridor
(j) which
leads past the stable and the garden is
made of the same gray
stone and is not
unusual in any way.
One short hallway (k)
branches off and
leads to a staircase spiraling down to
a
lower level, while
another (l) leads to an
oddly shaped room (12). In an alcove
in
the northeast corner of this room is a
cot
and a wooden chest. Along the west wall
of the room is a large desk strewn with
sheets of parchment. Diagrams and unfamiliar
scribbles abound on most of the
parchment sheets. A leather cylinder (50
gp) lies on the desk. Inside is a scroll
containing a spell (Dispel
Magic). If the
spell is utilized by a character other
than
a <wizard>, or a magic-user who is not
able to use a third-level spell, one of
the
following three things will occur: 70%
chance of user being stunned for 1-6
turns; 20% chance of amnesia for 1-6
turns; or 10% chance of permanent insanity.
A saving throw vs. spells, made at
-2, will negate the insanity effect, leaving
the user stunned for 1-6 turns as if the
first-mentioned result had occurred.
Also to be found on the desk is a large
brass key on a leather strap. This key
may be useful to the party in the future,
but at the time of its discovery, any character
who places or ties the key about his
or her neck or waist will suffer the following
side effects after 30 minutes of wearing
it: (1) a great tiredness will overcome
the character, causing him or her to attempt
to slow the groups progress and
movement, and (2) the wearer of the key
becomes somewhat paranoid specifically,
he or she thinks another member
of the party (determined at random) has
been taken over by a doppleganger and
is out to destroy the group. The wearer
of
the key will even go so far as to quote
folklore and legend about the infamous
doppleganger
in order to prove his point.
Within 6 rounds after it is removed from
around the neck or waist, the keys side
effects will be gone. The key and its strap
may be carried in a pocket or pouch
without harm to the carrier. The key
cannot be removed from the leather
strap, and the entire apparatus will radiate
magic if detected for.
Along the south wall of the room is a
shelf upon which rest twelve containers.
These containers are corked and are not
transparent. It is impossible to guess
the
contents by shaking the bottles because
of the thickness of the ceramic from
which they are constructed. The only
way to discern what is inside is to spill,
dump or taste the contents. Several of
the containers have symbols inscribed
thereon. Any thief will have a percent
chance equal to his or her level to decode
each symbol (roll for each container
separately). Note: Do not show the
symbols until a roll for understanding
is
successful.
![]()
Container 1: Symbol (meaning
explosives) shown at left.
Inside is a clear
red liquid. It will
explode internally if imbibed,
causing 2-8 points of damage.
Container 2: No symbol. It contains
mares sweat.
Container 3: No symbol. Hippogriff
feathers are inside.
![]()
Container 4: Symbol (meaning
sex change) shown at left.
This is a greenish, milky liquid
which, if taken internally, will
change the sex of the person
drinking it. Taking a second
dose will not reverse the effects,
but a Dispel
Magick spell might
(20% base chance, plus 10% per
level of the spell caster).
Container 5 No symbol. Human blood
is inside this vessel.
![]()
Container 6: Symbol (meaning
poison) shown at left. A
blue, milky liquid
which is poison
(save vs. poison or die if
taken internally).
![]()
Container 7: Symbol (meaning
cure wounds) shown at
left. 4 doses of a pinkish
fluid which cures 1-8 hit points
of damage per dose.
Container 8: No symbol. Contains one
huge pearl valued at 500 gp.
![]()
Container 9: Symbol (meaning
anti-potion) shown at left.
This clear liquid is an anti-potion
mixture (three doses) which
will reverse the effects of the
contents of any other container.
![]()
Container 10: Symbol (meaning
hair) shown at left. This
milky gray fluid will cause hair
to grow wherever it comes in
contact with flesh (including the
tongue).
Container 11: No symbol. The container
holds hundreds of long, silky
strands of (apparently human)
hair.
Container 12: No symbol. This jar is
full of insect legs.
The corridor (c)
leading out the northeast
wall of the ballroom is tiled in magenta.
At the end of a 30-foot
hallway is a
door which opens
into what appears to
be a music room (13). A number of
finely
made instruments, all seeming to be in
mint condition, are displayed in this
room. The adventurers may recognize
one lute, three harps, one mandolin, and
a Fochlucan
bandore. The bandore is
the only instrument with magical properties;
however, a bard
is the only character
who will be able to distinguish that
instrument from the others.
The corridor (d)
which leads north
from the ballroom is lined with bronze-colored
tiling. Several
tiles have symbols
of inlaid ivory, with the following designs
repeated three or four times each:


All are symbols denoting royalty. The
door leading to the north is made of fine
wood banded in highly polished brass,
and also contains one rendition of each
of the symbols. The
room to the north
(14) has ivory
tiling on the floors and
walls, and marble columns line the walls.
In the northern part of this room there
is
a raised dais about four feet high. On
this
dais are two huge, ornately carved
thrones. A large rat holding a long sword
is lounging upon each throne. These
creatures are obviously wererats,
and
they will attack the party as soon as possible.
(AC 6; HP: 21, 16; D/A: 1-8.) Once
the wererats have been dealt with, party
members may search the room.
Behind the thrones on three sides of
the dais is a heavy
purple drapery which
reaches from ceiling to floor. There is
approximately 1½ feet of space between
the drapery and the wall. Pegs are evenly
spaced along these walls. Two doors are
located behind the drapery on the north
wall. Each of these doors leads into a
separate corridor. The
west corridor(m)
leads to a false door. Trying to move it
will open a trap door in the floor beneath
it, dropping all party members within 20
feet of the false door into a pit 20 feet
deep. This pit is 10 feet wide by 20 feet
long and contains about 4 feet of water
at the bottom. Roll for damage from
the pit on the following table, using d12:
1-3:
No damage.
4-6: 1-4 points of damage.
7-8: Broken foot and
1-8 points of damage.
9-10: Broken leg and
1-8 points of damage.
11: Two broken feet
and 2-16 points of damage.
12: Two broken legs
and 3-18 points of damage.
(This table applies
to animals as well as humans.)
The east corridor (n)
leads to a door
which is not locked but appears swollen
and is very difficult to move. Opening
it
will require several shoulder hits by a
character of not less than 16 strength.
When the door does come open, there is
a 70% chance that the character doing
the pushing will fall into the room a
30-foot pit which contains 3 feet of
water. (Use the same damage
table as for
the pit trap in the previous corridor,
with
+1 to the die roll.)
Also behind the drapery in the throne
room in the northwest corner on the west
wall is a secret
door. It appears to be part
of the wall. Even if detected, it will
not
open until the first and third pegs from
the west wall are grasped, pulled and
then pushed firmly. This will cause the
door to swing open easily but if it is
not held open, it will swing shut just
as
easily and then must be
re-opened. The
secret door leads into a 30-foot corridor
(o) running north and south, with
another
secret door in the southwest corner.
This latter secret
door need only be detected
and pressed firmly to cause it to
open.
It swings open into a huge
den (15)
filled with comfortable furniture, with
a
large fireplace in the northwest corner.
There is a large, plush couch, two comfortable
chairs, a large table with four
matching chairs, and an aquarium in the
room. A section of shelves on the east
wall contains a number of figurines: a
gold statue about
1 foot tall worth
about 800 gp; an
ivory elephant (100 gp);
several wooden carvings of animals
(worth 100 gp total); a small jade statue
of a man in a squatting position (200 gp);
and several miniature carvings such as
a
mahogany frog, an ebony fly (magical),
an ebony lizard, and a mahogany spider.
There are also two ornately decorated
pewter plates, worth 150 gp each, propped
up at the back of the shelf. Also contained
here are several books and tomes,
all well-known literary works of the time.
None are magical in nature and none
have any appreciable value.
Above the fireplace is a large mantle.
Over the mantle, a large coat of arms is
mounted on the wall. It is carved of heavy
wood and is colored gold with red bands
crossing it at the top and bottom. A duck
is depicted in the middle of the design.
Two bastard swords in scabbards are
mounted to either side of the coat of
arms. There are carvings on the hilt and
scabbard of each sword, but they seem
to be ornate rather than rune-like. The
sword on the left is a magical (+3) sword.
The sword on the right is also magical,
but not beneficial: As soon as it is drawn
from its scabbard, it will cause the character
holding it to attack the nearest other
character, at +1 to hit, for 1-6 rounds
before it can be dropped. The victimized
character may defend him or herself, or
may move away from the wielder so that
another character nearby draws the
swords attention.
No ashes are in the fireplace, although
there are tools on either side, and a pile
of logs in a small niche to the left of
the
fireplace. (Another niche on the right
is
empty.)
Inside the fireplace at the back is a
secret door about five feet high. If the
door is discovered, it can be opened
simply with a firm push. Behind the door
is a sleeping ogre
(AC 5; HP: 29; D/A:
1-10). There is a base 50% chance, going
up to 65% if the swords above the mantle
are examined, that any group searching
the den will cause the ogre to awaken
and enter the den through the secret
door to attack. If the ogre doesnt attack
earlier, it may be surprised when its
chamber is entered. There is a 35%
chance the ogre will remain asleep when
the secret door is opened.
Another secret door is on the east wail
of the den, concealed as a section of
bookcase, and will be revealed as a door
only if triggered. In order to trigger
this
door, the left-hand pewter plate must be
removed from the shelf, uncovering a
keyhole behind it. The key for this lock
may be (or perhaps has already been)
found in the wizards laboratory (12).
Turning the key in the lock will release
a
spring latch, and the door will open.
This secret
door opens into a majestic
bedroom (16). This is obviously
the master
bedroom of the General. Its lavish
furnishings include an intricately carved
ebony bed, a similarly carved wardrobe,
and a dry sink with a porcelain basin.
In one corner of the room stand two
ceramic urns. One has a lid and is slightly
smaller than its companion. This urn
contains dried flowers. If the container
is
opened, a spray of spores will be released.
Anyone within a ten-foot radius
must save vs. spells or have an amnesialike
malady for 1-4 hours. A character
who is so affected will refuse to leave
this
room willingly for the duration of the
effect,
because this room is the only reference
point in his or her mind.
In the other urn are about 100
small
silver-colored balls.
Although this container
has no lid, the contents cannot be
seen by peering into it because of the
small neck of the urn. As soon as one of
the balls is removed or touched, it will
burst and set off a reaction among the
others, causing them to all burst within
the next five segments. This causes no
immediate harm but releases a delayedaction
poison into the room. All who remain
for 2 rounds after the end of the
reaction (2% rounds after the first ball
is
disturbed) must save vs. poison after or
fall into a comatose sleep. Anyone remaining
in the room six rounds after the
end of the reaction (including those who
fall asleep) must save vs. poison or die.
Characters who make the first saving
throw will fall into a comatose sleep if
they fail the second save, and will die
if
they are not removed within three more
rounds.
In a drawer at the bottom of the wardrobe
is a tray lined with velvet. In the
trays twelve compartments are the following
items: (1) alkanet root, (2) bitter
aloe, (3) asafetida, (4) ash leaves, (5)
camomile, (6) catnip, (7) gum camphor,
(8) blue flag, (9) nutmeg, (10) juniper
berries, (11) horseradish, and (12) china
root. Also in this drawer is a small jewel
case with a heavy
gold-chain bracelet
(worth 250 gp) inside.
Seen through
the 20-foot-wide portal
(e) to the west of the ballroom
is a fountain
room (17), done primarily in indigo-colored
tile, with jade-colored tiles surrounding
the fountain and forming a
ledge about 2 feet high. In the center
of
the fountain is a statue of a grinning
imp.
As soon as at least one character comes
within 5 feet of the ledge, the imp will
animate and say the following riddle:
A narrow fellow in the grass
Occasionally rides
You may have met him did you not,
His notice sudden is
The grass divides as with a comb
A spotted shaft is seen
And then it closes at your feet
And opens further on
Several of natures people
I know, and they know me;
I feel for them a transport
Of cordiality
But never met a fellow,
Attended or a/one
Without a tighter breathing
And zero at the bone.
(The Snake, by Emily Dickinson)
If the subject of the riddle is guessed
immediately, the imp turns to stone
again. If no one says the answer (a
snake), the imp will spit poison at one
character per round, starting with the
nearest intruder. If the victim fails to
save
vs. poison, he or she will take 7-12 points
of damage right away and 1-4 points per
hour afterward. A Neutralize Poison spell
will halt the loss of hit points.
The only items of value in this room
are the jade-colored tiles (which are actually
jade) covering the ledge around
the fountain. Removal of all the tiles
will
require three hours of careful work, and
if the party attempts
this task, they will be
attacked after one
hour by a party of 6 bugbears
13; D/A: 2-8. Roll
d4 to determine from
which of the four
entranceways they attack.)
Each bugbear has on its body a
pouch containing 1-12
gp.
The corridor leading from
the center
of the north wall of the fountain room
leads to the armory (18). This room
is full
of all types of armor and weapons. There
are 2 suits
of leather, one set of chain
mail, and one suit of splint mail all lying
on the floor in pieces. There are one
crossbow, a short bow, ten quivers of
arrows, two long swords, three short
swords, and five daggers also strewn
about the room. In one leather pouch are
ten darts. A morning star, a footmans
flail, a throwing hammer, and a halberd
all hang along the south wall.
In the northwest corner stands a suit of
splint mail holding a long sword. If either
this armor or this sword is touched, the
figure will animate and attack (AC 4; HP:
30; D/A: 1-8). It may be killed in a
normal
manner, in which case the armor is
destroyed, or it can be defeated by the
use of Dispel
Magick. In this case, the
armor may be utilized by one of the party.
This suit of armor stands in front of a
concealed door. Any elf in the group of
adventurers will have a 60% chance of
spotting this door once the armor has
moved from its resting place. This door
leads to a seemingly dead-end corridor.
There is a secret door at the north end
which can be opened only by pushing
against the bottom within one foot of the
floor. (The door is hinged at the top and
swings both ways.)
Once that door is opened,
the party
will be looking into a 40-foot-square
room (19). Immediately opposite
on the
north wall is another door. Against the
center of the east wall is a treasure chest.
The only way this chest can be reached
is by walking along the centerline of the
room from the west wall to the east wall.
Anyone who heads directly for the chest
from any of the doorways will cause the
floor to open up, dumping the character(
s) into a pit of water 20 feet down,
causing 2-8 points of damage per character.
This trap covers a 20-foot-by-30-
foot area of the room, as outlined on the
map, and affects any character within
that space when the trap is sprung.
The chest is bolted to the floor and will
remain in place even if the floor is rotated.
It is also wizard
locked. If the chest is
opened, the party will find two diamond
bracelets (2,000 gp each), two ruby rings
(1,000 gp each), and a total of 500 cp.
The door on the north wall opens into
a corridor which leads to the secret alcove
behind the fireplace in the den. The
second secret door, like the first, is
opened by pushing against the bottom.
The corridor leading from the northeast
corner of the fountain room is tiled
in silver. At the
end of the hall is a door
which opens into the Generals public,
or
known, quarters (20). This room
has a
huge bed in its center and a femininelooking
dressing table on one wall, two
large wardrobes on another, and a dry
sink on still another. A large gold chest
stands in one corner. (Close inspection
will reveal that it is not really gold.)
The
bed is surrounded by a gauze curtain
held in place by a ring directly over the
bed. White furs
(total value 200 gp) are
strewn over the bed itself.
Inside the dressing table is a large selection
of silken lingerie, some of which
is quite daring in design. All of the lingerie
has the smell of roses; at the back of
one drawer is a small pewter bowl (20
gp) containing fragrant dried rose
petals.
There is also a small vial of a fragrant
oil in the same drawer.
In one wardrobe are feminine clothes
(very musty) and in the other is masculine
clothing, including some military
uniforms.
In a drawer at the bottom of the wardrobe
is a small pouch containing juniper
berries. There is also a smallish locked
chest of wood. It contains a golden orb,
approximately palm-sized. (A layer of
gold paint
can be scraped off, revealing a
lead sphere of no worth.)
In the gold-colored
chest are dirty
clothes. The chest has a false bottom
which will spring open if pushed slightly
and then released quickly. Beneath the
false bottom is a
small gold chest containing
some jewelry: one ruby set in a
gold brooch
(1,000 gp), a pair of emerald
earrings in silver settings (500 gp), and
an emerald choker (1,000 gp). The ruby
in the brooch can be removed, revealing
a tiny vial which is empty.
There are two tapestries on the north
wall. One covers a secret door, which
can be easily opened if it is detected. The
corridor beyond leads into the treasure
room (19).
Leading west from the fountain
room
is a corridor tiled in emerald green. The
door at the end of this hallway opens into
a large room (21). The first thing
noticed
when the door is opened is a tall creature
which resembles a lion with wings and a
human-like head. This is located about
ten feet inside the room and as soon
as the door is opened, it will emit a deafening
roar. All within 30 feet must save
vs. fear (as against a wand) or flee in
panic for three turns. This is only a statue
of an androsphinx with a Magick
Mouth
spell cast on it. Party members who
make the saving throw will see the statue
for what it is, but will not be able to
offset
the fear effect of the characters who fail
the save. The statue emits only one roar.
There is a large wooden table on the
west wall of this room. It is a mimic
of the
smaller, more intelligent variety (AC 7;
HP: 43; D/A: 3-12). If it is detected and
then given food, it will divulge a limited
amount of information, such as: There
is a secret door in the southwest corner
of the room leading south. It leads to
treasure. The mimic cannot and will not
be of any further assistance. It will not
attack except in self-defense.
The secret door in this room may be
opened by sliding a portion of wall to
the
east into a slightly thicker section of
wall.
The hallway thus reached is a nondescript
one which leads only to another
door.
Inside that door is a room
(22) decorated
all in black tile.
The totality of the
blackness causes these walls to absorb
light, allowing a character or creature
to
see only ten feet ahead. Even magical
light is so absorbed. Those who investigate
the room will eventually discover it
is entirely empty. There is no difficulty
entering the room or moving within it.
But, when a character tries to leave (via
the door in the west wall), he or she is
immediately teleported to another room.
The room (23) that
characters are teleported
into is made of the same gray
stone as most
of the rest of the castle.
The room is illuminated by two 3-inch
discs (Continual
Light spells) in the northwest
and southeast corners. There are
no visible exits. A six-foot-tall obelisk,
shaped like a three-sided pyramid, stands
in the center of the room. On each side
are three numbers, positioned as shown
below:
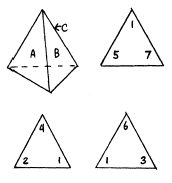
Along the north, east and south walls
are three large wooden chests. The one
on the north wall contains a crown of
gold with a huge diamond in its center.
Gems radiate out from this diamond:
four rubies, four emeralds and 2
aquamarines. The crown is ornately
etched and edged in platinum. It is worth
10,000 gp. The chest on the east wall
contains a silver tiara. It has a diamond
in
its center with radiating lines etched
outward from it. It is worth 4,000 gp.
The
3rd chest contains a total of 500 pp.
The obelisk is the key to transportation
out of the room. The outline of the
number 1 on each side must be traced
with a finger or other implement. One
side, at random, will then fall outward
45
degrees and stop. The obelisk is hollow.
Etched on the floor inside it is a circle.
Three sharply pointed daggers
are embedded
in the interior walls of the obelisk,
about midway up each side. They
appear to be spaced to meet as the three
sides close together. A person is teleported
from the room by stepping into
the circle. The open side of the obelisk
will then snap shut; however, teleportation
occurs instantly, thus causing the
daggers to stab into thin air. Any person
teleported out of this room will reappear
in the corridor outside the black room,
at
the spot he or she would have reached
by going through the door out of the
black room (if that were possible).
Leaving the ballroom from
the corridor
in the southwest corner (f) will
take
the party through a
flame-colored hallway.
After rounding the first corner, the
party comes upon a stairway which descends
about 40 feet over the 90-foot
distance, then turns and leads into
another chamber.
This room (24)
is the Ceremonial
Chamber. On the north wall is a semicircular
dais which can be ascended by
several steps all along its edge. In the
center of the dais is a pit with a rope
ladder leading downward. This ladder is
spiked to the floor at the southernmost
edge of the pit. Anyone who remains in
the room for more than ten minutes has
a
30% chance of hearing moans issuing
from below. The rope ladder extends
down for 30 feet. The pit is about 10 feet
square and of indeterminate depth.
When a character descends to the bottom
of the ladder, he or she will find a
pool of water 25 feet further down.
Branching off a corridor at the northeast
corner of the Ceremonial Chamber
are two filthy cells. In the first (A)
is a
hideous creature with one sensory organ
stalk and two tentacles. The room is
filled with offal, and any who open the
door will be blasted with an odious smell.
(The creature is an <shit
eater>. AC 3; HP: 39;
D/A: 1-8/1-8/2-5, 90% chance for typhus
if bit.)
In the northernmost cell (B) is an
enraged
creature. Its thrashing and doorbeating
can be heard up to 40 feet away.
It is an 8-foot-tall humanoid creature
with the head of a bull. (This is a minotaur.
AC 6; HP: 38; D/A: 2-8 butt vs. opponents
over 6, or 1-4 bite vs. those less
than 6.)
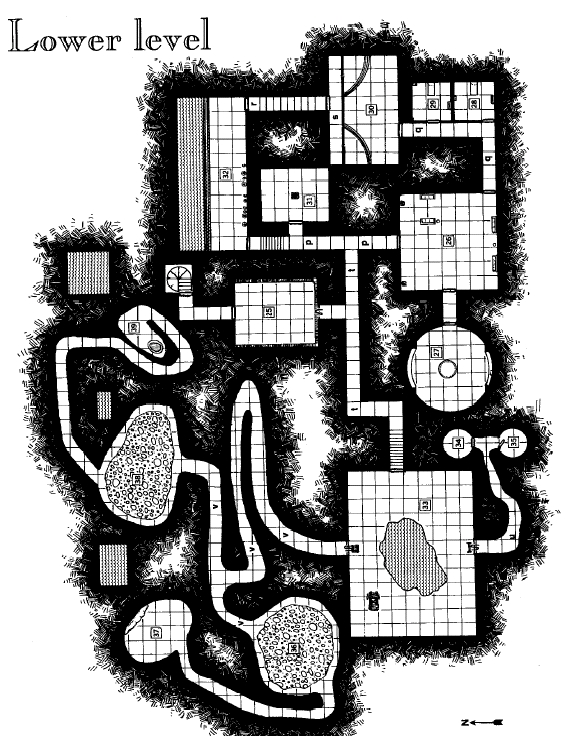
LOWER LEVEL
The first room of the lower level (25)
is
what appears to be the lair of three displacer
beasts
(AC 4; HP: 40,34,17; D/A:
2-8/2-8; -2 on opponents to hit rolls.).
Once these creatures have been dealt
with, characters will notice this room
is a
well-stocked wine cellar. Shelves on the
east, south, and west walls hold more
than 500 bottles of vintage wine. There
is
a 65% chance for anyone examining the
wine bottles to find one near the center
of the south wall that cannot be removed
from the shelf. If this bottle is rotated
clockwise, it will release a latch on a
secret
door, which can then be pushed
open.
This secret door opens into
a corridor
(t) which, after 20 feet, turns
both east
and west. Going east
along the corridor
leads to another hallway (p), which
goes
north and south.
This passageway leads south
to a very
large room (26), lavishly furnished
in
gold and white. There are several plush,
comfortable sofas, three furs (200 gp
each) on the floor, and two globular
lamps (50 gp each). A <giant> poisonous
snake
has coiled itself up behind one of the
couches and waits there for some unsuspecting
adventurer. (AC 5; HP: 25;
D/A: 1-3 plus poison.)
There are two statues of women, in the
northeast and northwest corners of the
room. These statues seem to be of pure

gold and are perfect replicas of beautiful
young girls. (They are pure
gold; however,
if even one nick is made in either
statue, it will explode, doing 2-16 points
of damage to anyone within a ten-foot
radius. At the instant of the explosion,
the gold of the statue will turn to stone.)
The door on the west side
of this
lounge opens into a boudoir (27).
In the
center of the room is a large circular
bed.
A gauze curtain encircles the bed. Intruders
in this room will see movement
behind the curtain. On the bed is a giant
scorpion.
(AC 3; HP: 33; D/A: 1-10/1-
10/1-4 poison sting.) There are shelves
carved into the walls of the room on the
north and south. On the south shelf sits
an ebony coffer, approximately 10 inches
on each side, with ornate carvings on it.
It seems to be upside down, as there is
a
line around it about 2 inches from the
bottom. If the entire coffer is picked
up, a
gas will pour from tiny holes in the bottom
bottom.
This gas will cause confusion for
anyone in the room who does not save
vs. spells. Confused characters will do
one of the following things for 1-3 turns:
(1) Lose sense of direction.
(2) Forget the mission.
(3) Think everyone else
in the room is an enemy.
(4) All of the above.
(5) All of the above,
twice normal duration.
(6) Extreme drowsiness
for 1-2 turns.
If the top is lifted off the box, a
golden
orb will be
found. The gold can be
scraped off, revealing a silver-colored
ball with an almost invisible seam around
it, where it may be opened. The silver
is
thick, making the ball fairly heavy. Inside
the ball is a hollow space in which rests
a
gold-colored ring (a Ring
of Invisibility).
Two rooms,
(28) and (29), open off the
east side of this corridor. They are identical
in shape and size. There are feminine
decorations in the southern room,
as well as 2 more displacer
beasts (AC
4; HP: 38,33; D/A: 2-8/2-8; -2 on opponents
to hit rolls). There is nothing
else of interest in the room.
In the north room there is a girl. She is
very beautiful, and claims to be one of
the Generals harem. She will say that
he
turned the other harem girls into gold
but missed her because she successfully
hid from him. She will ask to join the
group. She does not know where the Midas
Orb is hidden, but she feels that perhaps
the General is still alive. She claims
to have heard the screams and shrieks of
a man being tortured, but has never
found the source. She says that she
knows of the Generals wizard, and that
he (the wizard) has been gone for a very
long time. If the group accepts her, she
will elude them at her earliest convenience.
(She is, in fact, the wizard, employing
polymorph
self and charm person
spells.) If the adventurers should opt
to attack her, she will become invisible
and escape the area.
The room at the north end
of the corridor
(30) is a bathing area. The room
is
tiled in white except for the baths, which
are tiled in blue. There are two small
holes on the north wall of each bath (for
the pouring of water into the baths).
There are several small furs on the floor
but they are rather ragged and a little
moth-eaten (worthless). Should anyone
venture too close to the eastern bath,
a
huge
spider (AC 6; HP: 13; D/A: 1-6, save
vs. poison at +1) will attack.
Another room (31)
branches east off
the main north-south corridor going
north from the lounge. A
black, oily substance
covers the floor here. Investigation
will show this is actually some sort
of crude oil. If the party sets it on fire,
it
will burn for about twenty minutes or so,
and increase the chance for a wandering
monster to 2 in 6 during that time. In
the
center of the room is a trap door. The
handle has broken off, so the group will
have to pry it open. Accomplishing this
will disclose a pit approximately 5 feet
by
5 feet across and 10 feet deep. There is
a
locked chest at the bottom of the pit.
It
has handles on each end for lifting. If
the
chest is lifted out of the pit, an enraged
spectre
(AC 2; HP: 47; D/A: 1-8 plus
energy drain; +1 or better weapon to hit)
will emerge from beneath. In the chest
are 500 pp.
At the north end of the
corridor, down
a flight of low, broad stairs, is a room
(32)
with a pool of water
covering the entire
northern part of the floor. Bubbles are
coming from the north side of the pool.
The water escapes by flowing underneath
the steps leading into the pool.
There are a number of urns lining the
walls, but close inspection will uncover
nothing of value.
Leading south from the southeast
corner is a passageway which runs into
an east-west hallway (s), the only
features
of which are two small holes near
the floor on the south wall. These are
used to fill the baths in the bathing room.
Moving west from the corridor from
the wine cellar leads to a huge room (33).
This room has whips, a rack, chains and
other
types of equipment commonly associated
with
torture. There is a huge
heavy chair with straps on the arm rests
and the legs situated on the north wall.
This chair conceals a door (which is
simply a sliding panel of rock). There
are
heavy stocks concealing another similar
door on the south wall of the room. A
shallow pool of murky water is in the
center of the room. Directly above it,
about 25 feet overhead, can be seen the
end of a rope ladder dangling from overhead.
By looking further up, characters
may be able to discern a hole in the ceiling.
In the pool lurk 4 giant
leeches
(AC9; HP: 17,13,9,5; D/A: 1-4 and blood
drain).
The south tunnel (u)
gets progressively
smaller until it is only 4 feet wide
and 10 feet high. At the end of the tunnel
are 2 doors. The north door is locked
and has a small grate near the top for
ventilation. Inside
the room (34), in
chains, is an emaciated old
man in a
loincloth. From his wild ravings, it can
be
determined that he is (or at least thinks
he is) General Bohica, but he will offer
no other information, due mostly to his
mental incapacitation.
The door leading to the
southern room
(35) is slightly ajar. If the party
becomes
more engrossed in the north cell initially,
they will be attacked from the south cell
by a creature standing eight feet tall,
with a brownish-black combination of
fur and feathers. (This is an owlbear.
AC
5; HP: 32; D/A: 1-6/1-6/2-12 and hug for
2-16.)
The door in the north wall
of the tor-
ture chamber opens into a tunnel (v)
similar
to the southern tunnel.
It slopes
downward gradually until it divides and
turns both east and west. At this point,
low heat can be felt from both directions.
To the left, the tunnel bends around to
the south. As soon as an adventurer goes
in that direction, a red glow may be seen
and the heat increases with each step
taken in that direction.
The room (36) itself
contains a lava pit
in the center, with only a 3- to 5 foot-
wide walkway around the edge. The
lava is boiling furiously, with sulfurous
smoke exiting through cracks in the high
ceiling. The whole room is lit by the
glow, and there is a 70% chance that a
small tunnel may be seen through the
haze leading out to the southwest. All
who enter the lava room must save
vs.
poison
or be overcome by the heat and
oppressive atmosphere.
The tiny tunnel heading
southwest
from this room winds around to the north
and opens into a room (37). On the
far
wall is a huge cloth covering and apparently
containing a rather large, motionless,
lumpy shape or shapes. If the cloth
is pulled down or moved, 20
gold
balls will
rain down from the ceiling. All
persons in the room must roll for dexterity
(their own dexterity or less on d20 to
save) or be hit by the balls for 1-6 points
of damage. Each of the spheres has a
50% chance of exploding when it hits
someone, causing an additional 2-12
points of damage to that figure. The Midas
Orb is not among these spheres.
The tunnel leading off
to the right of
the branch snakes around to a room (38)
with a lava pit in its center. The lava
is
bubbling and smoking, with the smoke
and most of the noxious vapors escaping
through cracks and holes in the ceiling.
Members of an adventuring party must
save vs.
poison or be overcome by these
odors. A narrow ledge encircles the pit.
Anyone peering through the smoke and
haze has a 50% chance of spotting a
small tunnel exiting the room on the
north wall.
This tunnel slopes steeply downward
and becomes very narrow.
It winds
around to a room (39) with a pit
in the
center. If anyone lowers him or herself
over the edge, fierce snarls and growls
will emanate from the bottom. The pit
curves downward for twenty feet into the
darkness, making it impossible to see to
the bottom from the rim. When someone
reaches the bottom, the noises will be
discovered to be just a Magick
Mouth
spell. There is a small room at the bottom
of the pit with a pile of one dozen black
balls, approximately palm-sized. If the
balls are scraped, one of the following
consequences will occur (roll d12) for
each one:
1-6: The ball explodes,
causing
2-12 points of damage to the nearest
character.
5-11: The ball is made
of stone.
12 (or, for the last
ball examined
if a 12 has not yet been rolled): The
ball is the Midas Orb.
The Midas Orb
does not radiate magic,
so it must be tested (by using it) to ensure
that it is the real Orb.
As the group leaves this area, they will
encounter the Mad Wizard, who may
also be very angry, in the large torture
chamber. If Wthai can be overcome by
the adventurers, the success of the quest
is assured and the return of the Midas
Orb to the country and the people of
Gnarda can be accomplished.