Ancient Heritage
More than 1,000 years ago, Illefarn and
Laughing Hollow were part
of what is
now called the Fallen Kingdom. This was
a flourishing kingdom of Gold Elves,
Moon Elves, and Wild Elves with a
substructure <link>
of dwarves who did most of the
crafting and mining.
The rise of several strongholds of evil
spelled Doom for the kingdom.
Unable to match the sheer numbers of
orcs, goblins,
trolls,
and other creatures
generated by the forces of evil, the elven
king invited humans to settle the lands.
The humans willingly allied themselves
with the kingdom and fought long and
hard against the evil creatures (except, of
course, for those humans who decided
their best interests were with the forces of
evil). After an intermittent war lasting
2 centuries, the forces of evil were once
again beaten back to the current site of
Dragonspear Castle.
But when the dust had settled, the
elves looked about and realized that
much of their forests had been turned
into human towns. Human craftsmen
had generally supplanted the dwarves,
and the land they had fought for was no
longer theirs.
Sadly, the elves moved far to the west
to Evermeet Island. The dwarves have
yet <link>
to replenish their losses from that long
war and a live mostly in seclusion. Today,
little is seen or even known of the Fallen
Kingdom in the lands of the TRADE Cities.
Humans tried to establish their own
kingdoms, but the smaller kingdoms
lasted just long enough to establish various
hereditary nobilities, such as the
dukes of Daggerford. They eventually
disintegrated in dynastic struggles which
left all claimants dead.
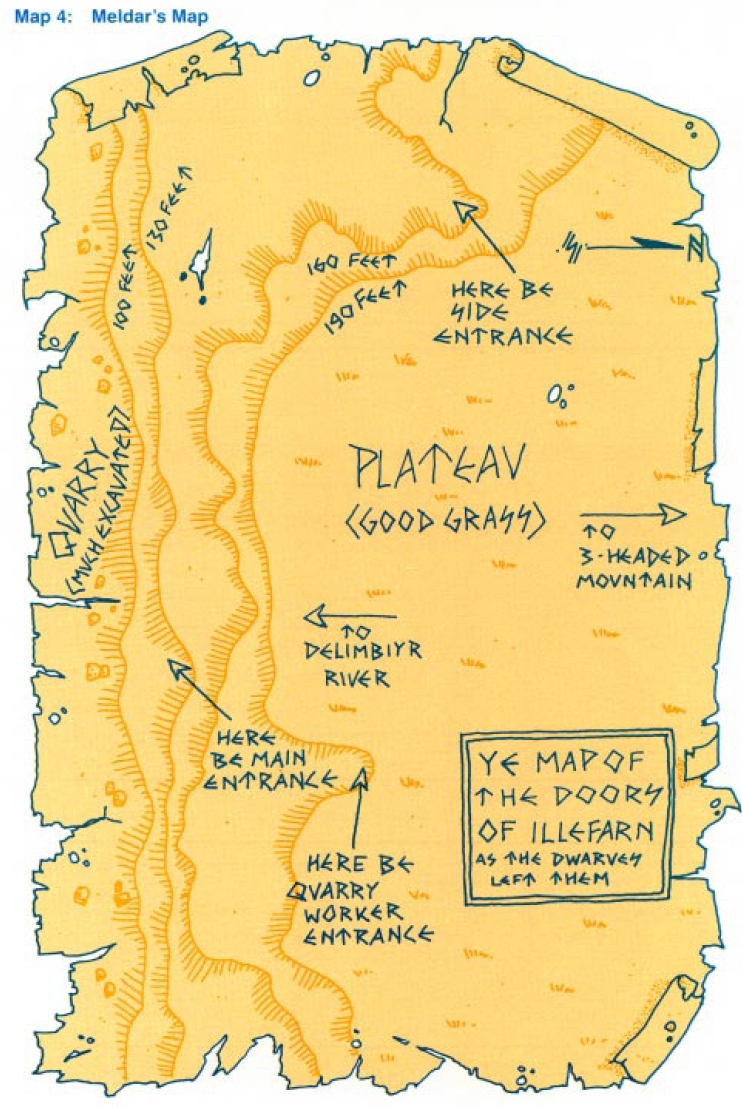
Illefarn Mountain
One of the most important places in the
Fallen Kingdom was Illefarn Mountain,
located north of the area now known as
Laughing Hollow. Here the dwarves
delved
and crafted, making the bright metal
weapons and tools loved by the elves.
The Laughing Hollow contained their
stone quarry. From this they made the
now-vanished halls of the elven king. The
main entrance to their city of Illefarn was
located on the edge of the quarry. Men
and elves who visited there could see the
dwarves carving out great hunks of marble
and granite and carrying it into the
mountain.
The original main entrance to Illefarn
has been lost. The quarry is the Home of
the wild descendants of the elves who
never went to the west, and they protect
their home vigilantly from the inroads of
orc and man
alike. No one knows if there
are still dwarves in the mountain.
Recently, a band of a dozen adventurers
set out in search of Illefarn. Only 3
returned, all of them wounded. The<y>
reported an ambush by an overwhelming
number of orcs in Laughing Hollow.
Only an attack by Wild Elves drove the
orcs off. The elves refused to TALK much
with the adventurers, simply telling them
they should leave. The elves then faded
away, apparently in search of more orcs.
The Call to Laughing
Hollow
The main entrance to Illefarn caved in
centuries ago as a result of the last-ditch
defense of the complex. None of the current
inhabitants even realize it exists.
However, this is all about to CHANGE.
The Shaking Earth <Earthquake>
| You are on militia duty when you feel
the EARTH moving under your feet. Sections of the wall buckle with the posts pointing upward at strange angles, but the binding holds and and the wall stays together. The catwalk behind the wall breaks off in a couple of places. |
The north wall shakes, with mortar
and loose stoners flying everywhere.
Slowly, inexorably, the north wall collapses
as you watch. Its supports give
way, and as it falls, you can see workers
caught under the wall. You hear their
continuing screams as the dust settles.
To see if the PCs manage to stay on
their feet during the quake, have each
one make an Ability check against their
DEX on 1d20. If they fail, they
fall to
the ground, although they take no damage.
Much of the north wall of the 2nd
story of the barracks has collapsed on
Derval Ironeater's brother, Dervin Stonecarver,
and his two sons.
Each of the victims is pinned under a
stone weighing 1,800 cn (180#). It is conceivable
that the PCs could rig a tackle similar to
the one used by the dwarves to move
the
stones originally, but this would take
time. If an aftershock occurs, it could easily
bring down the rest of the wall and kill
those already trapped.
The best strategy for the PCs is to MOVE
the stones by hand. The stones can be
moved by anyone with a Strength of
18, if
he makes an Ability check or less on 4d4.
PCs with Strength in excess of 18
can
lift the stones at +1 for every point of
Strength they have above 18. Weaker PCs
make their Ability checks at -1 for every
point of Strength they have below 18.
Two PCs may combine their Strengths
to move one stone. Take the weaker
Strength, divide it in 1/2, and add it to
the stronger. Use this Strength number to
make the Ability check.
Any attempt that fails results in 1d8
points of damage to the person under the
rubble. Each of the trapped victims has
1d6+6 HP left after the accident.
Those participating in the rescue,
including anyone binding wounds or giving
other medical attention, receive 20
XP each. Dervin<Derval>
and his
sons also promise them favors from the
Ironeater clan, though nothing is immediately
forthcoming.
The Curse
Later the same day, reports trickle in from
upriver showing that the earthquake
originated somewhere in the Laughing
Hollow area. PCs who had positive
experiences
with King Melandrach in The Rescue
Mission may wonder if anything has
happened to him.
2 days later, reports come in from
the upriver farms that cattle and sheep
are dying and riverside crops, such as flax
and rice, are failing. What's more, the river
has changed color to a bilious green. The
council immediately orders the town to
cease using river water and only consume
water from the cisterns and town wells.
If the PCs drink the river water, they
may discover the problem the hard way.
Imbibing the polluted water causes 2d6
points of damage unless a SAVE
vs. poison is made, which means the
damage is only 1d6.
The Message
On the following day, a Wild Elf appears <wood
elf>
outside the wall. He says he has been sent
by King Melandrach, and he wants to TALK
to the people who last came to his forest.
The messenger refuses to talk to anyone
besides the PCs.
If the PCs agree to TALK with him, read
the following:
| The messenger is Deldrach Longarrow,
a Wild Elf from the court of King <wood elf> Melandrach. "The great earthshaking has caused much destruction in the hollow," he says. "Trees have fallen, dryads have died, the nixies' lake has drained half away "But the greatest damage was not in
"I am sure you wonder how the <7.2
Flowing Water>
"The plants and animals around
|
If the PCs ask how they can help investigate
the problem, the messenger says that
a long-buried entrance to the mines of
the dwarves of the Fallen Kingdom was
uncovered by the rockslides. King
Melandrach
thinks that the PCs could go in this
entrance and find the cause of the poisoned
water and determine how to stop
it.
If the PCs have the map given to them
by Meldar Farwander (from Caravan
Duty), they may match it with
Deldrach's <link=maps>
description of the uncovered entrance.
They will discover that, allowing for the
passage of 1,000 years since the map was
made, the uncovered entrance is probably
the main entrance to the dwarf city.
This was the entrance where the quarried
stone was taken into the mountain for
working.
The duke and the council agree that
this expedition should be made. They
provide food and other reasonable gear
for the PCs. They also supply them with a
stone enchanted with a continual
light
spell and six vials of holy water
provided
by Mother Maerovyna.
| As you are leaving Daggerford, you are
stopped by Derval Ironeater. He goes to each of you who came to the aid of his brother and nephews after the earthquake. "Please take this with you," he says. "It is a symbol of my Friendship. I think you might find it useful under Illefarn." He bows and leaves before you can
|
Derval gave each of the rescuers an amulet
made in the shape of a dwarven hammer.
The hammers do not react to a
detect magick spell.
To Laughing Hollow
The trip to Laughing Hollow is
identical
to the one made in The Rescue Mission,
including the possibilities for random
encounters. The adventurers are accompanied
by Deldrach, who refuses a horse
and walks, eating up the miles with the
stride of a veteran stalker. If the party
encounters any dangers, Deldrach fights <link=deldrach>
robustly at their sides.
Deldrach Longarrow, male Wild Elf, <wood
elf>
Guardian (Hero
| Initiate of the 2nd Circle) AC 4;
MV 12"; hp 20; #AT 1 or 2; Dmg 2-7 (short
sword) or 1-6 (longbow);
THAC0 17; AL
N. Equipment: leather armor, short
sword +1, long
bow +1.
Spells
1st level: animal friendship,
detect
snares and pits, locate
animals, predict
weather, speak
with animals.
<food attractive to the subject>
2nd level: cure light wounds,
goodberry,
produce flame.
< MC: The material
component of the spell is mistletoe passed over the freshly picked,
edible berries to be enspelled
(blueberries,
blackberries,
raspberries,
currants (e.g. black currants),
gooseberries, strawberries, etc.). >
<added black
currants>
<technically, blackberries
are fruit, not berries. this should perhaps be ignored, as the same goes
for raspberries.>
3rd level: cure disease, snare.
<cord-like object>
At Laughing Hollow
When the PCs reach Laughing Hollow,
they are met by Melandrach who welcomes
them and suggests they camp with
him outside the mountain so they can
enter at the crack of dawn. If the PCs
agree, allow them to use any experience
points they gained from killing monsters
or acquiring magical items during the
trip so far. Experience earned with money
has to wait until the PCs get back to Daggerford.
During the exploration of Illefarn, the
PCs can make use of this option as often
as they like. They can come back to
Melandrach, REST for the day, and
make
use of the experience they've gained in
combat and acquiring magickal items.
If the PCs ask Melandrach for assistance
in exploring Illefarn, read them the
following:
| Melandrach looks at you and shakes
his head sadly. "I FEAR that my followers and I are too used to the open sky to be able to breathe beneath the mountain," he says. "We are not creatures of earth and darkness, and I fear we would be more of a hindrance than help to you. If we could make such a trip, I assure you we would never have sent for you. We would have marched bravely into the shadows as our ancestors did many centuries ago." |
Although Melandrach is expressing the
basic attitude of his people, he does not
necessarily speak for all of them. If any
PCs are killed in Illefarn, Wild Elf <wood
elf>
replacements may be rolled up as fighters,
druids, or fighter/ druids. These
characters are considered to be young
enough to discard their conditioning and
join the party. Similarly, if Melandrach
doesn't see anyone coming out for a
couple of days, he'll start recruiting anyone
who passes near.
As the adventurers explore Illefarn, they
will encounter members of 3 distinct
groups fighting for control: the dwarf
faction,
the orc faction, and the THE
NECROMANCER
faction. Each group is described
below.
The Dwarf Faction
The last of the dwarves, along with
a few
gnomes, are led by Derval Ironeater's
brother, Korin Ironaxe. In all, 21 dwarves
and 5 gnomes are left of the brave band
that took up the occupation of Illefarn
some 3 years ago. There were originally
11 others with them, but they have
all died in combat with the other two factions.
Korin's family has tried to protect Illefarn
since the main body of dwarves left
many centuries ago. They had occupied
Illefarn for hundreds of years until about
a century ago when the lack of numbers
forced Derval to bring his family out of
Illefarn and take up residence in Daggerford.
But Korin disagreed. He felt that
dwarves should occupy Illefarn, so he led
all the allies he could find back into
the
warren 3 years ago. When he did, he
found that orcs had occupied part of it.
These days, Korin is primarily interested
in recovering the crown of Devin,
the ancient dwarf king, and bringing it
out of Illefarn to honor it in a more
defensible place. Unfortunately, Korin's
family has lost track of just where the
crown is located.
If the PCs arrive in Illefarn with the
sigils given to them that the gargoyles
on
the balcony in room 41 (in Area B -- see <link>
map) are alive, and he doesn't know any
other way in, except by the long-lost refuge
of King Devin. There used to be a
bridge/stairway to the battlement, but
that was destroyed by INVADERS centuries
ago. He encourages them to find this
place and promises them all the help he
can give. If the PCs ask for mapping help,
he can give them general information
about all of Illefarn except the refuge.
If the PCs don't bring the sigils with
them, Korin is naturally suspicious of
them. If convinced of their sincerity, he
will offer his help as outlined ^above^.
However, when swords start flying,
Korin's dwarves and gnomes won't be
much help. They are more concerned
with saving their own skins than aiding
the PCs in combat. Even if Korin sends
some troops along with the PCs, they will
hang back and protect themselves in
hopes that the PCs take the brunt of the
fighting and the brunt of the dying.
Korin figures that the more orcs and bandits
that get killed without sacrificing the
lives of dwarves, the better. If the PCs do
a good job, Korin just might get Illefarn
back.
Korin, however, would be grateful to
any PCs who found the crown of Devin
for him or otherwise aided him in cleaning
up the old homestead. Korin will
reward adventurers with money from his
treasure hoard and will let them keep
most of the loot they find. His gratitude
does not extend to risking dwarf lives
when an adventurer is on hand to take the
risks.
Korin will also offer the PCs the SANCTUARY
of his holding inside Illefarn. In the
same way that the PCs can return to
Melandrach, they can also rest up in
Korin's holding and utilize XP earned from killing orcs &&
bandits
and acquiring magickal items to
advance in levels. Again, experience from
money must wait to be used until they
can get back to Daggerford.
Korin does not want his PRESENCE mentioned
to Melandrach. The party may try
to tell him that the Wild Elves don't want <wood
elves>
to come into the mountain, but Korin
isn't taking any chances.
Following are the members of this faction.
Korin Ironaxe, male dwarf,
<hill || mountain?> Champion;
AC 1; MV 6"; hp 53; #AT 1;
Dmg 8-11; THAC0 9; S 18/65, I 12, W
11, D 15, C 16, Ch 16; AL LN. Equipment:
dwarven throwing hammer +2 <cf. Hammer
+3, dwarven thrower>
and <spiked buckler>, ring
of regeneration, amulet
of
proof against detection and location,
dust of disappearance
(3 uses).
Ibin, male dwarf, Priest:
AC
4, MV 6"; hp 15; #AT 1; Dmg 3-6;
THAC0 20; AL LG. Equipment: chain
mail and <medium> shield, hammer.
Spells:
1st level: cure light wounds (2)
2nd level: hold person.
<4 iron spikes>
Kain, male dwarf, Perfect:
AC
4; MV 6"; hp 28; #AT 1; Dmg 3-8;
THAC0 17; AL LG. Equipment: chain <deity=x>
mail and <large> shield, <horseman's>
mace +1. Spells:
1st level: cure light wounds
(2),
protection
from evil.
<holy water>
2nd level: aid, detect
life, silence 15'
radius.
<tiny strip of white cloth, honey, holy symbol>
3rd level: remove curse.
Gorn, male dwarf, High
Priest 9th: AC
3; MV 6"; hp 50; #AT 1; Dmg 4-9;
THAC0 13; AL LG. Equipment: chain
mail +1 and <large> shield, staff
of striking (13
charges), ring of faerie,
figurines
of golden
lions. Spells:
1st level: bless, cure
light wounds,
detect evil, protection
from evil, purify
food and drink.
<holy water, holy symbol>
2nd level: augury, chant,
hold
person,
slow poison, speak
with animals.
<infusion, 100 gp ($1000) pearl, 3
iron spikes, garlic>
3rd level: continual light,
dispel
magick,
cure disease.
4th level: cure serious wounds,
protection
from evil 10' radius.
5th level: dispel evil.
Dorus, male gnome, Trickster:
AC 7; MV 6"; hp 10; #AT 1; Dmg 1-
4; THAC0 20; AL NG. Equipment:
wand of illusion (42 charges),
dust
of
appearance (2 uses).
Spells:
1st level: color spray, detect
illusion.
<sand colored red,
yellow
and blue,
a piece of
yellow tinted mica>
2nd level: hypnotic
pattern.
<a
crystal rod filled with phosphorescent material>
Morri, male gnome, Cabalist:
AC 4; MV 6"; hp 13; #AT 1; Dmg 1-
4; THAC0 20; AL LG. Equipment: ring
of
protection +3, bag of tricks,
dust
of
illusion
(2 uses). Spells:
1st level: change
self, detect illusion,
phantasmal
force (2)
<a
piece of yellow tinted mica, fleece>
2nd level: detect
magick, improved
phantasmal
force.
3rd level: FEAR.
<chicken hearts>
Dwarf fighters
(17): AC 3; MV 6?; hp
21 each; #AT 1; Dmg 1-8; THAC0 18;
AL LG.
Gnome fighters
(3): AC 3; MV 6?; hp
25 each; #AT 1; Dmg 2-9; THAC0 18;
AL NG.
There are usually 3 or 4 members
in one of Korin's patrols,
including
at least 1 spell caster. Their objective
is
to scout around and safely eliminate any
of their enemies.
The Orc
Faction
Orc leader Wartsnak Direlord brought 43
orcs and
80 goblins from the High
Moor
along with 2 trolls
and 4 ogres.
Wartsnak led his followers into Illefarn
after hearing the story handed down from
his ancestors about an entrance. They
entered a few months before Korin's
group. They had just settled down and
were beginning to seriously explore when
the dwarves
arrived.
Wartsnak has no interest in sharing
Illefarn with anyone. His followers attack
anything not orcish that enters.
Following are the members of this faction.
Wartsnak Direlord, male orc, Swashbuckler:
AC 2; MV 12"6"; hp 25;
#AT 1;
Dmg 3-10; THAC0 15; AL LE; XP 300.
Equipment: plate mail and shield, battleaxe
+2, ring
of spell storing with
feather
fall, stinking cloud, SLOW.
Stub, male orc, Adept:
AC 5;
MV 9"; hp 8; #AT 1; Dmg 1-8; THAC0
20; AL LE; XP 74. Spells:
1st level: dark,
resist<remove>
FEAR.
Zurch, male orc, Priest:
AC 5;
MV 9"; hp 10; #AT 1; Dmg 1-8; THAC0
20; AL LE; XP 125. Spells:
1st level: cure light wounds (2)
2nd level: chant.
Prollot, male orc,
Perfect:
AC
5; MV 9"; hp 19: #AT 1; Dmg 1-8;
THAC0 18; AL LE; XP 339. Spells:
1st level: cause
light wounds, detect
good,
protection
from good.
<unholy water, unholy symbol>
<deity=x>
2nd level: augury,
resist
fire, snake
charm.
<dragon bones,
<A tube of silvery fluid (quicksilver,
10 gp weight, worth 100 gp): T1-4.59>
3rd level: cause
blindness.
Emee, male goblin,
Curate:
AC 6; MV 6"; hp 18; #AT 1; Dmg 1-6;
THAC0 20; AL LE; XP 220. Spells:
1st level: cure
light wounds, detect
magic,
protection
from evil.
<unholy symbol, unholy water>
2nd level: chant,
detect
charm.
Ellisin, male goblin,
Lama:
AC 6; MV 6"; hp 30; #AT 1; Dmg 1-8;
THAC0 18; AL LE; XP 850. Spells:
1st level: cause
light wounds, cure light
wounds,
dark.
2nd level: augury,
chant,
speak
with
animals.
<a set of gem-inlaid sticks>
3rd level: dispel
magic, locate object.
<lodestone>
4th level: neutralize
poison.
Orcs (40):
AC 5; MV 9"; HD 1; hp 5
each; #AT 1; Dmg 1-8; THAC0 19; AL
LE; XP 15.
Goblins
(80): AC 6; MV 6"; hp 4 each;
#AT 1; Dmg 1-6; THAC0 20; AL LE; XP
14.

Trolls
(2): AC 4; MV 12"; HD 6+6; hp
33, 30; #AT 3; Dmg 1d4+4/1d4+4/2-
12; SA attacks three foes at once; SD
regenerates 3 points per round at third
round, all parts continue to fight unless
burned; AL CE; XP 614.

Ogres (4): AC 5; MV 9"; MD 4+1; hp
19 each; #AT 1; Dmg 1-10; AL CE; XP
185.

Normal orc patrols consist of 3 orcs
and 7 goblins. Once they realize that a
party of explorers has invaded their
domain, they send a second patrol after the
1st. The 2nd patrol stays just within
infravision range of the first,
and contains
either a spellcaster, an ogre, or a troll.
THE NECROMANCER Faction
A force of bandit adventurers led by
Kelthas
the Dread, a necromancer with
3
apprentices, and Jorykul, a half-orc
_ Priest
with 2 Acolytes, entered Illefarn about
the same time Korin did. They entered
through the collapsed roof leading to
Area J (see map) and began a slow exploration, <link>
running into orcs and dwarves
almost immediately. However, they
found some good loot and are here for as
much more as they can get.
Kelthas will gladly make a deal with
anyone who wants to make one with him.
However, it's unpleasant negotiating
with someone who smells like an open
grave. And, of course, you can't trust
<1.6 Odor Detection, DSG>
Kelthas. If the mood strikes him, he is
likely to kill anyone with whom he has
made an agreement.
The 3 apprentices of Kelthas are
named Bryn, Karri, and Duggwell. Jorykul
's half-orc Acolytes are Izeley and Dappleford.
A number of human,
half-orc,
half-elf,
dwarf,
and hobbit _ bandits
are
among their followers. Kelthas has also
raised a number of dwarf, human, orc
and goblin skeletons
to assist his forces in
guarding various areas against orc incursions.
VERSION 1 (Original): THE WIZARD (Necromancer)
VERSION 2: THE
NECROMANCER (Mummy Master)
Kelthas the Dread, Mummy
Master:
AC 6; MV 12"; hp 31; #AT 1; Dmg
3-6; THAC0 16; AL CE; XP 1,920.
Equipment: potion
of wraith control (3
uses), scroll with
animate
dead (2 uses), clairvoyance,
wizard
eye.
<+3>
Spells:
1st level: shield,
scare
(x2).
<ghoul
bone>
2nd level: magick
mouth (x2), knock.
<honeycomb>
3rd level: wall
of ice, monster summoning I
*, ray of paralysis
* (+1),
<rock crystal, tiny
bag, tallow candle>
4th level: wraith
production * (+1), mummy
production * (+1) #,
<corpse, bone from
someone who became a wraith>
<corpse, embalming
fluid worth 1400 gp ($14,000)>
Kelthas has 2 magick books.
SPELLBOOK #1 (22,000 gp, $220,000)
1st level spellbook spells
comprehend
languages, protection
from good, detect magick, identify
(+1), plant death * (+1)
#, preserve, scare,
unseen
servant.
<A
pinch of soot && a few grains of salt>
<unholy water, bottle
of mist spray worth 200 gp ($2000)>
<pearl worth 100
GP ($1000),
owl
feather, wine, live miniature carp>
<dust, amber (100
gp) ($1000), brandy>
<string, wood>
<ghoul
bone>
2nd level spellbook spells
death
armor * (+2), pyrotechnics, find
familiar * #, invisibility, knock,
magick
mouth, ray of enfeeblement.
<a cream>
<brass brazier,
charcoal, 200 gp ($2000) worth of incense, basil, savory, catnip, fat>
<gum arabic>
<honeycomb>
SPELLBOOK #2 (27,000 gp, $270,000)
3rd level spellbook spells
ghast
production * (+2) #, monster
summoning I *, ray of enfeeblement,
ray
of paralysis * (+1), tongues,
dispel magick, wall
of ice.
<ghoul corpse, special
liquid costing 400 gp ($4000) to make>
<clay model of a
ziggurat>
<rock crystal, tiny
bag, tallow candle>
4th level spellbook spells
mummy
production * (+1) #, wight
production * (+2), wraith
production * (+1), dig.
<corpse, bone from
a wight>
<miniature
shovel,
tiny bucket>
<corpse, bone from
someone who became a wraith>
<corpse, embalming
fluid worth 1400 gp ($14,000)>
Bryn, Tomb
Haunter: AC 10;
MV 12"; hp 6; #AT 1; Dmg 1-6; THAC0
20; AL LE; XP 65. <20r1>
Spells:
1st level: identify
(+1), preserve.
<pearl worth 100
GP ($1000), owl
feather, wine, live miniature carp>
<dust, amber (100
gp) ($1000), brandy>
Karri, Necropolite:
AC 10;
MV 12"; hp 9; #AT 1; Dmg 1-4; THAC0
20r1; AL LE; XP 117. Equipment: ring
of
feather
fall<ing>. Spells:
1st level: protection
from good, unseen servant.
<unholy water, string, wood>
2nd level: death
armor * (+2).
<a cream>
Duggwell, Skeleton
Master: AC 9;
MV 12"; hp 10; #AT 1; Dmg 2-5;
THAC0 20r1; AL LE; XP 180. Equipment:
dagger
+1, ring of protection +1.
Spells:
1st level: comprehend
languages, unseen servant.
<A
pinch of soot && a few grains of salt>
<string, wood>
2nd level: pyrotechnics,
ray
of enfeeblement.
<>
Jorykul, half-orc,
Lama:
AC
3; MV 9"; hp 32; #AT 1; Dmg 1d6+2;
THAC0 15; AL NE; XP 656. Equipment:
footman's
flail +1, banded mail +1,
staff
of curing (11 charges), ring
of spell
turning,
cloak
of arachnidia. Spells:
1st level: command, cause
light
wounds (2)
2nd level: augury, find
traps, hold person.
<infusion containing a powdered pearl worth 100
gp ($1000)>
<6 iron spikes>
3rd level: animate dead, cause
disease.
<blood, human flesh, bone shard>
4th level: cause
serious wounds.
Izeley, half-orc, Adept: AC
5;
MV 12"; hp 9; #AT 1; Dmg 1-6; THAC0
20; AL NE; XP 77. Spells:
1st level: cause
light
wounds, cure
light
wounds, light.
Dappleford, half-orc, Curate:
AC 5; MV 12"; hp 20; #AT 1; Dmg 2-7;
THAC0 20; AL NE; XP 230. Spells:
1st level: cause
light
wounds (2),
detect
magick, protection
from evil.
<holy water>
2nd level: find traps, slow
poison.
<garlic>
Human Marauders (10): AC 4; MV 12";
hp 17 each; #AT 1; Dmg 1-8; THAC0 18;
AL CE; XP 120.
| 10 | Weapon/Armor | d% |
| 1 | medium horse, chainmail & small shield, long sword | 10% |
| 2 | light horse, leather armor & spiked buckler, long sword | 10% |
| 3 | light horse, leather armor, light crossbow | 10% |
| 4-7 | leather armor & shield, long sword | 40% |
| 8 | leather armor, pole arm | 10% |
| 9 | leather armor, light crossbow | 10% |
| 0 | leather armor, short bow | 10% |
Half-orc _ Marauders
(4): AC 2; MV 12?;
hp 18 each; #AT 1; Dmg 1-8; THAC0 18;
AL NE; XP 128.
AC7: Light warhorse, leather
armor, spiked buckler, long sword.
AC7: leather armor, small shield,
long
sword.
AC7: leather armor, spiked buckler,
long sword.
AC8: leather armor, long sword
Half-elf _ Marauders
(2): AC 5; MV 12"; hp
2221 each; #AT 1; Dmg 1-8; THAC0 18;
AL NE; XP 300.
AC 8: leather armor, light crossbow,
long
sword
AC 8: leather armor, long
sword
Dwarf _ Looters
(4): AC 4; MV 6"; hp 16
each; #AT 1; Dmg 1-8; THAC0 20; AL
CE; XP 82.
AC 8: leather armor, long
sword
AC 8: leather armor, long
sword
AC 8: leather armor, long
sword
AC 8: leather armor, short
bow, long sword
Hobbit (1 mixed, 2 stout, 2 tallfellow)
_ Marauders (5): AC 4; MV 6?; hp
21 each; #AT 1; Dmg 1-8; THAC0 18;
AL CE; XP 141.
AC 7: leather armor & small shield, long sword
AC 7: leather armor & small shield, long sword
AC 8: leather armor, light
crossbow, long sword
AC 8: leather armor, light crossbow, long sword
AC 7: leather armor & small shield, long sword
AC 7: leather armor & small shield, long sword
Skeletons (45): AC 7; MV 12"; HD 1;
hp 5 each; #AT 1; Dmg 1-6; THAC0 20;
SD half damage from sharp and edged
weapons, sleep, charm,
and cold- based
spells have no effect, holy water causes 2-
8 points of damage; AL N; XP 38.

The necromancer's patrols consist of
7 or 8 members, usually including
1 spellcaster. Skeletons are not used
for patrols, only for GUARD duty.
When confronting another party, the
<Brigands and Bandits
and Necromancers> MOVE to a defensible
position, usually the end of a corridor
where it goes into a larger chamber.
The rest of the group lurks in the
shadows, attempting to attack their enemies
by surprise.
If more than 1 patrol doesn't report
back to him, Kelthas pulls in his followers,
reorganizes them, and starts seriously
cleaning out all the areas he knows
have orcs and dwarves,
using his skeletons
as an advance force. Note that the skeletons
listed in the room descriptions are
the only ones he has. He can't get any
more unless his followers kill more foes
and bring back the bodies. He may also
bring back the bodies of his own fallen
followers.
General Description of Illefarn
Illefarn is divided into several areas, each
containing a number of rooms (see Maps <links>
8-18). The various levels of Illefarn are
connected by stairways, ramps, and shafts
(see Map 19). While many of the rooms <link>
are empty, others contain monsters, treasures
and obstacles; these are detailed in
the room descriptions. The PCs will also
have to deal with a variety of traps as well
as wandering patrols representing the
dwarf, orc,
and necromancer factions.
Appearance
Illefarn is a dark place. The dwarves
and
orcs who live here can see in the dark
and
have no reason to light it up with torches.
Only the areas occupied by Kelthas and
his followers are lit by torches.
The areas
are ventilated by small air shafts located
throughout the complex.
Most of the rooms have WALLS and ceilings
made ov worked stone. The floors are
cobblestone. Many ov the rooms have
faded and defaced wall paintings and
carvings.
Treasure
The dwarves who left Illefarn took most
of their furnishings with them. However,
they did leave behind some treasures,
expecting to come back later to reclaim
them. Moreover, most of the remaining
dwarves were driven out of their dwellings
and often did not have time to
remove their personal valuables. Some
they hid just before they died.
Traps
Old Traps
The original inhabitants of Illefarn had
no reason to set traps for intruders, as
they had a strong guard of dwarven _
fighters
to protect them. However, once most
of the original inhabitants left, those
staying behind had to protect themselves,
so they set up several traps in areas
they were no longer using and were
unable to guard. Over the centuries,
many of these traps have lost their potency,
but some are still deadly.
Roll 1d6 on the Old Trap Table whenever
a PC enters an area on a map marked
with OT. Details of each trap follow the
table.
| Roll | Result |
| 1 | Acid |
| 2 | Crossbows |
| 3 | Pit |
| 4 | Deadfall |
| 5 | Moving Wall |
| 6 | Cage |
1. Acid. A panel in the ceiling opens
up and a pot of acid upends on the person
below. The acid has long since evaporated,
but the pot has a 50% chance of
coming off its supports and hitting the
victim. If the victim fails an Ability Check
<WSG>
against his DEX, he takes 2-8 points
of damage.
2. Crossbows. A volley of arrows
fires
from crossbows hidden in the corner of
the ceiling. They fire as if from a Sharpshooter
and
hit everyone in the 10-by-10- foot area. Roll 1d10 to see how many
arrows actually fire, and distribute the
attacks randomly among the targets in
this area.
3. Pit. A 10-foot deep pit opens in the
floor. The trap has a 50% chance of opening
all the way, otherwise, a successful
Ability Check against the victim's Dexterity
<WSG>
prevents him from falling in. Anyone
with a Dexterity of 12 or less must make
an Ability check to pass safely around it.
Anyone who falls into the pit lands on
rusty iron stakes and takes 2d4 points of
damage.
4. Deadfall. There is a 50% chance
that this deadfall may have already been
sprung. If so, there is a mound of rubble
on the floor, with a further 50% chance
of a dead orc underneath it. If not already
sprung, it does 1d10 points of damage to
the victim.
5. Moving Wall. This moving wall has
a
50% chance of working. If it works, it will
crush its victims into the opposite wall.
The mechanism is old, however, and
takes 3 rounds to work; anyone dumb
enough to stand still will die.
6. Cage. There is a 50% chance that a
cage will fall from the ceiling to capture
anyone in the 10-by-10-foot AREA. It has
an AC of 4 and 20 HP.
New Traps
Since Korin Ironaxe and his followers are
gravely outnumbered, they have rigged a
number of new traps. Their traps are not
as elaborate as those of their ancestors,
because they don't have the Time or
materials. They have occasionally sprung
an old trap and have repaired the mechanism
to make it work again.
Roll 1d6 on the New Trap Table whenever
a PC enters an area on a map marked
with NT. Details of each trap follow the
table.
| Roll | Result |
| 1-3 | Pit |
| 4 | Deadfall |
| 5 | Net |
| 6 | Firebomb |
1-3 Pit. This is identical to the pit
described in the Old Trap Table, but this
one opens every time
4. Deadfall. This is identical to the
deadfall described in the Old Trap Table,
but this one works every time..
5. Net. This net drops from the ceiling
on everyone in the 10-by-10-foot AREA. It
has an AC of 7 and 15 HP.
6. Firebomb. A flask
of oil drops from
a nook in the ceiling and hits the floor.
There is a 60% chance that the striking
mechanism built into the flask works. If it
does, there is an explosion in a radius of
10 feet. Anyone caught in the explosion
area must make a SAVE
vs. dragon
breath. Anyone
who fails takes 4d6
points of <fire>
damage. Additionally, the gear
of those who fail their saves
catches fire. They take an extra 1d6 points
damage in the next round and any further
rounds until someone spends 1
round putting the fire
out.
Dealing with Traps
All of the traps presented here are progress
traps meant to SLOW up or kill anyone
entering certain areas. There are several
ways these traps are triggered. One is by
activating a pressure-sensitive plate on
the floor. Pit traps collapse the victim into
the pit if he weighs more than 10 lbs. or
so. Other traps may be activated by a
tripwire at ankle height.
There is always a chance that PCs will
find a trap before it springs on them.
Thieves and dwarves
have natural abilities
to find traps, but any seasoned
adventurer will likely have an eye out for
traps, especially if one has wounded or
killed a comrade. Any PC moving slowly
through a corridor or chamber can be
assumed to be looking for a triggering
mechanism. In this case, succeeding in an
Ability Check against half the PC's INT
means he spots the trap. (For
instance, a PC with an INT of 12
spots the trap on a roll of 6 or less on
1d20. A PC with an Intelligence of 13
spots the trap on a roll of 7 or less.)
Since only a single cobblestone is commonly
used as a pressure plate, the 1st
person over the trap will not necessarily
trigger it. Feel free to roll randomly to
determine which party member actually
triggers the mechanism. If the party specifies
that everyone is walking in the footsteps
of the leader, roll for the leader
activating the trap. If he doesn't, roll
Ability Checks against the INT
and DEX of each member of the party
to see if any were distracted or clumsy
and thus activated the trap anyway.
Finally, remember that traps are used
most effectively if they are only encountered
occasionally. It isn't much FUN for the
party to run into one trap after another with
nothing else to break up the action.
Patrols
As the PCs explore the various areas of
Illefarn, there is a chance they will
encounter patrols from one or more of the
dwarf, orc, and Necromancer
factions. In
most cases, the DM decides
the composition of these patrols, using
the guidelines given in the previous
descriptions of each faction.
Each AREA description contains its own
Patrol Table that gives the chances for
encountering a patrol from each faction
in that area. Each Time the party is
about
to enter a room, roll 1d6 on the Patrol
Table for that area to see which patrols are
present. If 2 patrols are present, there
is a potential 3-way battle. If a room
has 2 or more entrances, the patrols are
encountered inside the room. If the room
has only 1 entrance, the encounter
takes place outside the room in the corridor.
As explained before, the different factions
have different motivations and priorities.
The orc faction wants to destroy
everyone else. The dwarf faction wants
to
destroy everyone else. The dwarf faction
are potential allies whose first priority
is
to get back to their leaders with info.
THE NECROMANCER faction could
go
either way; their unpredictability makes
them dangerous. The DM
should emphasize consistency and common
sense in determining the reactions
of the patrols.
If a patrol spots the PCs or learns of disturbing
activities of an opposing faction,
the news should eventually get back to
their leaders. Likewise, if a patrol is
killed, the leaders of that faction will
become concerned and will start sending
out scouting parties. To stimulate this,
the chance of encountering a patrol in a
given AREA increases by 1 for every
encounter that has taken place, up to a
chance of 1-3 on a 1d6. This increased
chance goes into effect 2 hours after the
first encounter.
AREA and Room Descriptions
Many rooms are essentially empty, except
for the possibility of patrols. It is up to
the DM to describe these
rooms. Here are a few things to keep in
mind.
1st, some of the rooms are very small, <size>
but some are very large, larger than a <size>
torch or continual
light spell could reveal
entirely. Be sure to describe only what the
PCs can actually see.
Some rooms, such as the one the PCs
first enter, haven't been visited in quite a
while. Since the dust is thick on the
floors, indications of previous occupants
are obvious. In other rooms, such as ones
used as living quarters for the various factions,
there is little dust and therefore few
ways of telling whether 1 occupant or 1000 have been there.
To help with descriptions of uninhabited
rooms, a Room Description Table is
provided below. Roll up to four times on
1d6, ignoring any obviously contradictory
results. Incorporate these results in
describing rooms. Use of this table is
entirely optional.
| Roll | Result |
| 1 | Empty Room |
| 2 | FOOT PRINTS |
| 3 | Cobwebs |
| 4 | Rats |
| 5 | Body |
| 6 | Meal Remnants |
1. Empty Room. No one has been here
in ages.
2. FOOT PRINTS. FOOT PRINTS in the dust
indicate that anywhere from 3 to 9
people (or creatures) have walked from
1 door of the room to another, or circled
around and gone back through the
same door, if it only has 1.
3. Cobwebs. In a corner of the room is
a pile of broken stone furniture covered
with dusty cobwebs. There are no signs of
spiders.
4. Rats.
A small pack of rats scatters as <size>
the party enters the room. Any PC with
speak to animals may talk
with them. The
rats tell about "big feet" wandering
around and killing each other.
5. Body. In a dark corner is a rat-gnawed
body of an orc. The body is
decomposing, obviously dead for several
weeks. From the tracks in the dust, it
appears he crawled into the room to
escape and died.
6. Meal Remnants. Someone has used
this room to have a meal. There are
cooked bones of small animals and fabric <size>
food wrappings scattered on the floor.

AREA A
This was originally a workshop AREA where
stone was brought in from the quarries
outside to be formed into whatever was
needed. This area is largely empty.
Section 1. The massive metal doors
open into the hallway strewn with debris
which leads to room 2.
Room 2. The ceiling and walls of this
room are laced with cracks, all running
north and south, just like the earthquake
line.
Rooms 2-7, 9, 11-14. These are all
empty; extensive orcish <PHYSICAL GRAFFITI>
decorates
the WALLS. The original uses of these
rooms is unclear, although 6 and 11 were
probably latrines. If a PC stands on the
northern floor of room 3 and looks down
the ramp which leads to Area B, he will
see it is filled with rubble from the earthquake
and can no longer be passed
through.
Room 8. This room contains a ramp
leading down to Area B. This is how the
orcs usually get to that area. The passage
leading to this room has been reduced to
a width of 5 feet by a moving wall trap
which was sprung by orcs but did not
work properly.
Room 10. Kelthas and his followers
discovered the secret door in this room by
coming up the stairs from Area B. This is
their entry point to Area A. Retreating
Bandits head for this room and are
likely
to leave it open when running for help.
Section 15. This section contains a
stairway used by orcs and goblins
to enter
Area A from Area D.
Area A Patrol Table
| Roll | Faction |
| 1 | Dwarf and Necromancer |
| 2 | Dwarf |
| 3-4 | Necromancer |
| 5 | Necromancer and Orc |
| 6 | Orc |
Area B
Room 16. A large crack runs through this <size>
room from the north wall to the south wall.
The crack is about 6 feet deep and from 3 to
5 feet wide. In the center of the room is a
pillar 20×20 feet that rises to the ceiling,
with the exception of the southeast corner
of the pillar. There, it ends in a balcony
about 20 feet above the floor. The entire
pillar is surrounded by a large pool; the <size>
pool, however, is dry. Water spilling from
the fountains on the pillar which would
normally fill the pool now runs into the
crack. Water runs through the crack
in the
south wall, into the mountain, and out
again into Laughing Hollow. This is the
source of the pollution contaminating the
Delimbiyr River.
Leading from the balcony on the
southeast corner of the pillar to the edge
of the pool facing the balcony are the
remnants of what might have once been a
bridge.
Section 22. This is a tunnel leading to
some other portion of the dwarven _
mines. It is NOW totally collapsed
and
unpassable.
Section 24. This section contains a
ramp linking 23 and 47.
Room 25. Four of Korin's followers are
always in this room, ready to stop any orcs
coming down the shaft from room 61. One
of them is usually a spellcaster, either a
dwarf _ Priest
or gnome _ Illusionist.
If someone <links.direct>
approaches the door from room 23,
they stand ready to repel them, but they do
not open the door themselves.
If anyone entering the room does not
have the hammer amulet provided by
Dervan Ironeater, the followers of Korin
attack.
Section 33. This is a tunnel to some
other portion of the dwarven _ mines,
NOW
totally collapsed and impassable.
Room 36. This room contains a shaft
leading up to room 100. The shaft is
unknown to any of the current occupants
of Illefarn.
Room 41. This room is actually the pillar
in the center of the pool in room 16.
The pillar contains the mechanism for the
fountains that are now pouring polluted
water.
There is only 1 obvious way to gain
access to the interior of the pillar; PCs must
climb the 20-foot wall to the open
balcony
on the southeast corner and then LOOK for
an entrance. The wall can be climbed by
any PC who makes two successful Ability
checks, one against his DEX and
the
other against his STR.
There are 2 gargoyles on the rails of
the balcony who come to life when anyone
attempts to climb the wall. They come
to
life when a PC has climbed more than 10
feet up the wall. Once the gargoyles come
to life, they continue to attack as long as
anyone is within 20 feet of the wall. A PC
with the thief climbing ability can FIGHT
normally, but any other PC fighting while
climbing will do so at -2.
Gargoyles (2): AC 5; MV 9"/15"; HD
4+4; hp 22, 24; #AT 4; Dmg 1-3/1-3/1-
6/1-4; THAC0 15; SD +1 or better
weapon to hit; AL CE; XP 240.

Once past the gargoyles, a door in the
north wall of the balcony section of the
pillar leads to a 10x10 foot room. This
is the control room. There is a door on the
west wall of this room leading to the airlock
described in room 101.
There are 4 large switches set <size>
around a thick central pillar in this room.
All but the northern switch have been
pulled up. If the east and west switches
are pulled down, the fountains of contaminated
water are shut off. If the
southern switch is pulled down, there is a
change in the sounds of the running
water and the machinery, but there is no
other obvious effect. However, see room
101 for the actual effect of pulling down
this switch.
If the northern switch is pulled up, several
concealed fountain mouths open up
&& pure water starts flowing into the
pool and into the crack. This switch activates
the alternate water source which has
not been polluted. If the northern switch
is pulled up while the eastern and western
are still up, the polluted water is diluted,
but not enough to make any significant
difference.
| Roll | Faction |
| 1 | Dwarf and Necromancer |
| 2 | Dwarf |
| 3-4 | Necromancer |
| 5 | Necromancer and Orc |
| 6 | Orc |
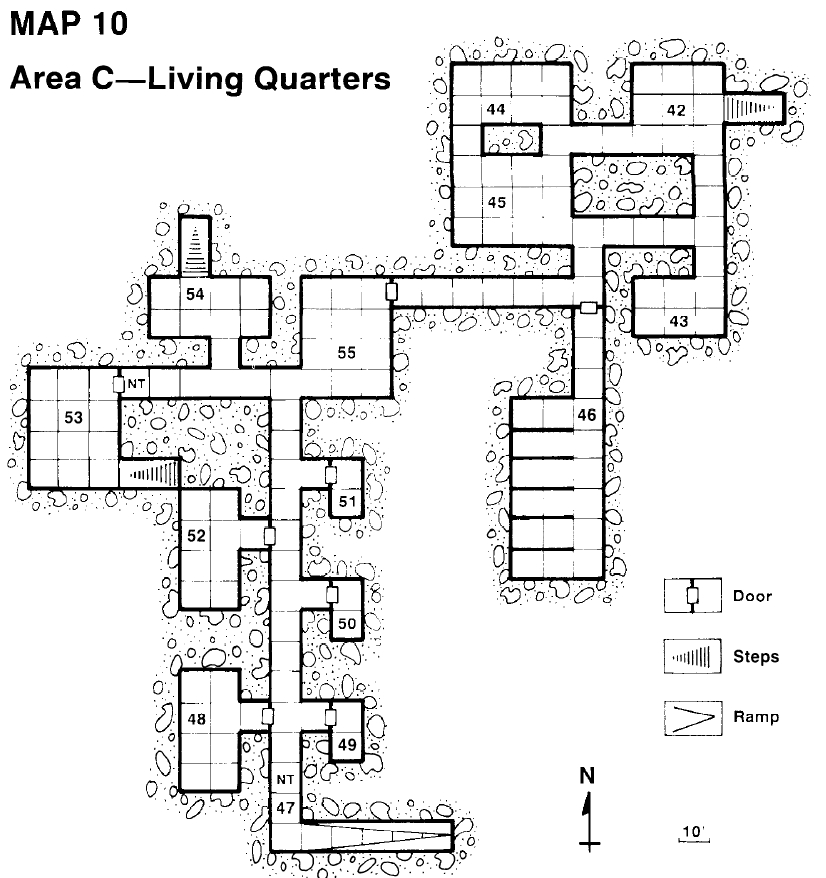
AREA C
This was originally a dwarf living AREA.
Some of the food of the dwarves was
stored here. Live animals were also kept
here in the stables. Now it is used as the
headquarters for Korin Ironaxe and his
followers.
Room 42. 4 of Korin's followers are
on duty here at all times. They are guarding
the stairs that lead down to room 31
below.
Room 43. The dwarves and gnomes
use
this room as a workshop for armor and
weapons maintenance.
Room 44. This room is used as living
quarters for the gnome _ Illusionists.
Room 45. 5 dwarves and the 3
gnome _ fighters
live here. Four of the
members of this group are usually the
ones on guard duty in room 42.
Room 46. This room contains the stables.
Korin keeps the 4 mules his
group uses as pack animals for their expeditions
here. 1 dwarf is always on stable
duty. <horses?>
Section 47. This section contains a
ramp leading to room 23.
Room 48. Korin Ironaxe has adopted
this room as his permanent domicile. The
treasure he and his men have accumulated
so far is kept here. In three locked
iron chests he has 1,250 sp, 500 ep, 400
gp, 50 pp, and a necklace
of missiles with Area D room leads up to room 89.
one 7d6, one 5d6, and three 3d6 fireballs.
Korin doesn't trust using the necklace
in close quarters, so he hasn't worn
it. He also hasn't allowed any of his followers
to use it.
Room 49-51. 2 of these rooms were
used as concealed treasure rooms.
The
3rd was used for general storage. This
changed after Korin and company
arrived. Now all three are used as latrines.
Room 52. Ibin, Kain,
and Gorn live
here when they are not on guard or patrol
duty or when they are not leading worship
in room 94.
Room 53. This room contains a stairway
leading to room 94.
Room 54. There are always 2 of
Korwin's followers standing guard here,
ready to aid or cover their comrades from
room 32 below should the need arise.
Room 55. This is the cooking area for
the dwarves. Vents in the ceiling take
the
smoke outside.
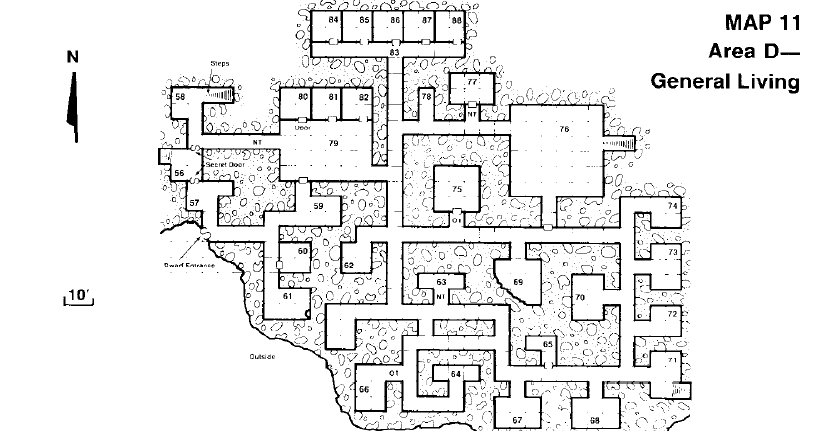
AREA D
This was a general living area for the
dwarves. There were small domiciles
for <size>
families and larger ones for groups of bachelors.
There were also some rooms used for
recreation areas and personal workshops.
The dwarves originally came through the
outside entrance located in this area. It is
still used occasionally to get supplies and
news from relatives in Daggerford.
Room 56. There are always three of
Korin's followers on duty here, including
1 cleric. Through concealed viewslots,
they keep their eyes on room 57 to see
who's using the entrance and also on the
north passage leading to the temple of
Moradin.
Room 57. The south passage of this
room leads to the secret entrance to the
outside used by the dwarves.
Room 58. The walls of the corridor
leading to this room are decorated with
paintings illustrating the lejendary feats
of Moradin Soul Forger and his lesser
associated deities. The stairway in this <deities=x>
room leads up to room 89.
Room 61. The notable feature of this
room is the shaft leading to room 25 in
Area B. Waiting at the bottom of this
shaft are dwarves ready to kill anything
that climbs down the rungs.
Room 65. This room is used as a latrine
by the orcs.
Room 76. This room is used as a headquarters
by the orcs. There are always
9 orcs, 21 goblins, and 1 ogre
here.
Of this group, 3 orcs and 7 goblins
are always on patrol in the area. The
rest guard the stairway which extends into
the center of the room.
Rooms 66-75, 77-78. These rooms are
regularly patrolled by the orcs. The
chance for an encounter with orcs in these
rooms is 1-4 on 1d6.
Area D Patrol Table
| Roll | Faction |
| 1 | Dwarf and Orc |
| 2 | Dwarf |
| 3-6 | Orc |
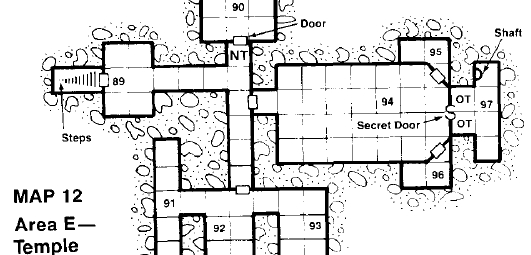
This was a temple to Moradin Soul Forger,
the
main god of the dwarves. The WALLS and
ceilings
are covered with paintings and carvings
which have been chipped and defaced by the
orcs. Some of this artwork has been partially
restored, thanks to Korin and his followers.
Most of the rooms are empty and therefore
are not described below. Room 97 is protected
by A secret door, and none of
the current occupants
of Illefarn knows about it.
Patrol encounters are handled differently in
this area. When the PCs first enter this AREA,
roll 1d6. A result of 1 means that room 94 is
occupied by a patrol; roll on the Patrol Table
to find out which. Roll 1d6 after each room is
explored. A roll of 1 means that a patrol is
coming up the steps into room 89.
Room 97. No one has found the secret
door
leading to this room since the last regular
dwarven _ Priest
died defending his shrine centuries
ago. The room contains 6 gold and
platinum statuettes depicting a dwarven god
in a swirl of stars. The statuettes are worth a
total of 300,000 gp. The dwarven reward for <$3,000,000>
their return is 30,000 gp. There is also a collection <$300,000>
of pendants, scepters, and other religious
items not connected directly with the worship
of Moradin worth a total of 50,000
gp. These <$500,000>
items have no particular religious significance
for the dwarves. Finally, there is a
stone
of controlling
earth elementals,
a spade of colossal
excavation,
and a mirror of mental
prowess.
If the PCs are working with the dwarves when
they make this discovery, the dwarves claim the
religious items, the stone of controlling earth
elementals, and the spade of colossal excavation.
They allow the PCs to use the magickal items as
long as they are working for the benefit of the
dwarves in Illefarn. They give the mirror of mental
prowess and the non-religious items to the
party as a reward.
Area E Patrol Table
| Roll | Faction |
| 1-3 | Dwarf |
| 4 | Dwarf and Orc |
| 5-6 | Orc |
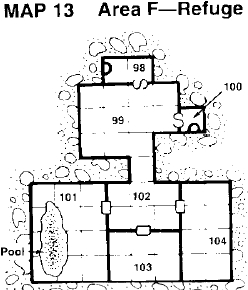
Area F
Room 99. This room contains a stone statue
of an armored dwarf. The statue comes to life
when anyone enters from either 98 or 100. It
attacks unless the person entering gives the
password, which is known to Korin Ironaxe.
(The password is "PEACE.") It freezes to immobility
again if the person entering goes back to
98 or 100, but it chases anyone moving from
99 into 102 and beyond.
Stone golem
_ dwarf: AC 5; MV 4"; hp 50;
#AT 1; Dmg 3-18; THAC0 10; SA SLOW
spell
every other round; SD only +2 weapons can
hit, immune to most spells; AL N; XP 3,250.
Room 101. Entering this room can be deadly.
The pool in this room is full of contaminated
water from room 16. Since the room is
so small, it is filled with poisonous fumes.
Anyone entering the room or standing in
room 102 suffers the equivalent of a class
C
ingestive poison attack (see
the DMG for details of this kind of attack). <cf. poison>
Because the contaminant in the water is a variant
of green slime, a cure
disease spell is needed
to help a victim, not a neutralize
poison.
This is obvious to any Priest.
This pool is fed by the southern switch in
the pillar at 41. If that switch has been pulled
down, the pool is empty, unless the northern
switch has been pulled up, in which case the
pool has refilled from the alternate water
source.
On the shelf on the north wall in this room
is a helm of underwater
action and gloves of
swimming and climbing. These are used to <source=x>
dive into the south end of the pool and swim
to an airlock door. Entering that door and
closing the door behind the diver automatically
drains the water out of the room. This
allows the diver to open the opposite door
which leads to room 41 and the controls for
the fountains.
If the party is working directly with the
dwarves, the dwarves insist on retaining the
helmet and gloves for future use. They allow
the party to use these items as long as they are
in Illefarn.
Room 103. This room was King Devin's
robing room. In a chest along the eastern wail
is a suit of bronze plate mail
+1. Because of
its fine craftsmanship and many jewels, it is
valued at 28,000 gp. This is the ancestral royal <$280,000>
armor of the dwarves of Illefarn, and dwarves
will pay its full value in gold or trade to get it
back.
Hanging on a rack on the western wall is a
cloak of elvenkind.
Any old elf, such as Sir
Elorfindar, will recognize this as the cloak
given to the king of the dwarves by the royal
house of the Fallen Kingdom.
On a padded shelf on the southern wall is
Devin's crown. The crown is studded with 5
diamonds, 10 rubies, and 15 fire opals
enchanted in the same manner as a helm
of
brilliance, but these
can be recharged. The
crown also has a double strength fire resistance,
just as a helm of brilliance does. Additionally,
it acts as a helm of telepathy,
A stone
of controlling earth elementals, a ring
of protection
+3, and a periapt
of proof against poison.
The crown is valued at 50,000 gp. <$500, 000>
Room 104. This room is a secret armory.
King Devin established it as a hideaway in
case he was caught without his normal gear.
However, Devin never got a chance to USE it,
as he was killed fighting INVADERS along with
everyone else who knew about the refuge.
In this room is a helm of
brilliance with 7
diamonds, 12 rubies, 24 fire opals, and 40
opals still intact. There is also a set of plate
mail +2 meant to go with the helm,
gauntlets
of ogre power, a
short sword of quickness
+2,
and a crossbow of speed
with 24 bolts +1.
<light crossbow>
If the party is working with the dwarves, the
dwarves are willing to give the party these
items if they can use them. If there are no
dwarves in the party, the plate mail +2 is useless
to them. If no one has a proficiency in
short sword or crossbow, those items are useless
to them. However, the helm of brilliance
and gauntlets of ogre power should be useful
to anyone.
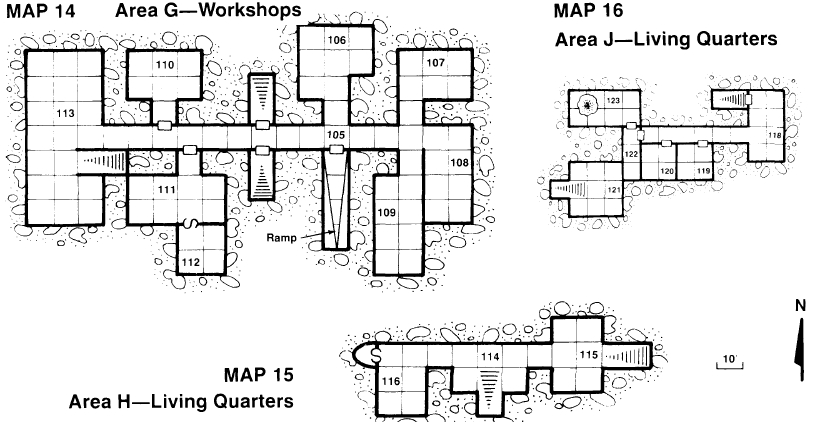
This was an AREA ov workshops && living areas
for apprentice craftsmen. It is NOW used as a
base by Kelthas for some ov his followers.
Section 105. A force of 6 skeletons
guards
this ramp for Kelthas. The ramp leads to Area
B.

Rooms 106-109. These are the quarters for
many of the demi-human followers of Kelthas.
The dwarves live in 106, the non-clerical
half-orcs live in 107, the half-elves in 105, and
the halflings in 109.
Room 110. This is the latrine for this group
of Kelthas's followers.
Room 111. This is the residence of Karri
and Duggwell. They have no idea of the existence
of room 112.
Room 112. This is an ancient dwarf
treasure
room. No one has disturbed this room for centuries.
Inside are 5 pots and 4 vases, all
superbly crafted and worth 500 gp each.
Room 113. 6 skeletons guard
this stairway
leading to room 121 in Area H.
Area J
This AREA contains some living quarters and is
also a landing for the stairs going up to the
next level.
Room 118. This is the bunkroom for the
remainder of Kelthas's human followers who
GUARD the stairway coming up from room 115.
Room 119. This room has been made into a
shrine to Myrkul by Jorykul and his
acolytes,
who also live here. Heaped before the altar is
the treasure thus far found by Kelthas's minions:
1,400 sp, 2,000 ep, 1,500 gp, 300 pp,
five turquoise pieces (worth 15 gp each), six
pink pearls (150 gp each), two black opals
(1,200 gp each), three silver necklaces (300
gp, 1,100 gp, 2,500 gp), a battle axe
+2 and a
<long> sword, flame
tongue. Jorykul intends to
destroy these last two items in a sacred ceremony
in honor of Myrkul.
Room 120. This is the headquarters and living
quarters for Kelthas. Bryn also lives here.
Room 121. This room contains a stairway
leading to 113.
Room 122. 6 skeletons stand
GUARD here
at the north door. They attack anyone who
attempts to enter room 123. Otherwise they
are immobile.
Room 123. The roof of this room has an
opening to the outside, currently covered by a
camouflaged tarpaulin. The bandits
entered
through this opening. There are several small
puddles of uncontaminated water on the floor
from leaks from outside storms.
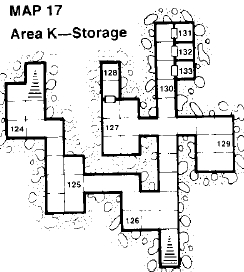
AREA K
This was originally a storage area. It is
occupied by orcs, who periodically attack
Kelthas and his followers in Area G.
Room 124. 6 goblins occupy this
room and guard the stairway.
Room 125. 2 ogres live here and
GUARD against attacks from 124 and 126.
Room 126-128. These rooms are occupied
by goblins who aren't on patrol.
Room 129. This is the treasure room
for the goblins. 3 goblins are on duty
here at all time. So far, their loot consists
only of 3 stone carvings of mules
(worth 75 gp each), 4 turquoise pieces
(15 gp each), and 60 gp.
Rooms 130-133. These rooms are all
occupied by goblins. 6 are on guard
duty in corridor 130 and 8 each are
relaxing in the other 3 rooms.
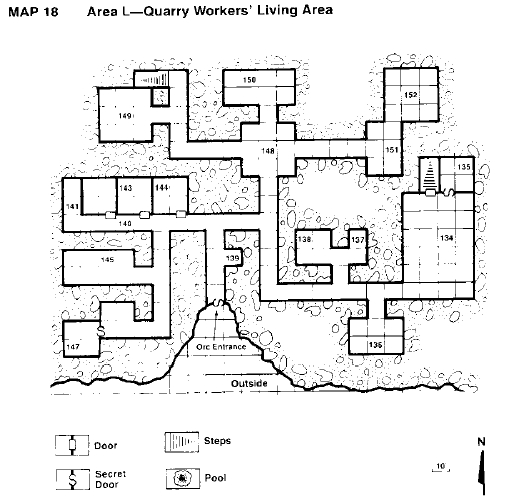
AREA L
This was originally the living area for the
dwarven quarry workers. NOW it is the
headquarters for the orcs. They found the
entrance many years ago.
Room 134. This is the residence and
guardroom for 17 goblins.
Room 135. This secret treasure room
has never been found by the orcs. It holds
the treasure of a guild of quarry workers.
On a shelf in the northeast corner is a silver
chain of office set with many precious
stones worth 3,000 gp, 5 matched
emeralds worth 500 gp each, and a gold
statuette of one of the founders of Illefarn
worth 5,000 gp (and weighing 3,000 gp). <$50,000,
weighing 300#>
The treasure is protected by a deadfall,
a single granite block which descends
from the ceiling and does 6d6 points of
damage to anyone in the room not standing
within 3 feet of the shelf. The
block falls if the items are removed from
the shelf in any order but chain, statuettes,
emeralds. If the block falls, it also
obstructs the doorway; it weighs 10,000 <1000#>
gp. Anyone making a successful DEX
check is able to duck out of the room
before the block drops. Anyone left in
the room not killed by the block is pinned
under it.
Rooms 136-138, 147-148: These rooms
are essentially empty, although they are
strewn with disgusting orcish debris.
Room 139. This a guard station. There
are always 5 orcs on duty.
Room 140-144. These are the main orc
quarters. There are three orcs living in
each. Room 141 is a latrine.
Room 145. This is Wartsnak's headquarters
and living area.
Room 146. The trolls live
here, and
one is present at all times. The trolls' personal
treasure is hidden under some rotting
meat in the northeast corner. The
treasure includes 400 cp, 300 sp, 55 ep,
40 gp, 3 pp, and a gold necklace worth
3,500 gp.
Room 149. This is an orc guardsroom
with 10 orcs living in it. At least 2 orcs
are on duty at all times.
Room 150. This is the orc treasure
room. One of the trolls is on
GUARD at all
times. In this room 500 sp, 450 gp ($4500),
and
three fine granite carvings of dwarves
worth 400 gp each. ($4000 each)
Rooms 151-152. Stub, Zurch. and
Prollot live in these rooms.
Success: Stopping the Flow
There is one and only one goal the party
must accomplish to succeed in this adventure:
stopping the flow of contaminated
water. To do this, they must get inside
the
pillar at 41 and turn off the east and west
switches to shut off the fountains.
Just turning the northern switch up
will not in itself do the trick. Remember,
all that does is activate the alternative
water source which dilutes the contaminated
water, but not enough to make any
real difference. It is not necessary START up
the fountains with clean water in this way.
If the party starts up these fountains after
shutting off the polluted water, the
dwarves will be upset that the PCs are
wasting the water from their alternate
water source, as this water can never be
replaced. In fact, it is entirely possible
that the dwarves will send the PCs back to
shut off the northern switch if they pulled
it up.
The best method for fixing the fountains
is to WAIT until the fountains are dry
after they are turned off. The fountains
and pool can then be cleaned, and the
crack can be repaired. The cisterns can
also be rebuilt. It is not necessary or
expected that the PCs make these repairs,
although their help would certainly be
welcomed by the dwarves.
If the PCs complete their mission and
shut off the contaminated fountains,
they are thanked by a very pleased Melandrach.
The Council of Daggerford is also
very pleased. For their efforts, the PCs
each receive 2,000 gp and 500 experience
points.
Failure to complete the mission is
another story. Melandrach just shrugs and
thanks them for their trouble, but secretly
he wonders about the competence of
the Daggerford militia and will be reluctant
to associate with any of them in the
future. The Council of Daggerford is
more vocal in their disapproval and is
likely to order them back to try again so as
not to tarnish the reputation of the militia.
Requests for help or additional
equipment are denied. If the PCs drag
their feet or are perceived as whining, the
duke concludes that these militiamen are
not cut out for adventuring and assigns
them to latrine duty for an indefinite period.
Additional Accomplishments
There are other goals the PCs may accomplish
in Illefarn, although these are all
secondary to shutting off the polluted
fountains. They can, for instance, recover
the religious artifacts in Area F and return
them to the dwarves. Korin is especially
interested in the crown of Devin. If the
PCs get it to him, Korin and his followers
are loyal to the PCs for the rest of their
days. The PCs are free to keep the items
(if they can smuggle them out), but if the
dwarves learn of these thefts, their anger
is permanent, possibly doing serious diplomatic
damage between the dwarves and
Daggerford.
The PCs may wish to clean out as many
of the members of the orc and necromancer
factions as they wish, accumulating
XP as they do. Note, however,
that PCs of 1st through 3rd level will
have their hands full tackling Kelthas and
some of his more powerful followers.
They may wish to battle the more powerful
forces in Illefarn when they are rested
and are at full strength. Better yet, the
PCs would do well to ally themselves with
a solid force of dwarves before they take
on Kelthas.
To prevent further incursions of
unwanted explorers, the PCs may wish to
seal up some of the entrances to Illefarn.
They may do this at their own initiative or
at the request of the dwarves.
Finally, the Council of Daggerford may
order the PCs to return to Illefarn to wipe
out the orc and necromancer factions,
assuming they haven't already, before the
conflict grows and spills into other
regions.